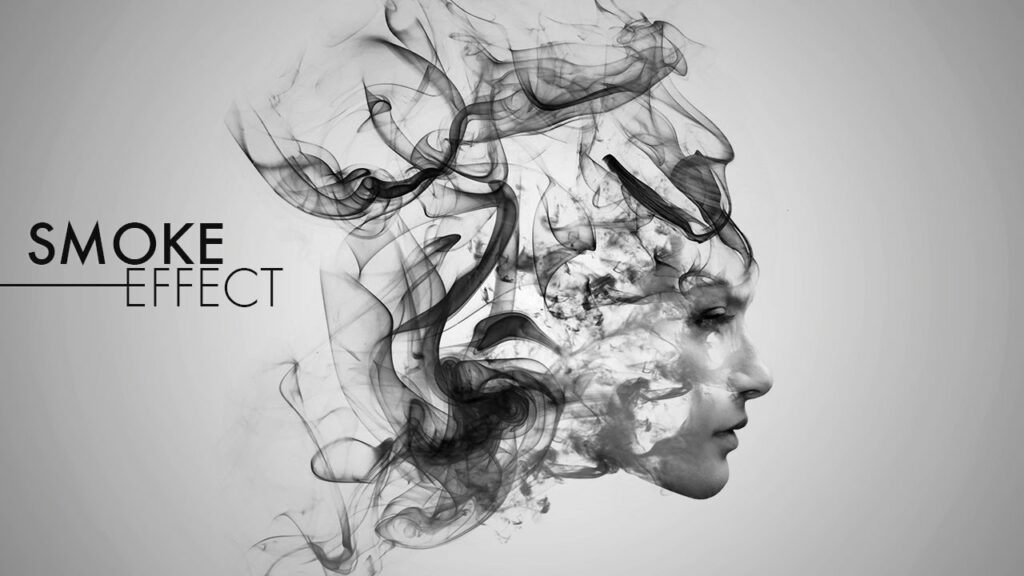
Unveiling Ethereal Beauty: Creating a Captivating Smoke Portrait in Photoshop
Introduction:
The world of digital art is a realm where creativity knows no bounds, and one extraordinary technique that has captured the imagination of artists is the creation of smoke portraits. Crafting a smoke portrait in Photoshop is a mesmerizing process that transforms ordinary images into ethereal masterpieces. In this extensive guide, we will embark on a captivating journey, exploring the step-by-step process of bringing a subject to life through the graceful dance of smoke. From preparing your canvas to mastering smoke rendering techniques, this comprehensive guide will unravel the secrets of creating a stunning smoke portrait in Photoshop.
Section 1: Setting the Stage – Preparing Your Canvas
Creating a mesmerizing smoke portrait begins with setting up a canvas that provides ample space for artistic expression. Open Adobe Photoshop and create a new document with dimensions that align with your vision. Consider the desired resolution, keeping in mind the intended use – whether it’s for digital illustration, print, or online platforms.
Choose a background color that complements the mood you wish to convey through your smoke portrait. A neutral or dark background often works well, allowing the smoke to take center stage. As you embark on this artistic journey, the canvas becomes your blank slate, ready to capture the fluidity and elegance of smoke.
Section 2: Selecting the Right Image
The success of a smoke portrait often hinges on selecting the right base image. Choose a photograph that features a distinct subject with clear contours and a compelling pose. Portraits with dynamic lighting, interesting facial expressions, or unique features can enhance the impact of the final smoke portrait.
Consider the mood and narrative you want to convey through your creation. Whether it’s a portrait that exudes serenity, mystery, or intensity, the base image serves as the foundation upon which the ethereal smoke elements will weave their magic.
Section 3: Understanding the Smoke Rendering Process
Before delving into the technicalities of smoke rendering, it’s crucial to understand the essence of the process. Smoke rendering involves transforming photographic elements into wisps, curls, and tendrils of smoke that appear to dance and swirl around the subject. This illusion is achieved through a combination of layering, blending modes, and careful manipulation of smoke brushes.
The objective is not to replace the subject with smoke entirely but to intertwine the two elements, creating a harmonious fusion that captivates the viewer’s imagination. Mastering smoke rendering techniques allows for a seamless integration of the photographic and digital elements, resulting in a visually striking and surreal portrait.
Section 4: Extracting the Subject
Begin the smoke portrait creation process by extracting the subject from the base image. Use tools such as the Pen Tool, Magic Wand, or Quick Selection Tool to carefully outline and separate the subject from the background. Ensure precision in the selection process, capturing intricate details such as hair and fine edges.
Once the subject is isolated, create a new layer with the subject alone. This layer will serve as the canvas on which the smoke will be intricately woven.
Section 5: Introducing Smoke Brushes
The magic of a smoke portrait lies in the artful use of smoke brushes. Photoshop offers a variety of smoke brushes, and you can also explore third-party brushes to find the ones that best suit your vision. Install and load the selected smoke brushes into Photoshop before commencing the smoke rendering process.
Experiment with different brush sizes, opacities, and shapes to achieve a diverse range of smoke effects. Brushes that mimic wisps, swirls, and tendrils are particularly effective in capturing the delicate nature of smoke.
Section 6: Creating the Initial Smoke Trails
With the subject isolated on its own layer and the smoke brushes at your disposal, begin creating the initial smoke trails. Select a smoke brush and choose a color that complements the overall tone of your portrait. Start brushing along the contours of the subject, allowing the smoke to organically intertwine with the features.
Adjust the brush opacity and size as needed to achieve a subtle and seamless integration of smoke elements. Pay attention to the flow and direction of the smoke, emphasizing areas where it naturally wraps around the subject’s contours.
Section 7: Layering and Blending Modes
To enhance the depth and complexity of your smoke portrait, embrace the power of layering and blending modes. Duplicate the layer containing the initial smoke trails and experiment with different blending modes such as Screen, Overlay, or Soft Light. Each blending mode imparts a unique luminosity and translucency to the smoke, contributing to its ethereal quality.
By layering multiple instances of smoke with varying blending modes, you create a multidimensional and dynamic smoke effect that gracefully envelops the subject.
Section 8: Contouring with Adjustment Layers
Fine-tune the interaction between the subject and the smoke by incorporating adjustment layers. Create adjustment layers such as Levels, Curves, or Hue/Saturation to contour the overall tonality of the image. This step ensures that the smoke seamlessly integrates with the subject’s lighting and color palette.
Experiment with adjustment layers on both the subject and smoke layers, refining the overall composition and achieving a cohesive visual harmony. The goal is to create a captivating interplay of light and shadow, enhancing the realism of the smoke elements.
Section 9: Refining Details and Enhancing Realism
Zoom in to your smoke portrait to refine details and enhance the realism of both the subject and the smoke. Use a soft brush to meticulously blend the edges where the subject and smoke meet, ensuring a seamless integration. Pay attention to subtle nuances, such as the way smoke interacts with hair strands or clothing textures.
Consider adding highlights and shadows to the smoke elements to mimic the play of light, contributing to the overall depth and authenticity of your smoke portrait.
Section 10: Embracing Color Variations
Explore color variations within the smoke to add visual interest and nuance. Create a new layer above the smoke layers and experiment with gradient overlays, soft brushes, or adjustment layers to introduce subtle color shifts. These variations can evoke different moods and enhance the overall artistic expression of your smoke portrait.
Consider the emotional impact you want to convey – whether it’s a monochromatic and dreamlike ambiance or a dynamic interplay of vibrant hues. The strategic use of color elevates the visual storytelling within your smoke portrait.
Section 11: Dynamic Composition with Additional Elements
To enrich the narrative and composition of your smoke portrait, consider incorporating additional elements. This could involve introducing symbolic objects, abstract patterns, or thematic overlays that complement the overall concept. Create new layers for these elements and experiment with blending modes and opacities to seamlessly integrate them into the smoke-filled atmosphere.
The inclusion of dynamic elements contributes to the storytelling aspect of your smoke portrait, inviting viewers to explore layers of meaning and interpretation.
Section 12: Atmospheric Effects – Fog and Mist
Enhance the ethereal atmosphere of your smoke portrait by introducing subtle atmospheric effects such as fog or mist. Create new layers above the smoke layers and use soft brushes or gradient tools to simulate misty textures. Experiment with blending modes and opacities to achieve a delicate haze that envelops the entire composition.
These atmospheric effects add a touch of mystique and elevate the otherworldly quality of your smoke portrait.
Section 13: Fine-Tuning and Balancing Elements
As you approach the final stages of your smoke portrait, dedicate time to fine-tuning and balancing the elements. Assess the overall composition, paying attention to the distribution of smoke, the subject’s prominence, and the harmony of colors. Use adjustment layers, layer masks, and brushes to refine any areas that may need attention.
This meticulous process ensures that every aspect of your smoke portrait contributes to a cohesive and visually compelling final result.
Section 14: Adding Finishing Touches
Elevate your smoke portrait with subtle finishing touches that enhance its overall appeal. Experiment with subtle glows, vignettes, or lens flares to infuse a touch of cinematic drama. These enhancements can add a polished and professional quality to your smoke portrait, drawing attention to key focal points and creating a captivating visual impact.
Consider the scale and intensity of the finishing touches, ensuring that they complement rather than overpower the delicate nature of the smoke elements.
Section 15: Saving and Exporting Your Smoke Portrait
Once you’re satisfied with the final result of your smoke portrait, it’s time to save and export your creation. Save your Photoshop project file (.PSD) to retain all layers and editable elements for future adjustments. Additionally, export your smoke portrait in a suitable format for your intended use, such as JPEG or PNG.
Optimize the file size while preserving image quality, especially if your smoke portrait is intended for digital platforms or social media. For print projects, ensure that your exported file meets the resolution requirements for high-quality reproduction.
Section 16: Showcasing Your Smoke Portrait
Celebrate your mastery of smoke portrait creation by showcasing your artwork. Share it on social media, incorporate it into your portfolio, or submit it to digital art communities. Engage with fellow artists, invite constructive feedback, and let your smoke portrait become a testament to the beauty that can be crafted through the convergence of photography and digital art.
Consider creating variations or exploring different themes with the smoke portrait concept. Each iteration allows for new artistic discoveries and expands the possibilities of this enchanting technique.
Conclusion:
Creating a smoke portrait in Photoshop is a journey of artistic exploration, where the graceful dance of smoke converges with the subtleties of portraiture. From selecting the right image to mastering smoke rendering techniques, each step in this comprehensive guide contributes to the alchemy of transforming a static photograph into a mesmerizing visual experience.
Whether you’re a seasoned digital artist or an enthusiastic beginner, the process of crafting a smoke portrait invites you to transcend the ordinary and embrace the extraordinary. Let the ethereal beauty of smoke intertwine with the essence of your subject, creating a timeless and captivating masterpiece that lingers in the viewer’s imagination. Embrace the magic of digital art, and may your smoke portrait stand as a testament to the boundless possibilities of creative expression.


