The Ultimate Guide to Installing a Printer in Windows XP
In the world of computing, printers play an indispensable role in transforming digital documents into tangible, physical copies. Whether you’re a student printing assignments, a professional producing reports, or a hobbyist creating artwork, knowing how to install a printer in Windows XP is essential for unleashing the full potential of your printing capabilities. In this exhaustive guide, we’ll delve deep into the intricacies of printer installation in Windows XP, empowering you to set up your printer with ease and confidence.
Understanding Printer Installation in Windows XP:
Before we embark on the journey of printer installation, it’s crucial to understand the fundamentals of printer setup in Windows XP. Printer installation involves connecting your printer to your computer, installing the necessary drivers and software, and configuring printer settings to ensure seamless operation. With Windows XP’s built-in printer detection and installation wizard, the process is streamlined and accessible to users of all levels.
Step-by-Step Guide to Installing a Printer:
Now that we’ve established the importance of printer installation, let’s explore the step-by-step process of setting up your printer in Windows XP:
Step 1: Connecting the Printer:
To begin, ensure that your printer is powered on and properly connected to your computer via a USB cable, parallel cable, or network connection. If using a USB or parallel cable, connect one end to the corresponding port on your printer and the other end to a USB or parallel port on your computer. If using a network connection, connect your printer to your local network using an Ethernet cable and ensure that both your printer and computer are connected to the same network.
Step 2: Detecting the Printer:
Once your printer is connected, Windows XP will automatically detect the new hardware and attempt to install the necessary drivers. You may see a “Found New Hardware Wizard” notification in the system tray indicating that Windows is searching for drivers for your printer.
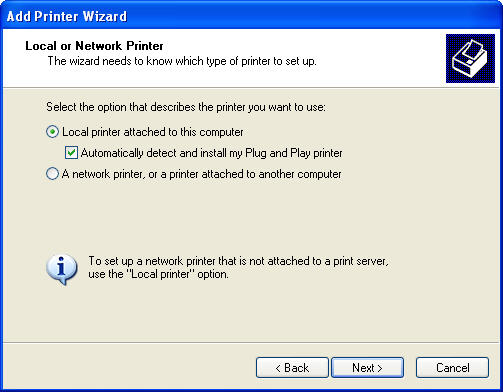
Step 3: Using the Add Printer Wizard:
If Windows XP does not automatically detect and install the printer drivers, you can use the “Add Printer” wizard to manually install the printer. To access the Add Printer wizard, click on the Start button, select “Printers and Faxes,” and then click on the “Add a printer” option in the Printer Tasks pane.
Step 4: Selecting the Printer Port:
In the Add Printer wizard, you’ll be prompted to select the printer port. Choose the appropriate port based on how your printer is connected to your computer. If using a USB or parallel cable, select the corresponding port (e.g., USB001 or LPT1). If using a network connection, select the network printer option and enter the network path to your printer (e.g., \hostname\printername).
Step 5: Installing Printer Drivers:
After selecting the printer port, Windows XP will prompt you to install the printer drivers. If drivers are available from Windows Update, you can choose to download and install them automatically. Alternatively, you can use the drivers provided by your printer manufacturer. Insert the printer installation CD or download the drivers from the manufacturer’s website and follow the on-screen instructions to install the drivers.
Step 6: Completing the Installation:
Once the printer drivers are installed, Windows XP will prompt you to give your printer a name and set it as the default printer if desired. Enter a descriptive name for your printer (e.g., “HP LaserJet 1020”) and choose whether to set it as the default printer. Click on the “Finish” button to complete the installation process.
Step 7: Testing the Printer:
After completing the installation, it’s a good idea to test your printer to ensure that it’s functioning correctly. Print a test page by right-clicking on your printer icon in the Printers and Faxes window, selecting “Properties,” and then clicking on the “Print Test Page” button in the General tab. If the test page prints successfully, your printer is ready for use.
Advanced Printer Configuration Options:
For users seeking to customize their printer settings further, Windows XP offers advanced configuration options to optimize printing performance and functionality. These include options to adjust print quality, paper size, and orientation, as well as features such as duplex printing, collation, and color management.
Conclusion:
In conclusion, installing a printer in Windows XP is a straightforward process that empowers you to unlock the full potential of your printing capabilities. By following the step-by-step guide outlined in this article and exploring the various configuration options available, you can set up your printer with confidence and precision. Whether you’re printing documents, photos, or artwork, understanding how to install a printer in Windows XP ensures that you can produce high-quality prints with ease and efficiency. So go ahead, connect your printer, install the drivers, and start printing your creations with confidence!


