The Comprehensive Guide to Setting Up a Wireless Network Connection in Windows XP
In today’s digital age, the ability to connect wirelessly to the internet has become a necessity for many users. Whether you’re working from home, streaming multimedia content, or simply browsing the web, setting up a wireless network connection in Windows XP can provide the freedom and flexibility to access the internet from anywhere within your home or office. In this exhaustive guide, we’ll delve deep into the intricacies of configuring a wireless network connection in Windows XP, empowering you to establish a secure and reliable wireless connection with ease.
Understanding Wireless Network Connections in Windows XP:
Before we delve into the specifics of setting up a wireless network connection, let’s take a moment to understand what a wireless network is and its significance within the Windows XP operating system. A wireless network allows devices to connect to the internet and communicate with each other using radio waves instead of physical cables. In Windows XP, wireless network connections are managed using the Wireless Zero Configuration service, which simplifies the process of connecting to wireless networks and ensures seamless interoperability with a wide range of wireless hardware.
Step-by-Step Guide to Setting Up a Wireless Network Connection:
Now that we’ve established the importance of wireless network connections let’s explore the step-by-step process of configuring a wireless connection in Windows XP:
Step 1: Ensure Wireless Hardware Compatibility:
Before attempting to set up a wireless network connection, it’s essential to ensure that your computer’s wireless hardware is compatible with Windows XP. Most modern laptops and desktop computers come equipped with built-in Wi-Fi adapters that are compatible with Windows XP. If your computer does not have built-in Wi-Fi capabilities, you may need to purchase a separate Wi-Fi adapter that is compatible with Windows XP.
Step 2: Enable Wireless Networking:
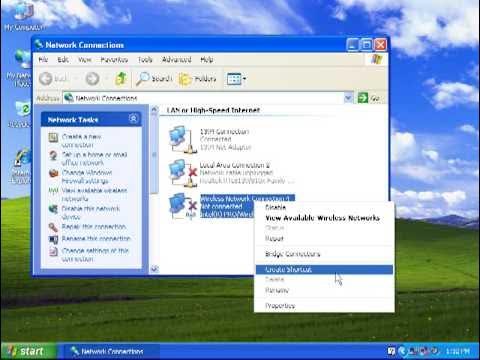
To begin, ensure that wireless networking is enabled on your computer. In Windows XP, wireless networking is enabled by default, but you can verify this by right-clicking on the network icon in the system tray and selecting “Open Network Connections.” In the Network Connections window, you should see an icon labeled “Wireless Network Connection.” If this icon is not present, you may need to enable wireless networking in your computer’s BIOS settings or install the necessary drivers for your wireless adapter.
Step 3: Scan for Available Networks:
Once wireless networking is enabled, right-click on the “Wireless Network Connection” icon in the Network Connections window and select “View Available Wireless Networks.” Windows XP will scan for available wireless networks in your area and display them in a list. Select the network you want to connect to from the list and click on the “Connect” button.
Step 4: Enter Network Security Key (if applicable):
If the wireless network you’re connecting to is secured with a password or network security key, you’ll need to enter this information to establish a connection. Enter the network security key in the provided field and click on the “Connect” button. Windows XP will attempt to authenticate with the wireless network using the provided credentials.
Step 5: Connect to the Wireless Network:
Once authentication is successful, Windows XP will establish a connection to the wireless network, and you’ll see a notification indicating that you are now connected. You can verify the connection status by checking the network icon in the system tray, which should now display signal strength bars indicating the strength of the wireless signal.
Step 6: Configure Network Settings (if necessary):
If your wireless network requires additional configuration settings, such as static IP addresses or DNS servers, you can configure these settings by right-clicking on the “Wireless Network Connection” icon in the Network Connections window, selecting “Properties,” and navigating to the “Internet Protocol (TCP/IP)” properties. Here, you can enter the necessary IP address, subnet mask, default gateway, and DNS server addresses provided by your network administrator.
Step 7: Test the Connection:
Once you’ve configured your wireless network connection, it’s a good idea to test the connection to ensure that everything is working correctly. Open a web browser and navigate to a website to verify that you can access the internet through your wireless connection. If you encounter any issues, double-check your network settings and ensure that you entered the correct network security key (if applicable).
Advanced Wireless Network Configuration Options:
For users seeking to optimize their wireless network connection further, Windows XP offers advanced configuration options to enhance security, performance, and reliability. These include options to configure wireless encryption protocols such as WEP, WPA, or WPA2, as well as features such as MAC address filtering, network authentication methods, and wireless channel selection.
Conclusion:
In conclusion, setting up a wireless network connection in Windows XP is a straightforward process that empowers you to access the internet and communicate with other devices wirelessly. By following the step-by-step guide outlined in this article and exploring the various configuration options available, you can establish a secure and reliable wireless connection with ease. Whether you’re connecting to your home network, office network, or public Wi-Fi hotspot, understanding how to configure a wireless network connection in Windows XP ensures that you can stay connected and productive wherever you go. So go ahead, connect to your wireless network, and enjoy the freedom and flexibility of wireless computing!


