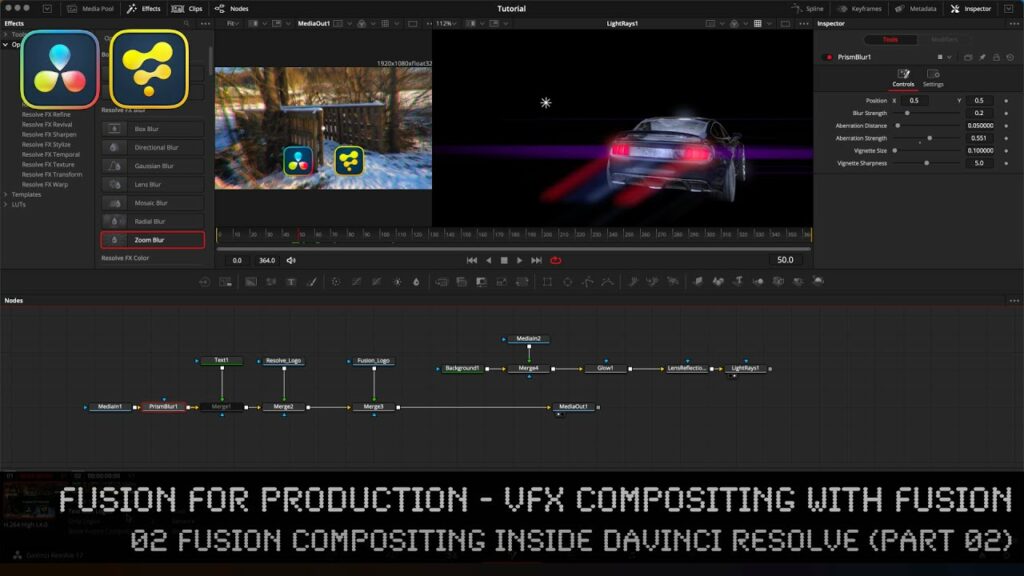
Mastering Advanced Compositing: A Comprehensive Guide on How to Use the Fusion Page for Advanced Compositing in DaVinci Resolve

Introduction: DaVinci Resolve is a powerful video editing and color grading software that offers users a comprehensive set of tools and features for professional-level editing, grading, and compositing. The Fusion page in DaVinci Resolve provides users with advanced compositing capabilities, allowing them to create complex visual effects, motion graphics, and composites with precision and control. In this comprehensive guide, we will explore the step-by-step process of using the Fusion page for advanced compositing in DaVinci Resolve, from importing footage to creating intricate visual effects and composites for professional-quality results.
Understanding Advanced Compositing: Advanced compositing involves combining multiple layers of footage, graphics, and effects to create seamless and realistic visual effects and composites. This process requires precision, attention to detail, and creative problem-solving skills to achieve professional-quality results. In DaVinci Resolve, the Fusion page provides users with a node-based compositing environment that allows for flexible and non-destructive editing of visual effects and composites. Users can create complex node trees, apply sophisticated effects and filters, and animate properties over time to create dynamic and immersive visuals.
Step 1: Importing Footage into DaVinci Resolve The first step in using the Fusion page for advanced compositing in DaVinci Resolve is to import the footage into the project. Launch DaVinci Resolve on your computer and create a new project by clicking on the File menu and selecting New Project. Import the footage into the project by clicking on the Media tab, navigating to the location of the footage on your computer, and dragging and dropping the files into the Media Pool. Alternatively, you can use the Import button in the Media Pool to import the footage into the project.
Step 2: Accessing the Fusion Page After importing the footage into DaVinci Resolve, switch to the Fusion page by clicking on the Fusion tab at the bottom of the interface. The Fusion page provides users with a node-based compositing environment where they can create, edit, and animate visual effects and composites. The Fusion page consists of several panels, including the Node Editor, Viewer, Timeline, and Inspector, which allow users to navigate and manipulate the node tree, preview the composition, and adjust properties and parameters of nodes and effects.
Step 3: Building the Node Tree Once you’re on the Fusion page, start building the node tree by adding nodes to the Node Editor. Nodes are individual elements that perform specific functions, such as image processing, masking, blending, and animation. To add a node, right-click anywhere in the Node Editor and select the type of node you want to add from the context menu. Connect the nodes together by dragging the output of one node to the input of another node, creating a flow of data through the node tree. Experiment with different nodes and connections to achieve the desired visual effect or composite.
Step 4: Applying Effects and Filters After building the node tree, apply effects and filters to manipulate and enhance the footage. Select a node in the Node Editor and navigate to the Inspector panel to adjust the properties and parameters of the node. Use the Effects Library panel to browse and add built-in effects and filters to the node tree, such as blurs, glows, color corrections, and distortions. Customize the effects and filters by adjusting their parameters in the Inspector panel, such as intensity, radius, threshold, and blend mode, to achieve the desired look and style.
Step 5: Creating Masks and Mattes To isolate specific areas of the footage and apply effects selectively, create masks and mattes in the node tree. Add a Mask node to the node tree and connect it to the node representing the footage you want to mask. Use the Mask controls in the Inspector panel to draw and adjust the shape, size, and feathering of the mask. Combine multiple masks and mattes by adding additional Mask nodes and connecting them to the previous nodes in the node tree. Use masks and mattes to create complex composites, cutouts, and rotoscoping effects with precision and control.
Step 6: Animating Properties Over Time After applying effects, filters, and masks to the node tree, animate properties over time to create dynamic and immersive visuals. Select a node in the Node Editor and navigate to the Inspector panel to access the animation controls. Use keyframes to set the initial and final values of properties such as position, scale, rotation, opacity, and effect parameters. Adjust the timing and interpolation of keyframes to control the speed and easing of the animation. Preview the animation in the Viewer panel to fine-tune the timing and motion of the effects.
Step 7: Previewing and Rendering the Composition Once you’ve finished building the node tree and animating properties, preview the composition in the Viewer panel to assess the overall look and feel. Play back the composition to review the timing, pacing, and motion of the effects and animations. Make any necessary adjustments or refinements to the node tree, effects, and animations to achieve the desired result. When you’re satisfied with the composition, navigate to the Deliver page to render the final output. Configure the render settings, such as output format, resolution, codec, and destination folder, then click on the Render button to export the composition as a video file.
Tips and Best Practices:
- Organize the node tree in a logical and intuitive manner, using color-coded nodes and labels to distinguish different elements and sections of the composition.
- Use node groups to encapsulate and organize complex sections of the node tree, making it easier to manage and edit large compositions.
- Experiment with different blending modes, layering techniques, and opacity settings to create interesting and unique visual effects and composites.
- Take advantage of built-in tools and features, such as rotoscoping, tracking, and particle systems, to add additional complexity and realism to the composition.
- Save and version your work regularly to avoid losing progress and enable easy rollback to previous states if needed.
- Study and analyze examples of advanced compositing techniques and effects in films, video games, and motion graphics to inspire and inform your own work.
Conclusion: The Fusion page in DaVinci Resolve provides users with powerful tools and features for advanced compositing, allowing them to create complex visual effects, motion graphics, and composites with precision and control. By following the step-by-step process outlined in this guide and experimenting with different techniques and effects, you can create stunning and immersive compositions that elevate the quality and impact of your projects. Whether you’re creating cinematic sequences, dynamic motion graphics, or immersive visual effects, DaVinci Resolve offers a versatile and flexible platform for realizing your creative vision and pushing the boundaries of visual storytelling and expression. With practice, experimentation, and creativity, you can master the art of advanced compositing in DaVinci Resolve and unlock endless possibilities for visual storytelling and expression.


