The Ultimate Guide to Creating a System Backup in Windows XP

In the realm of computing, safeguarding your system against unforeseen disasters and data loss is paramount. Whether you’re a casual user with important documents and cherished memories or a business professional with critical files and sensitive information, creating a system backup in Windows XP is essential for ensuring the integrity and security of your data. In this exhaustive guide, we’ll delve deep into the intricacies of creating a system backup in Windows XP, empowering you to protect your valuable files and restore your system to a healthy state in the event of a catastrophe.
Understanding System Backup in Windows XP:
Before we delve into the specifics of creating a system backup, let’s take a moment to understand what a system backup is and its significance within the Windows XP operating system. A system backup is a complete copy of your system’s files, settings, and configurations, stored on an external storage device such as a USB drive, external hard drive, or network drive. By creating a system backup, you can protect your data against hardware failures, software errors, malware infections, and other unforeseen events that may cause data loss or system corruption.
Step-by-Step Guide to Creating a System Backup:
Now that we’ve established the importance of system backups let’s explore the step-by-step process of creating a system backup in Windows XP:
Step 1: Accessing the Backup Utility:
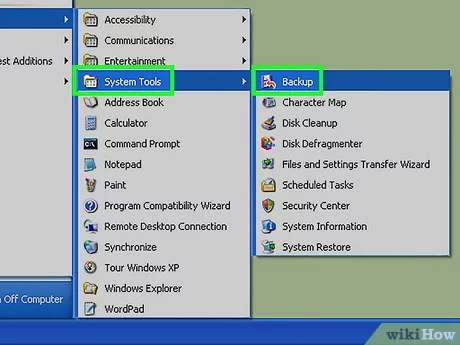
To begin, click on the Start button and navigate to All Programs > Accessories > System Tools > Backup. This will launch the Backup Utility, a built-in tool provided by Windows XP for creating and managing backups.
Step 2: Choosing Backup Wizard:
Once the Backup Utility is open, select the “Backup Wizard” option to launch the Backup Wizard, which will guide you through the process of creating a backup.
Step 3: Selecting Backup Type:
In the Backup Wizard, you’ll be prompted to choose the type of backup you want to perform. Windows XP offers several backup types, including “Normal,” “Copy,” “Daily,” “Incremental,” and “Differential.” For most users, the “Normal” backup type is sufficient, as it creates a complete backup of all selected files and folders.
Step 4: Selecting Files and Folders:
After choosing the backup type, you’ll be prompted to select the files and folders you want to include in the backup. You can choose to back up specific files and folders or select entire drives or partitions. For a complete system backup, it’s recommended to select all files and folders on your system drive (usually the C: drive).
Step 5: Choosing Backup Destination:
Next, you’ll need to choose the destination for your backup. This can be an external storage device such as a USB drive or external hard drive, a network location, or writable CDs or DVDs. Select the desired destination and follow the on-screen instructions to proceed.
Step 6: Scheduling Backup (Optional):
If you want to schedule regular backups to occur automatically, you can set up a backup schedule in the Backup Utility. This allows you to specify the frequency and timing of backups, ensuring that your data is always protected without requiring manual intervention.
Step 7: Initiating Backup:
Once you’ve configured all backup settings, click on the “Finish” button to initiate the backup process. Windows XP will begin copying the selected files and folders to the specified destination, displaying a progress bar to indicate the status of the backup.
Step 8: Verifying Backup:
After the backup process is complete, it’s a good idea to verify the integrity of the backup to ensure that all files were copied successfully. You can do this by navigating to the destination folder and checking that all files and folders are present and accessible.
Advanced Backup Options:
For users seeking to customize their backup experience further, Windows XP offers advanced options and settings to tailor backups to their specific needs. These include options to compress backup files, encrypt sensitive data, and create backup catalogs for easy restoration.
Conclusion:
In conclusion, creating a system backup in Windows XP is a critical step in safeguarding your data against unforeseen disasters and ensuring the integrity and security of your system. By following the step-by-step guide outlined in this article and exploring the advanced options and settings available, you can create a robust backup strategy that protects your valuable files and restores your system to a healthy state in the event of a catastrophe. Whether you’re a home user, a small business owner, or an IT professional, knowing how to create a system backup in Windows XP ensures that you can recover from data loss and system failures with ease and confidence. So go ahead, create that backup, and enjoy peace of mind knowing that your data is safe and secure!


