Mastering Taskbar Efficiency: A Comprehensive Guide to Pinning Programs in Windows 7
The taskbar in Windows 7 serves as the nerve center of your computing experience, providing quick access to your most frequently used programs and utilities. One of the key features that makes the taskbar so versatile is the ability to pin programs directly to it, ensuring that your essential tools are always just a click away. In this exhaustive guide, we’ll delve into the intricacies of pinning programs to the taskbar in Windows 7, empowering you to streamline your workflow and boost productivity with ease.
Understanding Taskbar Pinning:
Before we dive into the step-by-step process, let’s first understand what taskbar pinning entails. Pinning a program to the taskbar involves placing its shortcut directly onto the taskbar for quick and convenient access. Once pinned, the program’s icon remains visible on the taskbar at all times, allowing you to launch it with a single click, without the need to navigate through the Start menu or desktop shortcuts.
Pinning Programs to the Taskbar:
Now, let’s explore the process of pinning programs to the taskbar in Windows 7:
- Locate the Program Shortcut: Begin by locating the shortcut of the program you wish to pin to the taskbar. This can typically be found on the desktop, in the Start menu, or within the program’s installation folder.
- Open the Program: Before pinning the program to the taskbar, it’s essential to ensure that it is currently running. If the program is not already open, launch it by double-clicking on its shortcut or selecting it from the Start menu.
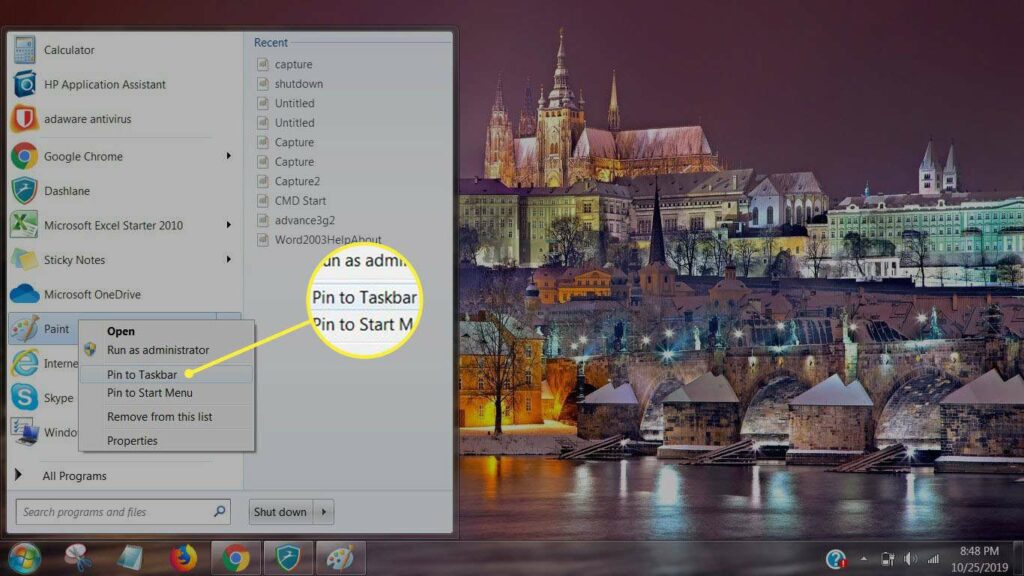
- Pin to Taskbar: Once the program is open, right-click on its taskbar icon to reveal a context menu. From the menu, select the “Pin to taskbar” option. Alternatively, you can drag the program’s shortcut directly onto the taskbar and release the mouse button to pin it.
- Confirm Pinning: After selecting the “Pin to taskbar” option or dragging the shortcut, you’ll notice that the program’s icon is now permanently affixed to the taskbar. You can identify pinned programs by their distinct icons and the absence of the small arrow indicator used for indicating running programs.
Managing Pinned Programs:
After pinning programs to the taskbar, you may want to customize their placement and behavior for optimal efficiency. Here’s how you can manage pinned programs on the taskbar in Windows 7:
- Reposition Icons: To rearrange the order of pinned program icons on the taskbar, simply click and drag them to your desired location. Release the mouse button to drop the icon into its new position.
- Unpin Programs: If you no longer wish to have a program pinned to the taskbar, right-click on its icon and select the “Unpin this program from taskbar” option from the context menu. The program’s icon will be removed from the taskbar, but the program itself will remain installed on your computer.
- Customize Taskbar Properties: Windows 7 offers additional customization options for the taskbar, allowing you to fine-tune its appearance and behavior. To access these options, right-click on an empty area of the taskbar and select “Properties” from the context menu. From here, you can adjust settings such as taskbar location, icon size, and taskbar button grouping.
- Create Toolbar: In addition to pinning individual programs, you can also create custom toolbars on the taskbar to organize related shortcuts and folders. Right-click on an empty area of the taskbar, navigate to “Toolbars,” and select “New toolbar.” Choose the folder or location you want to create a toolbar for, and it will appear on the taskbar for easy access.
Enhancing Productivity with Pinned Programs:
By leveraging the power of pinned programs on the taskbar, you can significantly enhance your productivity and streamline your workflow in Windows 7. Here are some tips for maximizing the effectiveness of pinned programs:
- Pin Frequently Used Programs: Identify the programs you use most frequently and pin them to the taskbar for instant access. This eliminates the need to search through the Start menu or desktop shortcuts, saving you time and effort.
- Organize Programs by Task: Organize your pinned programs on the taskbar based on the tasks or projects you’re currently working on. Group related programs together to create a logical and efficient workflow.
- Utilize Jump Lists: Take advantage of jump lists, which provide quick access to recent documents, tasks, and frequently performed actions within pinned programs. Right-click on a pinned program icon to access its jump list and perform common tasks without opening the program itself.
- Customize Taskbar Appearance: Customize the appearance of the taskbar to suit your preferences and workflow. Experiment with different icon sizes, taskbar locations, and grouping options to find the configuration that works best for you.
Conclusion:
Pinning programs to the taskbar in Windows 7 is a simple yet powerful feature that can greatly enhance your computing experience. By following the steps outlined in this guide, you can easily pin your favorite programs to the taskbar for quick and convenient access, allowing you to work more efficiently and effectively. Whether you’re a casual user or a seasoned professional, mastering the art of taskbar pinning empowers you to take control of your desktop and optimize your workflow in Windows 7.


