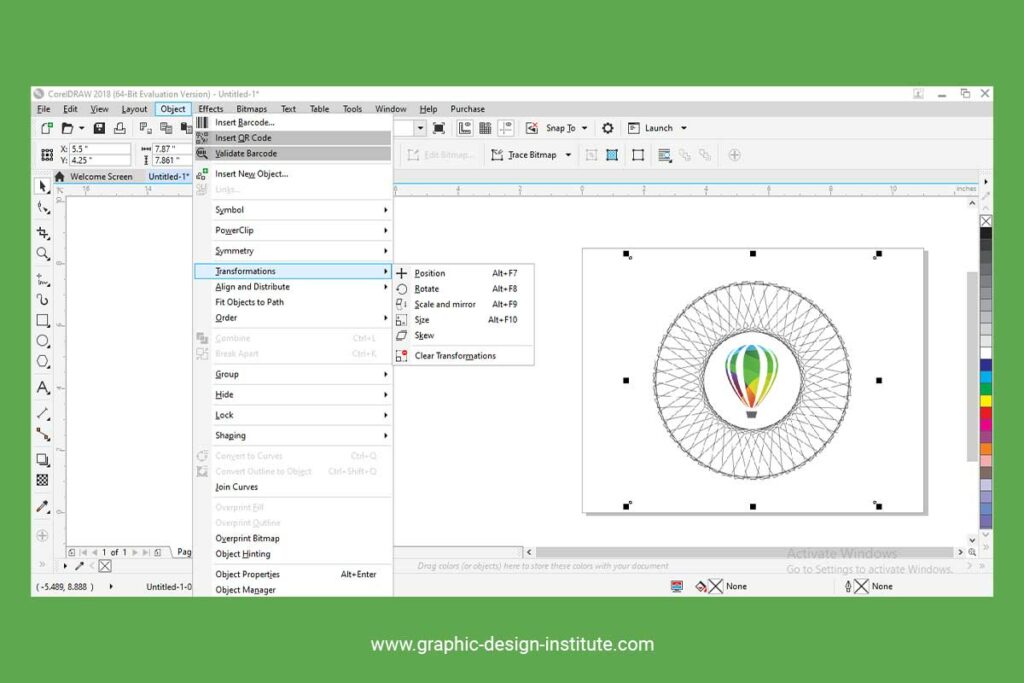
Restoring Design Harmony: An Extensive Guide to Clearing All Transformations Applied to an Object in CorelDRAW

Introduction:
CorelDRAW, a cornerstone in the realm of graphic design, equips artists and designers with a diverse array of tools to bring their creative visions to life. Among the essential skills within the software is the ability to apply transformations to objects dynamically. However, knowing how to clear all transformations from an object is equally crucial, ensuring precision and maintaining the integrity of the design. This comprehensive guide aims to unravel the intricacies of clearing all transformations applied to an object in CorelDRAW, catering to both beginners seeking foundational insights and experienced designers aiming to refine their skills.
I. Understanding the Importance of Clearing Transformations:
- Preserving Design Integrity: Clearing transformations is essential to restore an object to its original state, preserving the integrity of the design. This step is particularly crucial when multiple transformations have been applied, and a return to the initial form is desired.
- Precision Editing: The ability to clear transformations provides designers with the precision needed for meticulous edits. It serves as a reset button, allowing for a clean slate when adjustments are required without the influence of previous transformations.
II. Basic Techniques to Clear Transformations:
- Selecting the Object: Begin by selecting the object that has undergone transformations. Use the Pick tool to click on the object, ensuring that it becomes the active selection in the workspace.
- Accessing Transformation Options: Navigate to the Object menu in the top toolbar. Within the Object menu, look for transformation-related options. Some versions may have a specific submenu dedicated to transformations.
- Choosing “Clear Transformations”: Locate the “Clear Transformations” option within the Object menu or its respective submenu. Click on this option to initiate the process of reverting the selected object to its original, untransformed state.
III. Clearing Transformations Using the Property Bar:
- Property Bar Overview: The Property Bar is a dynamic interface element that displays context-sensitive options based on the selected tool or object. When an object with transformations is selected, the Property Bar provides relevant options, including those for clearing transformations.
- Locating the “Clear Transformations” Button: Look for the “Clear Transformations” button on the Property Bar. This button typically features an icon representing the restoration or reset of transformations. Clicking on this button initiates the process of clearing all applied transformations.
IV. Navigating the Object Manager for Clearing Transformations:
- Understanding the Object Manager: The Object Manager in CorelDRAW is a powerful tool for managing design elements hierarchically. It provides an organized view of objects, layers, and groups within the document.
- Clearing Transformations in Object Manager: In the Object Manager, locate the object with applied transformations. Right-click on the object and look for options related to transformations. Choose the “Clear Transformations” or equivalent option from the context menu.
V. Troubleshooting and Best Practices:
- Confirmation and Reversibility: Before confirming the clearance of transformations, ensure that it is the desired action. Certain versions of CorelDRAW may prompt a confirmation dialogue to prevent accidental transformations. Additionally, consider saving a copy of the file before performing the action for added reversibility.
- Checking for Nested Transformations: In complex designs with grouped objects or nested transformations, confirm that all relevant objects are selected before initiating the process. Clearing transformations on a parent group may not affect nested transformations within individual objects.
VI. Collaboration and Transformation Clearing:
- Documenting Transformation Reversals: In collaborative design projects, communication is key. Clearly document the process of clearing transformations, especially if it significantly impacts the design. This ensures that team members are informed about changes made to specific objects.
- Collaborative Decision-Making: When considering the clearing of transformations in a collaborative setting, involve team members in the decision-making process. Discuss the reasons behind the transformation clearance and how it aligns with the overall design vision.
VII. Advanced Techniques for Transformation Reversal:
- Using Undo/Redo Commands: CorelDRAW offers the Undo (Ctrl + Z) and Redo (Ctrl + Y) commands to navigate through a sequence of actions. If the transformation clearance was accidental or undesired, these commands provide a way to revert to the previous state.
- Scripting for Batch Transformations: In scenarios where multiple objects require the same transformation clearance, consider using CorelDRAW’s scripting capabilities. Custom scripts can automate the process, enhancing efficiency in large-scale design projects.
Conclusion:
In conclusion, the ability to clear all transformations applied to an object in CorelDRAW is a fundamental skill that ensures precision, control, and the preservation of design integrity. As designers navigate through the step-by-step guide and explore advanced techniques, they gain a deeper understanding of the tools available for reverting objects to their untransformed states. By incorporating troubleshooting tips, best practices, and collaborative strategies, designers can navigate the intricacies of transformation clearance with confidence and efficiency. Embrace the power of resetting transformations in CorelDRAW, and let your designs evolve with clarity and precision.


