Painting the World in Hues: Mastering the Effortless Photoshop Color Splash Effect without Selections
Introduction:
The art of selective colorization, often referred to as the Color Splash Effect, has long captivated photographers and digital artists alike. Adobe Photoshop, a robust platform for creative expression, provides a myriad of tools for bringing vibrant visions to life. In this extensive guide, we will embark on a journey to demystify the process of creating an easy Photoshop Color Splash Effect, eliminating the need for complex selections. This technique allows artists to effortlessly transform their images, emphasizing specific colors while leaving the rest in black and white, resulting in a visually striking and dynamic composition.
I. Understanding the Color Splash Effect:
1.1 Definition and Visual Impact:
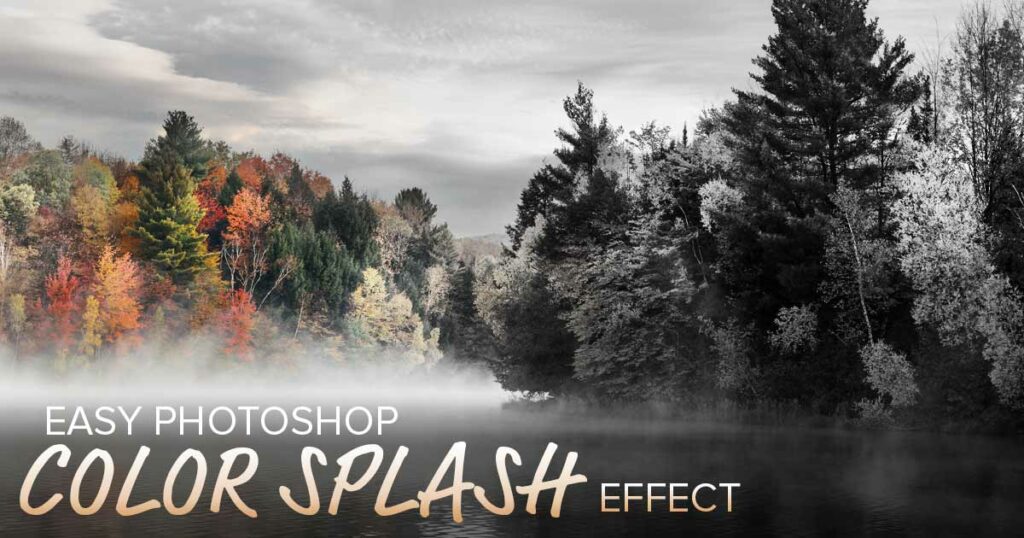
- The Color Splash Effect involves isolating and highlighting specific colors within an image while converting the remaining elements to black and white.
- This technique draws attention to the selected color, creating a visually impactful focal point within the composition.
1.2 Simplifying the Process:
- Traditional color splash techniques often involve intricate selections and masking processes.
- The approach outlined in this guide simplifies the process, making it accessible for both beginners and experienced users.
II. Selecting the Right Image:
2.1 Criteria for Image Selection:
- Begin with a photograph that features a distinct and compelling subject.
- Opt for images with a strong contrast between the color you wish to emphasize and the rest of the scene.
2.2 Composition and Focal Point:
- Choose an image with a clear focal point where the Color Splash Effect will have the most impact.
- Consider elements such as composition, lighting, and overall visual balance.
III. Opening and Preparing the Image in Photoshop:
3.1 Importing the Image:
- Open the chosen image in Adobe Photoshop and create a duplicate layer to preserve the original.
- This non-destructive approach allows for flexibility in experimentation.
3.2 Converting to Black and White:
- Use the Black & White adjustment layer to desaturate the entire image.
- Adjust the sliders to achieve a balanced and visually pleasing black and white conversion.
IV. Reintroducing Color with Layer Mask:
4.1 Layer Mask Basics:
- Add a layer mask to the black and white layer by clicking the mask icon at the bottom of the Layers panel.
- The layer mask will allow us to selectively reveal the color from the original image.
4.2 Brush Tool for Easy Color Application:
- Select the Brush Tool (B) and set the foreground color to black.
- With the layer mask selected, paint over the areas where you want to reintroduce color.
- Use a soft brush for a seamless transition between color and black and white.
V. Fine-Tuning Color Intensity:
5.1 Adjusting Layer Opacity:
- Fine-tune the intensity of the color by adjusting the opacity of the black and white layer.
- This step allows for subtle variations, enhancing the overall impact of the Color Splash Effect.
5.2 Enhancing Saturation with Vibrance:
- Apply a Vibrance adjustment layer to selectively boost the saturation of the reintroduced color.
- Adjust the Vibrance slider to achieve the desired level of vibrancy.
VI. Refining the Composition:
6.1 Sharpening Details:
- Enhance details within the color-splashed areas by using the Sharpen tool.
- Be cautious not to over-sharpen to maintain a natural appearance.
6.2 Adding Blur for Depth:
- Introduce a subtle Gaussian Blur to the black and white layer to create depth and emphasize the color-splashed elements.
- Adjust the blur radius based on the image’s resolution and visual preferences.
VII. Exploring Advanced Techniques:
7.1 Gradient Map for Creative Color Grading:
- Experiment with Gradient Maps to introduce creative color grading to your Color Splash Effect.
- Apply a gradient map adjustment layer and choose a gradient that complements the image’s mood.
7.2 Incorporating Textures:
- Elevate your composition by overlaying textures onto the color-splashed areas.
- Experiment with blending modes and opacity to seamlessly integrate textures for added visual interest.
VIII. Finalizing and Exporting:
8.1 Iterative Review:
- Step back and review your Color Splash Effect, making any necessary adjustments.
- Consider iterating the process to explore different color variations and refinements.
8.2 Saving for Different Platforms:
- Save your final image in the desired format, considering the intended use (web, print, social media, etc.).
- Preserve layers for future edits and experimentation.
IX. Conclusion:
The easy Photoshop Color Splash Effect, as presented in this guide, liberates artists from the complexities of traditional selection-based techniques. By embracing a simplified approach, creators can effortlessly transform their images into vibrant and dynamic compositions that captivate the viewer’s attention. As you embark on your Color Splash journey, let your creativity flourish, explore variations, and use this technique to breathe new life into your visual narratives. With Photoshop as your creative canvas, the world becomes a playground of colors waiting to be unleashed.


