Timeless Allure: A Comprehensive Guide to Crafting Vintage Photo Effects with Adobe Lightroom
Introduction:
In the realm of digital photography, the nostalgic charm of vintage aesthetics holds a timeless appeal. Adobe Lightroom, a versatile post-processing tool, offers photographers the ability to effortlessly transport their images back in time through the creation of vintage photo effects. This comprehensive guide aims to delve into the intricacies of crafting vintage photo effects with Adobe Lightroom, allowing users to infuse their digital images with the warmth, tones, and character reminiscent of bygone eras.
I. The Allure of Vintage Photography:
1.1 Embracing Nostalgia:
- Vintage photography evokes a sense of nostalgia, transporting viewers to a different era and capturing the essence of timeless moments.
- The grain, tonal qualities, and color shifts associated with vintage photographs contribute to their enduring allure.
1.2 The Timeless Aesthetic:
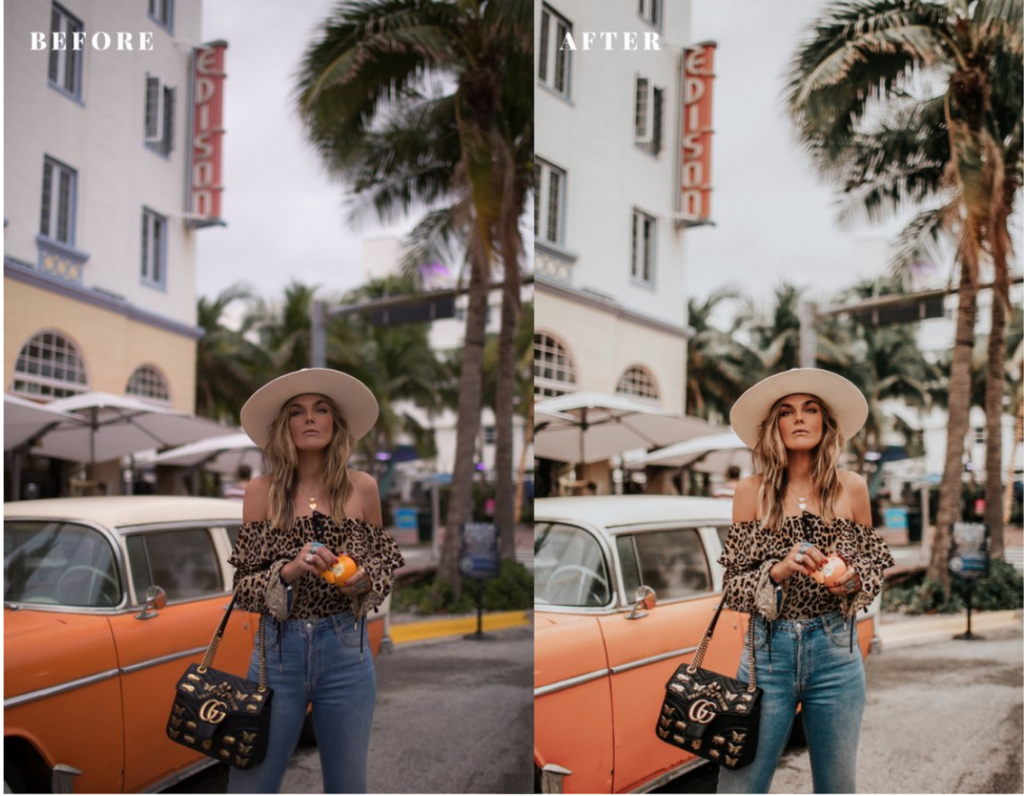
- Vintage photo effects are characterized by muted tones, film grain, subtle color shifts, and an overall softness that imparts a classic and enduring aesthetic.
- Adobe Lightroom provides photographers with a set of powerful tools to recreate these timeless qualities in their digital images.
II. Choosing the Right Image:
2.1 Image Selection Criteria:
- Begin with an image that complements the vintage aesthetic, considering factors such as subject matter, composition, and lighting.
- Images with a hint of nostalgia or those featuring elements that resonate with a bygone era are particularly suitable.
2.2 Assessing Tonal Range:
- Vintage photo effects often emphasize a specific tonal range. Choose images with a range of highlights, midtones, and shadows to fully leverage the vintage treatment.
III. Opening and Importing the Image into Lightroom:
3.1 Importing the Image:
- Open Adobe Lightroom and import the selected image into the Library module.
- Organize the imported image by applying relevant keywords, tags, and metadata for efficient management.
3.2 Creating a Virtual Copy:
- Before applying vintage effects, create a virtual copy of the image to preserve the original. Right-click on the image in the Library module and select “Create Virtual Copy.”
IV. Applying Basic Adjustments:
4.1 Adjusting Exposure and Contrast:
- Head to the Develop module and start by adjusting the exposure and contrast to achieve a balanced tonal range.
- Pay attention to preserving highlight and shadow details.
4.2 Tweaking Temperature and Tint:
- Create a warm and inviting vintage atmosphere by adjusting the temperature towards the warmer side and subtly tweaking the tint.
- This helps emulate the warm tones associated with vintage film.
V. Introducing Film Grain and Texture:
5.1 Film Grain Settings:
- Navigate to the Effects panel in the Develop module and increase the Amount of grain to introduce a film-like texture.
- Adjust the Size and Roughness to achieve the desired level of graininess.
5.2 Incorporating Texture:
- Experiment with the Texture slider to introduce subtle details and enhance the tactile quality of the image.
- This step contributes to the vintage feel by mimicking the textural nuances found in film photographs.
VI. Playing with Split Toning:
6.1 Selective Color Tones:
- Utilize the Split Toning panel to introduce selective color tones to the highlights and shadows.
- Choose warm tones for highlights and cooler tones for shadows, enhancing the vintage color palette.
6.2 Adjusting Balance:
- Fine-tune the balance slider to control the distribution of color tones between highlights and shadows.
- This adjustment ensures a harmonious blending of warm and cool tones throughout the image.
VII. Embracing Vignetting and Dehazing:
7.1 Adding Subtle Vignetting:
- Enhance the vintage ambiance by applying a subtle vignette using the Effects panel.
- Adjust the Amount and Midpoint sliders to control the strength and placement of the vignette.
7.2 Softening with Dehazing:
- Use the Dehaze slider in the Effects panel to subtly soften the image and create an atmospheric, dreamy quality.
- Adjust the slider to achieve the desired level of softening without compromising details.
VIII. Exploring Creative Presets:
8.1 Adobe Lightroom Presets:
- Experiment with Adobe Lightroom presets designed specifically for vintage effects.
- These presets provide a quick and easy way to apply a cohesive vintage look with a single click, saving time and offering creative inspiration.
8.2 Customizing Presets:
- Tailor presets to match the specific nuances of the image by adjusting individual settings after applying the preset.
- Customization ensures that the vintage effect complements the unique characteristics of each photograph.
IX. Finalizing and Exporting:
9.1 Iterative Review:
- Step back and review the vintage treatment applied to the image.
- Make any necessary adjustments to fine-tune the vintage effect and ensure it aligns with the intended aesthetic.
9.2 Exporting the Vintage Image:
- Save the final vintage image in the desired format, resolution, and color space.
- Consider the intended use, whether it be for web sharing, printing, or archival purposes.
X. Conclusion:
Crafting vintage photo effects with Adobe Lightroom is a delightful journey into the rich tapestry of photographic history. Through thoughtful adjustments and creative exploration, photographers can imbue their digital images with the timeless charm and character reminiscent of vintage photographs. By leveraging the powerful tools and features provided by Adobe Lightroom, artists can effortlessly transport viewers to an era of timeless elegance and enduring nostalgia. As you embark on your journey to master vintage photo effects, let your creativity guide you, and watch as your digital images transform into timeless pieces that resonate with the aesthetics of the past.


