Navigating Elegance: A Comprehensive Guide to Drawing Curves with the 3-Point Curve Tool in CorelDRAW
Introduction:
CorelDRAW, a versatile vector graphics editor, stands as a beacon for artists, designers, and illustrators seeking to translate their creative visions into digital masterpieces. Among the plethora of tools within CorelDRAW, the 3-Point Curve Tool emerges as an invaluable instrument, offering a unique approach to crafting elegant curves. In this extensive guide, we will delve into the intricacies of using the 3-Point Curve Tool in CorelDRAW, exploring techniques, customization options, and advanced tips to empower you in creating digital artworks with fluid and sophisticated curves.
Understanding the 3-Point Curve Tool:
The 3-Point Curve Tool is a specialized feature in CorelDRAW designed for drawing curves with precision and simplicity. As the name suggests, it allows users to define a curve using just three anchor points, providing a quick and intuitive method for creating smooth and flowing lines. This tool is particularly useful for artists who value efficiency without compromising on the elegance of their designs.
Customizing Settings for Optimal Control:
Before embarking on your creative journey, familiarize yourself with the customization options of the 3-Point Curve Tool. Access the ‘Tool Options’ or ‘Property Bar’ (depending on your CorelDRAW version) to adjust parameters such as line thickness, color, and curve type. Tailor these settings to match your design preferences and optimize the 3-Point Curve Tool for your specific needs.
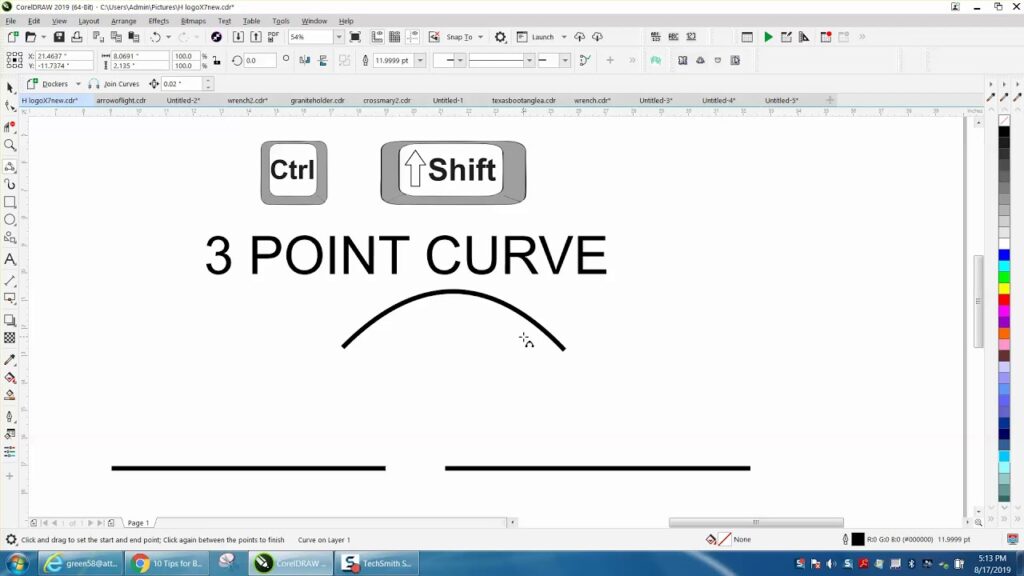
Mastering Basic 3-Point Curve Techniques:
- Placing the First Anchor Point: Activate the 3-Point Curve Tool from the toolbar or press the ‘Y’ key. Click once on the canvas to place the first anchor point, which serves as the starting point of your curve.
- Defining the Second Anchor Point: Move the cursor to the desired direction of the curve and click again to set the second anchor point. Unlike other curve-drawing tools, the 3-Point Curve Tool requires only two clicks to establish the direction and shape of the curve.
- Completing the Curve with the Third Anchor Point: Move the cursor further along the desired curve trajectory and click for the third time to place the third anchor point. CorelDRAW automatically generates a smooth and flowing curve that passes through the three anchor points.
- Adjusting Curve Controls: Fine-tune the curve by adjusting the control handles associated with each anchor point. Click and drag the handles to modify the curvature and direction of the curve, providing additional control over the resulting shape.
Advanced 3-Point Curve Techniques:
- Node Editing for Precision: The Node Edit tool complements the 3-Point Curve Tool by allowing you to fine-tune and adjust existing curves. Select the curve with the Node Edit tool, and manipulate individual nodes for precise adjustments to the curve.
- Symmetry with Mirror and Rotate Tools: Enhance your designs by incorporating symmetry. Duplicate your 3-Point Curve, use the Mirror or Rotate tool to create a mirrored or rotated copy, and achieve balanced compositions effortlessly.
- Combining 3-Point Curves: Create intricate and harmonious designs by combining multiple 3-Point Curves into a single, fluid composition. Use the ‘Join Curves’ or ‘Join Nodes’ option to seamlessly connect curves and create complex shapes.
Troubleshooting and Optimization Strategies:
- Avoiding Overlapping Curves: Overlapping curves can create unintended shapes or intersections. Exercise caution to ensure each curve complements others without causing unwanted visual clutter.
- Curve Smoothing Options: If your 3-Point Curve appears jagged or uneven, experiment with the curve smoothing options available in the Property Bar. Adjusting the smoothing level will refine the curvature, providing a smoother and more polished appearance.
- Adjusting Stroke Properties: Fine-tune the appearance of your 3-Point Curve by adjusting stroke properties in the ‘Object Properties’ docker. Experiment with line thickness, end caps, and join styles to achieve the desired visual impact.
Conclusion:
The 3-Point Curve Tool in CorelDRAW is a gateway to efficiency and elegance in digital design. By mastering the basic and advanced techniques outlined in this comprehensive guide, you’ll unlock the full potential of the 3-Point Curve Tool and infuse your artwork with sophisticated and fluid curves. Whether you’re crafting logos, illustrations, or intricate designs, the 3-Point Curve Tool in CorelDRAW empowers you to create with efficiency and finesse. Embrace the art of drawing curves with the 3-Point Curve Tool, and let your creativity flow seamlessly on the digital canvas with the timeless elegance it brings to your designs.


