Mastering Transitions: A Comprehensive Guide to Adding Transitions Between Clips in DaVinci Resolve

Introduction:
Transitions play a crucial role in the art of video editing, serving as bridges between clips and enhancing the overall coherence, rhythm, and visual appeal of a project. DaVinci Resolve, renowned for its powerful editing capabilities, offers a plethora of transition options and techniques to elevate your edits and captivate your audience. In this comprehensive guide, we’ll delve into the intricacies of adding transitions between clips in DaVinci Resolve, empowering you to master this essential aspect of post-production.
Understanding the Importance of Transitions:
Transitions serve multiple purposes in the editing process:
- Seamlessness: Transitions smooth the transition between clips, eliminating jarring cuts and creating a seamless flow of visuals.
- Narrative Continuity: Transitions help maintain narrative continuity by guiding the viewer’s attention and clarifying the relationship between scenes.
- Visual Interest: Transitions add visual interest and flair to your edits, enhancing engagement and immersing the audience in your storytelling.
Navigating the Transition Options in DaVinci Resolve:
DaVinci Resolve offers a wide range of transition options and techniques to suit different editing styles and project requirements. Let’s explore the primary methods for adding transitions between clips:
- Cross Dissolve:
- Cross Dissolve is one of the most common and versatile transitions, blending the outgoing and incoming clips smoothly over time.
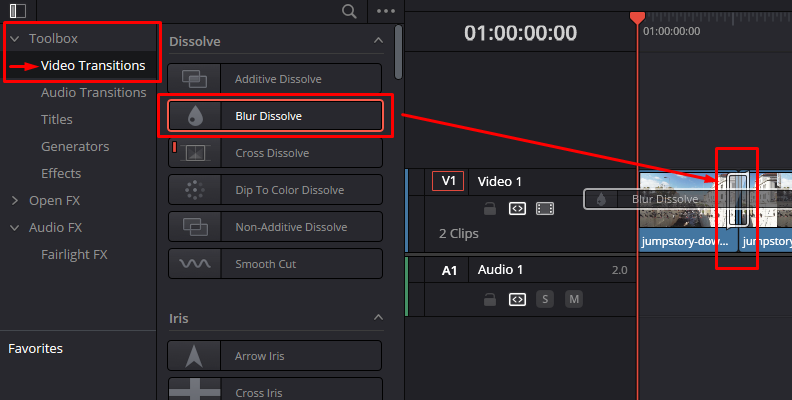
- To add a Cross Dissolve transition, position the playhead between two clips on the timeline, then select the Effects Library tab and navigate to the Transitions category.
- Locate the Cross Dissolve transition and drag it onto the edit point between the clips on the timeline.
- Adjust the duration of the transition by dragging its edges on the timeline or using the Inspector panel to fine-tune its properties.
- Cut:
- The Cut transition provides an instant, seamless transition between clips without any blending or overlap.
- To add a Cut transition, position the playhead between two clips on the timeline, then select the Effects Library tab and navigate to the Transitions category.
- Locate the Cut transition and drag it onto the edit point between the clips on the timeline.
- Adjust the duration of the transition as needed to achieve the desired timing and pacing for your edit.
- Dip to Color:
- The Dip to Color transition gradually fades from one clip to another while overlaying a solid color in between.
- To add a Dip to Color transition, position the playhead between two clips on the timeline, then select the Effects Library tab and navigate to the Transitions category.
- Locate the Dip to Color transition and drag it onto the edit point between the clips on the timeline.
- Customize the color and duration of the transition using the Inspector panel to achieve the desired visual effect.
- Push:
- The Push transition pushes the outgoing clip off-screen while simultaneously revealing the incoming clip from the opposite direction.
- To add a Push transition, position the playhead between two clips on the timeline, then select the Effects Library tab and navigate to the Transitions category.
- Locate the Push transition and drag it onto the edit point between the clips on the timeline.
- Adjust the direction and duration of the transition using the Inspector panel to achieve the desired visual effect.
- Fusion Transitions:
- DaVinci Resolve’s Fusion page offers a wide range of customizable transitions created with the powerful Fusion visual effects toolset.
- To access Fusion transitions, select the Fusion page, navigate to the Effects Library tab, and explore the Fusion Transitions category.
- Drag a Fusion transition onto the edit point between clips on the timeline, then customize its appearance and behavior using the Fusion interface.
Best Practices for Adding Transitions:
To optimize your workflow and achieve seamless results when adding transitions between clips in DaVinci Resolve, consider the following best practices:
- Consider the Context:
- Choose transitions that complement the tone, style, and narrative of your project, ensuring coherence and consistency throughout your edit.
- Consider factors such as pacing, rhythm, and emotional impact when selecting transitions to convey your intended message effectively.
- Use Transitions Sparingly:
- Avoid overusing transitions, as excessive or gratuitous effects can distract from the storytelling and detract from the overall impact of your edit.
- Use transitions judiciously to enhance key moments, emphasize narrative beats, or guide the viewer’s attention without overwhelming the visual experience.
- Experiment with Timing:
- Experiment with different transition durations and timings to achieve the desired pacing and rhythm for your edit.
- Adjust the timing of transitions to synchronize with the audio track, emphasize dramatic moments, or create subtle visual accents that enhance the overall impact of your edit.
- Customize Transition Properties:
- Take advantage of DaVinci Resolve’s extensive customization options to tailor transitions to your specific creative vision.
- Use the Inspector panel to adjust parameters such as duration, easing, opacity, and blending modes to fine-tune the appearance and behavior of transitions for optimal results.
- Preview and Iterate:
- Preview transitions in real-time to evaluate their effectiveness and make adjustments as needed.
- Iterate on your edits, fine-tuning transition timings, durations, and properties until you achieve the desired visual impact and narrative coherence.
Conclusion:
Adding transitions between clips in DaVinci Resolve is a powerful technique for enhancing the flow, coherence, and visual appeal of your edits. By mastering the transition options and techniques available in DaVinci Resolve, you can elevate your editing skills, captivate your audience, and bring your creative vision to life with style and sophistication. Whether you’re crafting a cinematic masterpiece, a promotional video, or a vlog for social media, the ability to add transitions with precision and finesse is indispensable for achieving professional results and realizing your artistic vision.


