The Complete Guide to Adjusting Clip Speed in DaVinci Resolve
Introduction:
Clip speed adjustment is a fundamental technique in video editing, allowing editors to control the pace, timing, and rhythm of their projects. DaVinci Resolve, renowned for its robust editing capabilities, offers a variety of tools and methods for adjusting clip speed with precision and flexibility. In this comprehensive guide, we’ll explore the intricacies of adjusting clip speed in DaVinci Resolve, empowering you to master this essential aspect of post-production.
Understanding the Importance of Clip Speed Adjustment:
Adjusting clip speed serves multiple purposes in the editing process:
- Pacing and Rhythm: Speed adjustments enable editors to manipulate the pacing and rhythm of their edits, creating dynamic sequences and enhancing storytelling impact.
- Time Compression and Expansion: Clip speed adjustments allow editors to compress or expand time within a scene, condensing lengthy footage or stretching out moments for dramatic effect.
- Creative Expression: Speed adjustments offer creative opportunities for experimentation and artistic expression, allowing editors to explore unconventional storytelling techniques and visual aesthetics.
Navigating the Clip Speed Adjustment Tools in DaVinci Resolve:
DaVinci Resolve provides a range of tools and methods for adjusting clip speed to suit different editing styles and project requirements. Let’s explore the primary methods for adjusting clip speed in DaVinci Resolve:
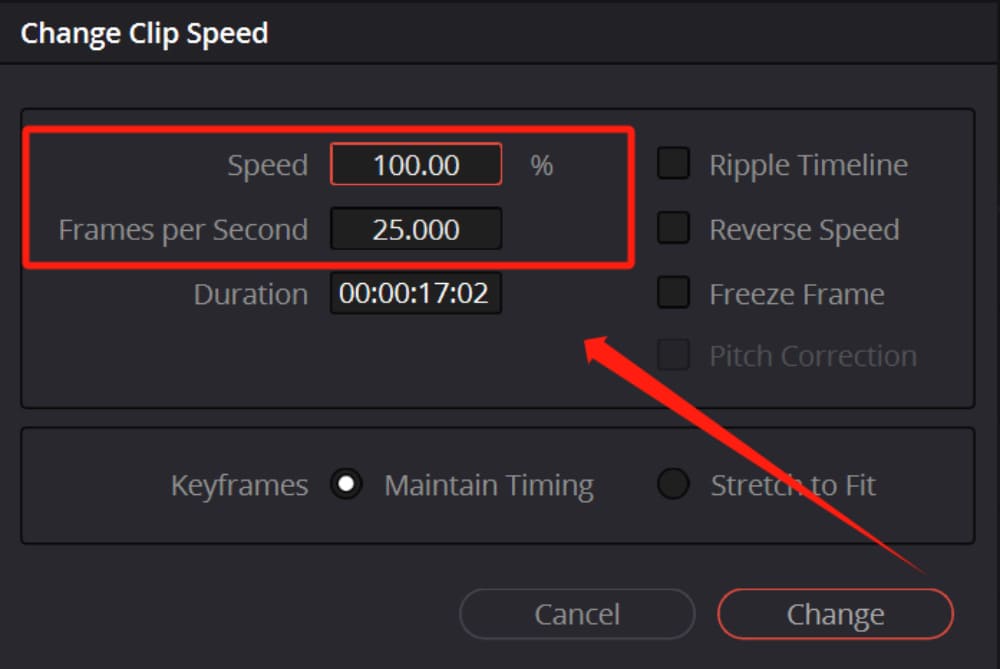
- Change Clip Speed:
- The Change Clip Speed tool in DaVinci Resolve enables editors to adjust the playback speed of a clip while maintaining its duration on the timeline.
- To access the Change Clip Speed tool, right-click on a clip on the timeline, navigate to the Change Clip Speed option in the context menu, and select the desired speed adjustment.
- DaVinci Resolve offers options to increase or decrease the clip speed by a specified percentage, as well as options for reverse playback and freeze frame effects.
- Retime Controls:
- Retime Controls provide a comprehensive interface for adjusting clip speed and timing properties with precision and flexibility.
- To access Retime Controls, select a clip on the timeline, navigate to the Inspector panel, and click on the Retime and Scaling tab.
- In the Retime Controls section, editors can adjust parameters such as Speed, Frame Blend, and Time Remap to achieve the desired speed effect.
- Frame Blend and Optical Flow options are available for enhancing the quality of speed adjustments and minimizing motion artifacts.
- Speed Points:
- Speed Points offer a powerful method for creating variable speed changes within a single clip, allowing editors to control the speed dynamically over time.
- To add Speed Points to a clip, right-click on the clip on the timeline, navigate to the Retime Curve option in the context menu, and select Add Speed Point.
- Dragging the Speed Points on the Retime Curve allows editors to adjust the playback speed at specific points in the clip’s timeline, creating smooth transitions between different speed segments.
- Speed Warp:
- Speed Warp is a sophisticated time manipulation tool in DaVinci Resolve that utilizes optical flow technology to enhance the quality of speed adjustments.
- To access Speed Warp, select a clip on the timeline, navigate to the Inspector panel, and click on the Retime and Scaling tab.
- Enable the Speed Warp option to apply optical flow-based frame interpolation, enhancing the smoothness and quality of speed adjustments, especially for slow-motion effects.
Best Practices for Adjusting Clip Speed:
To optimize your workflow and achieve seamless results when adjusting clip speed in DaVinci Resolve, consider the following best practices:
- Plan Ahead:
- Before adjusting clip speed, carefully review your footage and develop a clear understanding of the desired pacing, rhythm, and timing for your edit.
- Identify key moments, transitions, and sequences that could benefit from speed adjustments to enhance storytelling impact.
- Use Keyframes:
- Take advantage of keyframing capabilities in DaVinci Resolve to create dynamic speed changes and transitions within a clip.
- Use keyframes to gradually increase or decrease speed, create speed ramps, or synchronize speed changes with audio cues for precise timing.
- Experiment with Effects:
- Explore the various speed effects and techniques available in DaVinci Resolve, such as slow motion, time-lapse, and speed ramping, to add visual interest and creative flair to your edits.
- Combine speed adjustments with other effects, such as color grading, motion graphics, and audio enhancements, to create immersive and engaging visual narratives.
- Fine-Tune Motion:
- Pay attention to motion artifacts and visual inconsistencies that may occur when adjusting clip speed, especially with extreme speed changes or complex motion sequences.
- Use frame blending, optical flow, and other motion interpolation techniques to minimize artifacts and ensure smooth, natural-looking motion in your edits.
- Preview and Iterate:
- Preview speed adjustments in real-time to evaluate their effectiveness and make adjustments as needed.
- Iterate on your edits, fine-tuning speed changes, keyframe placements, and timing adjustments until you achieve the desired pacing, rhythm, and visual impact for your project.
Conclusion:
Adjusting clip speed in DaVinci Resolve is a versatile and powerful technique for controlling the pacing, rhythm, and timing of your edits. By mastering the clip speed adjustment tools and techniques available in DaVinci Resolve, you can elevate your editing skills, enhance the visual storytelling of your projects, and captivate your audience with dynamic and immersive narratives. Whether you’re crafting a cinematic masterpiece, a promotional video, or a vlog for social media, the ability to adjust clip speed with precision and finesse is indispensable for achieving professional results and realizing your creative vision.


