Mastering Footage Stabilization: A Comprehensive Guide to Stabilizing Shaky Footage in DaVinci Resolve
Introduction:
Shaky footage is a common challenge faced by videographers and filmmakers, often resulting from factors such as handheld camera movement, vibration, or environmental conditions. Fortunately, DaVinci Resolve offers powerful tools and techniques for stabilizing shaky footage, allowing editors to enhance the visual quality and professionalism of their projects. In this comprehensive guide, we’ll delve into the intricacies of stabilizing shaky footage in DaVinci Resolve, empowering you to master this essential aspect of post-production.
Understanding the Importance of Footage Stabilization:
Stabilizing shaky footage serves multiple purposes in the editing process:
- Enhancing Visual Quality: Stabilization helps smooth out jittery or erratic camera movements, resulting in a more polished and professional-looking final product.
- Improving Viewer Experience: Stable footage is easier on the eyes and provides a more enjoyable viewing experience for the audience, reducing distractions and enhancing engagement.
- Enabling Creative Freedom: Stabilization opens up creative possibilities by enabling editors to salvage footage that may otherwise be unusable due to excessive shake or motion blur.
Navigating the Stabilization Tools in DaVinci Resolve:
DaVinci Resolve offers a variety of tools and methods for stabilizing shaky footage, each tailored to different types of motion and stabilization requirements. Let’s explore the primary stabilization tools available in DaVinci Resolve:
- Warp Stabilizer:
- The Warp Stabilizer is a versatile tool in DaVinci Resolve for stabilizing shaky footage using advanced motion tracking and stabilization algorithms.
- To access the Warp Stabilizer, select a clip on the timeline, navigate to the Inspector panel, and click on the Stabilization tab.
- Enable the Warp Stabilizer option to apply automatic stabilization to the selected clip, adjusting parameters such as Smoothness and Result Scale to control the intensity of stabilization.
- SmoothCam:
- SmoothCam is another stabilization tool in DaVinci Resolve that utilizes optical flow technology to smooth out shaky footage and reduce unwanted motion artifacts.
- To access SmoothCam, select a clip on the timeline, navigate to the Inspector panel, and click on the Stabilization tab.
- Enable the SmoothCam option to apply automatic stabilization to the selected clip, adjusting parameters such as Smoothing and Result Scale to fine-tune the stabilization effect.
- Point Tracker:
- The Point Tracker tool in DaVinci Resolve allows editors to manually track specific points or features within a clip and apply stabilization based on their movement.
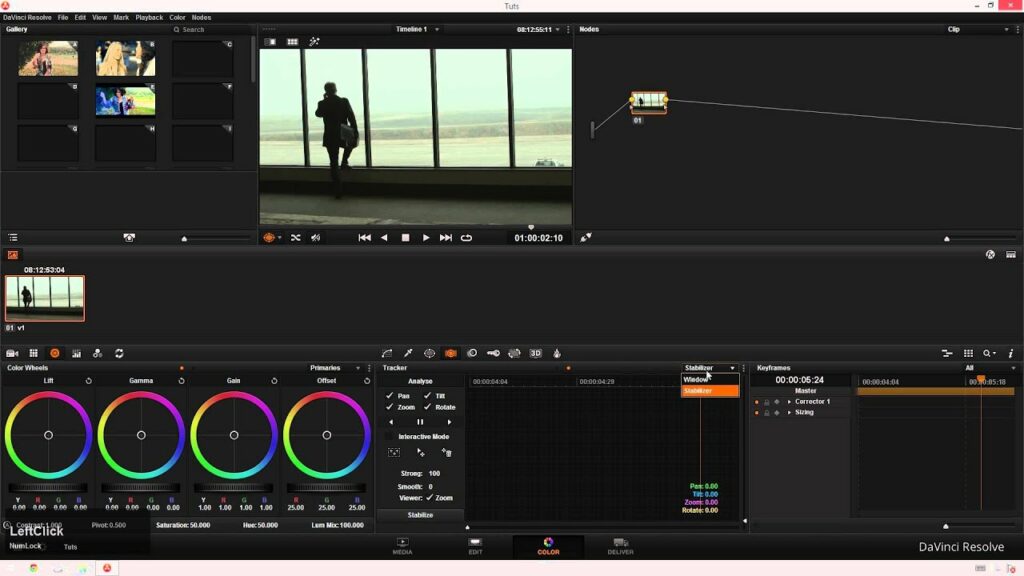
- To use the Point Tracker, select a clip on the timeline, navigate to the Color page, and open the Tracker panel.
- Add a new tracker to the clip, then manually track a stable feature within the footage to generate tracking data.
- Apply stabilization based on the tracked data, adjusting parameters such as Tracking Type and Smoothness to achieve the desired stabilization effect.
- Manual Adjustment:
- In addition to automated stabilization tools, DaVinci Resolve provides manual adjustment options for fine-tuning stabilization parameters and keyframe animation.
- Use the Transform controls in the Inspector panel to manually adjust position, rotation, and scale parameters to stabilize footage and compensate for camera movement.
- Apply keyframe animation to track and stabilize specific regions of interest within the footage, adjusting parameters over time to maintain stability throughout the clip.
Best Practices for Footage Stabilization:
To optimize your workflow and achieve optimal results when stabilizing shaky footage in DaVinci Resolve, consider the following best practices:
- Assess Footage Quality:
- Before applying stabilization, carefully review your footage to assess the severity and type of camera movement or shake present.
- Identify stable reference points or features within the footage that can be used for tracking and stabilization purposes.
- Use Multiple Methods:
- Experiment with different stabilization tools and techniques in DaVinci Resolve to find the most effective solution for your specific footage and stabilization requirements.
- Combine automated stabilization tools with manual adjustments and keyframe animation to achieve precise control over the stabilization process.
- Adjust Parameters:
- Take the time to fine-tune stabilization parameters such as Smoothness, Result Scale, and Tracking Type to achieve optimal results for your footage.
- Balance the intensity of stabilization with the preservation of natural motion and visual quality, avoiding over-processing or artifacts.
- Preprocess Footage:
- Before stabilizing footage, consider preprocessing steps such as color correction, noise reduction, and lens distortion correction to optimize the quality and accuracy of stabilization results.
- Clean, well-prepared footage can yield better stabilization results and minimize the risk of artifacts or visual anomalies.
- Preview and Iterate:
- Preview stabilization adjustments in real-time to evaluate their effectiveness and make adjustments as needed.
- Iterate on your stabilization settings, fine-tuning parameters and keyframe animation until you achieve the desired level of stability and visual quality for your footage.
Conclusion:
Stabilizing shaky footage in DaVinci Resolve is a powerful technique for enhancing the visual quality, professionalism, and viewer experience of your projects. By mastering the stabilization tools and techniques available in DaVinci Resolve, you can elevate your editing skills, salvage challenging footage, and create polished, professional-looking content. Whether you’re working on a documentary, narrative film, or promotional video, the ability to stabilize footage with precision and finesse is indispensable for achieving professional results and realizing your creative vision.


