Mastering Color Correction: A Comprehensive Guide to Color Correction in DaVinci Resolve
Introduction:
Color correction is a critical aspect of the post-production process, allowing editors to enhance the visual quality, consistency, and storytelling impact of their footage. DaVinci Resolve, renowned for its advanced color grading capabilities, offers a comprehensive suite of tools and features for color correction, empowering editors to achieve professional-grade results with precision and efficiency. In this extensive guide, we’ll explore the intricacies of color correction in DaVinci Resolve, providing you with the knowledge and techniques to master this essential aspect of post-production.
Understanding the Importance of Color Correction:
Color correction serves multiple purposes in the editing process:
- Enhancing Visual Quality: Color correction enables editors to adjust exposure, contrast, saturation, and white balance to achieve a balanced and pleasing aesthetic for their footage.
- Maintaining Consistency: Color correction ensures visual consistency across different shots, scenes, and sequences within a project, creating a cohesive and polished look.
- Conveying Mood and Atmosphere: Color correction allows editors to manipulate color tones and hues to evoke specific emotions, enhance storytelling, and create visual atmosphere.
Navigating the Color Correction Tools in DaVinci Resolve:
DaVinci Resolve offers a comprehensive suite of color correction tools and features to suit different editing styles and project requirements. Let’s explore the primary methods for color correction in DaVinci Resolve:
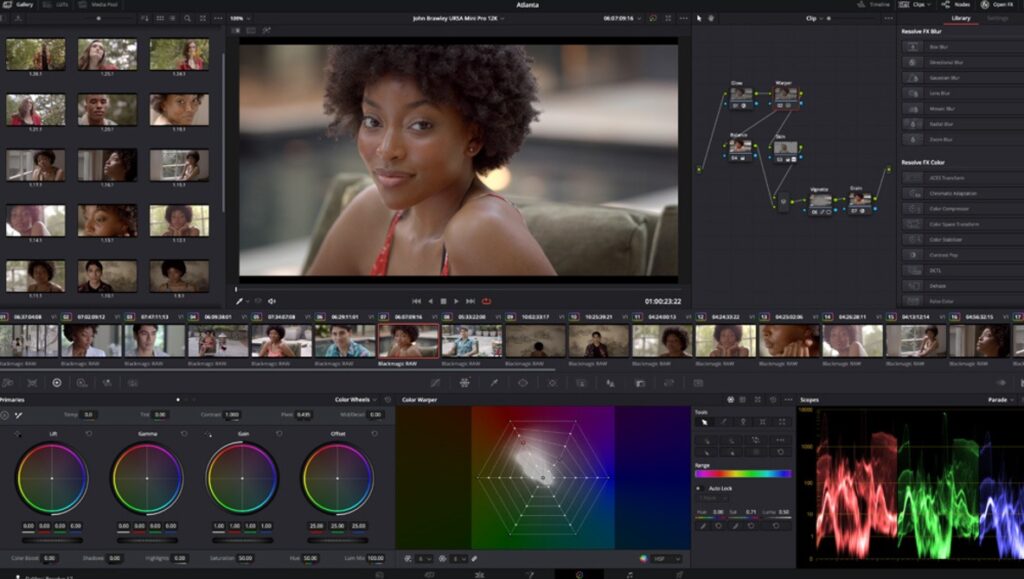
- Color Wheels:
- The Color Wheels panel in DaVinci Resolve provides intuitive controls for adjusting the tonal balance and color temperature of your footage.
- Use the Lift, Gamma, and Gain controls to adjust shadows, midtones, and highlights, respectively, by manipulating the corresponding color wheels.
- Fine-tune the color balance and temperature of your footage by adjusting the color temperature slider and tint controls.
- Curves:
- The Curves panel in DaVinci Resolve offers precise control over contrast, exposure, and color adjustments using customizable curves.
- Use the RGB curves to adjust overall contrast and exposure, as well as individual color channels (Red, Green, Blue) to fine-tune color balance and saturation.
- Experiment with S-curve adjustments to enhance contrast and add visual impact to your footage, or use targeted adjustments to correct specific color casts or tonal imbalances.
- Color Match:
- The Color Match tool in DaVinci Resolve allows editors to automatically match the color and tonal characteristics of one clip to another.
- Select a reference clip with desired color and tonal attributes, then apply the Color Match tool to automatically adjust the color balance, exposure, and contrast of the target clip to match the reference.
- Fine-tune the Color Match adjustments using additional controls for luminance, saturation, and contrast to achieve optimal results.
- Primary Bars:
- The Primary Bars panel in DaVinci Resolve provides quick and easy access to essential color correction controls, including Lift, Gamma, Gain, Contrast, Saturation, and Pivot adjustments.
- Use the Primary Bars to make global adjustments to exposure, contrast, and color saturation, allowing for rapid iteration and experimentation during the color correction process.
- Qualifier and Power Windows:
- The Qualifier and Power Windows tools in DaVinci Resolve offer advanced selective color correction capabilities, allowing editors to target specific areas or elements within a frame for precise adjustments.
- Use the Qualifier tool to select specific colors or tonal ranges within the footage based on luminance, hue, saturation, or other criteria.
- Apply Power Windows to isolate and adjust specific regions of the frame using shapes such as rectangles, ellipses, or custom masks, enabling targeted adjustments for complex grading tasks.
Best Practices for Color Correction:
To optimize your workflow and achieve professional results when color correcting in DaVinci Resolve, consider the following best practices:
- Set a Reference:
- Start your color correction process by establishing a reference frame or image with desired color and tonal characteristics to guide your adjustments.
- Use reference images, stills from the footage, or color swatches as a visual guide to achieve consistent color grading across different shots and scenes.
- Work in Stages:
- Break down the color correction process into stages, focusing on primary adjustments (exposure, contrast, white balance) before tackling secondary corrections (color grading, selective adjustments).
- By working in stages, you can maintain clarity and organization in your workflow, ensuring that each adjustment contributes to the overall visual aesthetic of the project.
- Use Scopes:
- Take advantage of DaVinci Resolve’s built-in waveform, vectorscope, and histogram scopes to analyze and monitor color and tonal information in your footage.
- Use scopes to identify exposure issues, color casts, and clipping artifacts, allowing for precise adjustments and ensuring optimal image quality and consistency.
- Maintain Consistency:
- Aim for visual consistency and coherence across different shots, scenes, and sequences within your project by applying consistent color correction settings and grading techniques.
- Use adjustment presets, group grading, or node templates to streamline your workflow and ensure uniformity in your color grading approach.
- Experiment and Iterate:
- Don’t be afraid to experiment with different color correction techniques, creative effects, and grading styles to achieve the desired look and feel for your project.
- Iterate on your adjustments, fine-tuning color balance, contrast, and saturation until you achieve the desired visual impact and storytelling effect.
Conclusion:
Color correction is a powerful tool for enhancing the visual quality, consistency, and storytelling impact of your footage in DaVinci Resolve. By mastering the color correction tools and techniques available in DaVinci Resolve, you can elevate your editing skills, achieve professional-grade results, and bring your creative vision to life with precision and finesse. Whether you’re working on a narrative film, documentary, commercial, or music video, the ability to color correct with confidence and proficiency is essential for achieving professional results and realizing your artistic vision.


