Mastering Material Application and Texture Mapping in 3D AutoCAD: Elevating Design Realism and Visualization

Introduction: In the realm of computer-aided design (CAD), AutoCAD stands as a cornerstone tool for architects, engineers, designers, and artists seeking to create intricate and realistic 3D models. Among the myriad of techniques available for enhancing visualizations and presentations, applying materials and textures stands out as essential methods for adding realism, depth, and visual interest to 3D models. In this extensive guide, we will delve into the intricacies of applying materials and textures in 3D AutoCAD, exploring the techniques, tools, and best practices to empower users to unlock the full potential of material application and texture mapping and realize their design visions with immersive clarity and sophistication.
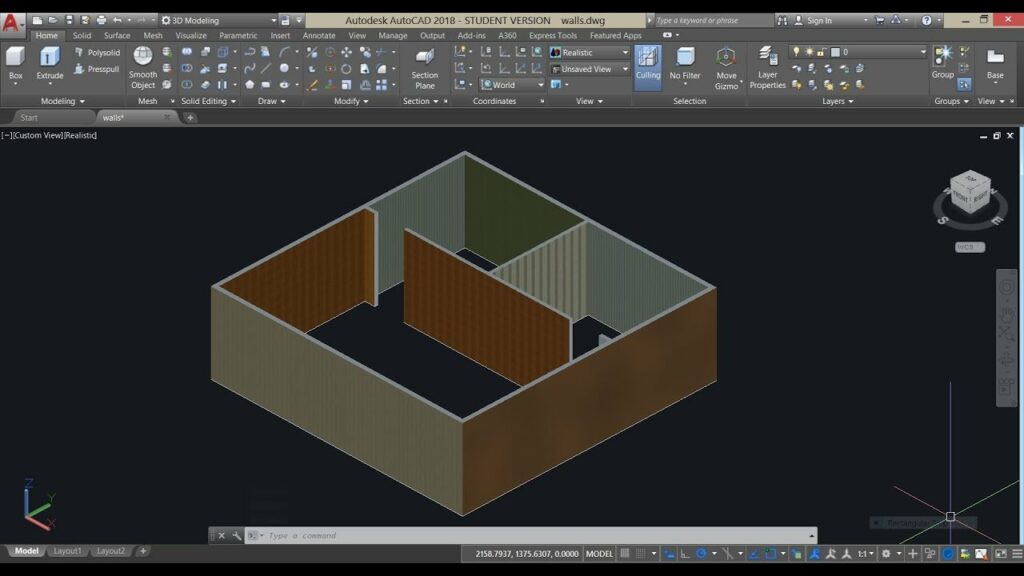
Understanding Material Application and Texture Mapping: Material application and texture mapping in 3D AutoCAD involve the process of assigning surface properties and patterns to geometric objects to simulate real-world materials and textures. Materials define the visual appearance and physical properties of surfaces, such as color, reflectivity, transparency, and texture, while textures provide detailed surface patterns, such as wood grain, fabric weave, or stone texture. By mastering the techniques for applying materials and textures, users can enhance the realism, clarity, and impact of their 3D models, bringing their design visions to life with immersive detail and authenticity.
Key Concepts in Material Application and Texture Mapping: Before delving into the process of applying materials and textures, it’s essential to understand some key concepts that underpin material application and texture mapping in 3D AutoCAD:
- Material Properties: Materials in 3D AutoCAD have properties such as color, reflectivity, transparency, glossiness, and bumpiness that define their visual appearance and physical characteristics. Adjusting these properties allows users to simulate a wide range of materials, such as metals, plastics, glass, wood, and fabric, and create realistic surface effects, such as reflections, refractions, and highlights.
- Texture Mapping: Texture mapping involves the process of applying two-dimensional images or patterns to three-dimensional surfaces to create detailed surface patterns and visual effects. Textures are mapped onto surfaces using mapping methods such as planar mapping, cylindrical mapping, spherical mapping, or UV mapping, which define how the texture coordinates are projected onto the surface geometry.
- UV Mapping: UV mapping is a common texture mapping technique that involves unwrapping the surface geometry into two-dimensional UV coordinates, which are then used to map textures onto the surface. UV coordinates define how textures are applied to surfaces, allowing for precise control over texture placement, orientation, and scaling.
- Texture Resolution: Texture resolution refers to the level of detail and clarity of textures, measured in pixels per unit area. Higher texture resolutions result in sharper, more detailed textures with greater clarity and realism, while lower texture resolutions may appear blurry or pixelated, especially when viewed up close or at high resolutions.
Basic Material Application and Texture Mapping Techniques: Applying materials and textures in 3D AutoCAD involves a series of steps that begin with defining the materials and culminate in assigning textures to surfaces. Here’s a basic overview of the techniques for applying materials and textures:
- Define Materials: Start by defining materials using material creation tools such as the “MATERIAL” command or the “Materials Browser” panel. Specify the properties of materials such as color, reflectivity, transparency, glossiness, and bumpiness to simulate the desired material characteristics and surface effects.
- Assign Materials: Assign materials to surfaces using material assignment tools such as the “MATERIALS” command or the “Properties” panel. Select the surfaces or objects to which you want to apply the material and specify the material to be assigned. Preview the material on the selected surfaces and confirm the assignment to apply the material to the surfaces.
- Create Textures: Create textures using texture creation tools such as image editing software or texture generators. Generate textures from photographs, images, or procedural algorithms to create surface patterns such as wood grain, fabric weave, stone texture, or brick pattern.
- Apply Textures: Apply textures to surfaces using texture mapping tools such as the “MAPUV” command or the “Texture Mapping” panel. Select the surfaces or objects to which you want to apply the texture and specify the texture to be mapped. Choose the mapping method and adjust mapping parameters such as scale, rotation, and offset to control the appearance and placement of the texture on the surfaces.
Advanced Material Application and Texture Mapping Techniques: While the basic material application and texture mapping techniques suffice for most applications, mastering advanced techniques can enhance the realism, clarity, and impact of 3D models in AutoCAD. Here are some advanced techniques and applications to consider:
- Procedural Textures: Create procedural textures using mathematical algorithms or procedural shaders to generate complex surface patterns and visual effects. Procedural textures are generated dynamically at render time, allowing for infinite variation and detail without the need for texture files, making them ideal for creating organic, naturalistic, or abstract surface effects.
- Texture Filtering: Apply texture filtering techniques such as mipmapping, anisotropic filtering, or trilinear filtering to improve texture quality and reduce aliasing artifacts. Texture filtering algorithms enhance texture clarity and detail, especially when textures are viewed at oblique angles or at different distances from the camera, ensuring crisp, clear texture rendering across a range of viewing conditions.
- Texture Baking: Bake textures onto surfaces to precompute lighting and shading effects, improving rendering performance and realism. Use texture baking tools to capture lighting information, shadow maps, ambient occlusion, or global illumination effects and bake them into texture maps, reducing rendering time and enhancing the realism of static or pre-rendered scenes.
- Material Libraries: Use material libraries and asset repositories to access a wide range of pre-defined materials, textures, and shaders. Import material libraries from third-party sources or online repositories to expand your material palette and streamline the material creation process, saving time and effort while ensuring high-quality and consistent material appearance across projects.
Best Practices for Material Application and Texture Mapping: To achieve optimal results when applying materials and textures in 3D AutoCAD, consider the following best practices:
- Plan and Sketch: Start with a clear plan and sketch of the scene you want to visualize or present, including its key features, materials, and textures. Use sketches as reference images or templates to guide the material and texture application process and ensure accuracy and consistency.
- Use Real-World References: Use real-world references such as photographs, material samples, or texture swatches to guide the material and texture creation process. Analyze material properties, surface patterns, and visual characteristics in reference images to replicate real-world materials and textures in 3D models, ensuring authenticity and realism.
- Experiment and Iterate: Experiment with different materials, textures, and mapping techniques to explore creative possibilities and refine your designs. Iterate on your designs by reviewing renderings, gathering feedback, and making incremental adjustments to achieve the desired result.
- Optimize Performance: Optimize performance by managing material complexity, optimizing texture resolutions, and configuring rendering settings to balance visual quality and rendering speed. Minimize the number of materials and textures in the scene, optimize material properties and texture settings, and adjust rendering settings to achieve fast, efficient, and high-quality renderings.
Conclusion: Applying materials and textures in 3D AutoCAD offers a powerful means of enhancing realism, depth, and visual interest in 3D models. By mastering the techniques, tools, and best practices for material application and texture mapping, users can unlock a world of creative possibilities and bring their design visions to life with immersive clarity and sophistication. Whether you’re visualizing architectural spaces, presenting product designs, or creating artistic renderings, the ability to apply materials and textures in 3D AutoCAD empowers you to realize your creative vision with precision and authenticity. With practice, experimentation, and attention to detail, you can harness the full potential of material application and texture mapping to create compelling and immersive visualizations that captivate audiences and inspire creativity.


