Mastering Margins: A Comprehensive Guide to Margins in Word XP
Microsoft Word XP, also known as Word 2002, is a versatile word processing software that offers users a wide range of formatting options to customize their documents. Among these options, setting margins is a fundamental aspect of document layout and design. In this exhaustive guide, we’ll explore the intricacies of working with margins in Word XP, empowering you to create documents with precise and professional layout.
Understanding Margins:
Margins refer to the blank space around the edges of a document. They define the boundaries within which text and other elements are contained. Adjusting margins allows users to control the layout, formatting, and appearance of their documents, ensuring readability and visual appeal.
1. Setting Margins:
Default Margins:
By default, Word XP sets 1-inch margins on all sides of a new document. These default margins provide a balanced layout and are suitable for most types of documents. However, users can adjust margins to meet specific requirements or preferences.
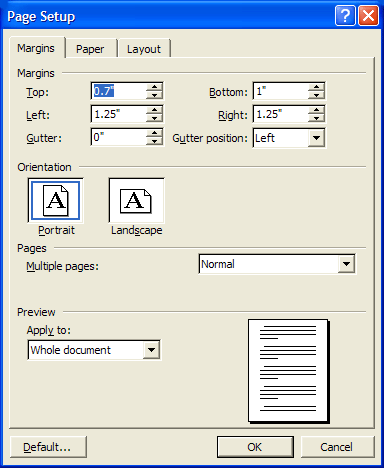
How to Adjust Margins:
- Click on the “File” menu.
- Select “Page Setup” to open the Page Setup dialog box.
- In the Margins tab, you can adjust the margins for the top, bottom, left, and right sides of the document by entering new values in the corresponding fields.
- Alternatively, you can use the presets provided in the Margins dropdown menu, such as Normal, Narrow, Wide, or Custom margins.
Customizing Margins:
Word XP offers users the flexibility to customize margins further by adjusting settings in the Page Setup dialog box. In addition to adjusting the margins for the entire document, users can set different margins for specific sections, such as the first page, odd pages, or even pages. This level of customization allows users to create complex layouts and designs for their documents.
2. Using Margins for Document Formatting:
Improving Readability:
Properly set margins enhance readability by providing adequate white space around the text. Wide margins prevent text from appearing cramped, while narrow margins can help conserve space and reduce the number of pages in a document.
Enhancing Design:
Margins play a crucial role in document design, helping to create visually appealing layouts. By adjusting margins, users can control the placement of text, images, and other elements, creating a balanced and harmonious design that draws the reader’s attention.
Meeting Formatting Requirements:
In certain cases, documents may need to adhere to specific formatting requirements, such as those set by academic institutions, publishers, or regulatory bodies. Adjusting margins allows users to meet these requirements and ensure compliance with formatting guidelines.
3. Using Margins with Headers and Footers:
Headers and footers are areas at the top and bottom of each page where users can insert text, page numbers, dates, and other information. Margins play a crucial role in determining the placement of headers and footers within the document.
Aligning Headers and Footers:
Users can align headers and footers with the margins of the document to create a consistent and professional appearance. By adjusting margins, users can control the distance between the edges of the page and the headers and footers.
Controlling Margins for Headers and Footers:
Word XP allows users to set different margins for headers and footers than for the main body of the document. This feature provides greater flexibility in designing headers and footers that complement the overall layout of the document.
Conclusion:
Margins are a fundamental aspect of document layout and design in Word XP. By mastering the techniques for adjusting margins effectively, users can create documents with precise formatting, readability, and visual appeal. Whether you’re writing reports, essays, letters, or other types of documents, understanding how to work with margins will help you create professional-looking documents that impress your audience.


