Mastering Finite Element Analysis with ANSYS: A Comprehensive Guide
Introduction: ANSYS is a leading finite element analysis (FEA) software used by engineers, researchers, and designers across various industries to simulate and analyze complex engineering problems. From structural analysis and heat transfer to fluid dynamics and electromagnetics, ANSYS provides a comprehensive suite of tools and capabilities for solving a wide range of engineering challenges. In this extensive guide, we’ll delve into the intricacies of performing finite element analysis in ANSYS, covering everything from model setup to post-processing and result interpretation.
Step 1: Installing ANSYS and Getting Started Before you can perform finite element analysis in ANSYS, you’ll need to download and install the software on your computer. ANSYS is available for Windows and Linux platforms and can be obtained from the ANSYS website or through authorized distributors. Once installed, launch ANSYS to begin your analysis journey. Familiarize yourself with the ANSYS Workbench interface, which serves as the central hub for creating, managing, and analyzing engineering models.
Step 2: Creating a New Project and Importing Geometry The first step in performing finite element analysis in ANSYS is to create a new project and import the geometry of the model you want to analyze. ANSYS supports various file formats for importing geometry, including CAD formats such as STEP, IGES, and Parasolid, as well as neutral formats like STL and SAT. Use the geometry import tools in ANSYS Workbench to import the geometry file and create a new geometry object in your project.
Step 3: Meshing the Geometry Once the geometry is imported, the next step is to generate a mesh, which discretizes the geometry into finite elements for analysis. Meshing plays a crucial role in the accuracy and efficiency of finite element analysis, as it determines the resolution of the model and affects the accuracy of the results. ANSYS provides powerful meshing tools for generating structured or unstructured meshes, including tetrahedral, hexahedral, and hybrid elements. Use the meshing tools in ANSYS Workbench to create a high-quality mesh that captures the geometric details and features of the model accurately.
Step 4: Assigning Materials and Properties After meshing the geometry, you’ll need to assign materials and properties to the model to define the behavior of the materials under different loading conditions. ANSYS allows you to assign material properties such as elastic modulus, Poisson’s ratio, and thermal conductivity to different regions of the model. You can choose from a library of built-in material models or define custom material properties based on experimental data or material specifications. Additionally, you can assign section properties to structural elements such as beams, shells, and solids to represent their cross-sectional geometry and behavior.
Step 5: Applying Boundary Conditions and Loads With the materials and properties defined, it’s time to apply boundary conditions and loads to the model to simulate real-world operating conditions. Boundary conditions specify the constraints or supports at fixed or pinned locations, while loads represent external forces, pressures, or displacements acting on the model. ANSYS provides a wide range of boundary condition and load types, including fixed supports, roller supports, prescribed displacements, concentrated loads, distributed loads, and thermal boundary conditions. Use the boundary condition and load assignment tools in ANSYS Workbench to apply the necessary constraints and loads to the model.
Step 6: Defining Analysis Settings and Solver Options Before running the analysis, you’ll need to define the analysis settings and solver options according to the desired analysis type and objectives. ANSYS offers various analysis types, including static analysis, transient analysis, harmonic analysis, modal analysis, and thermal analysis, each serving different purposes. You can specify analysis settings such as solution methods, convergence criteria, time steps, and output options to control the analysis process and obtain accurate results. Additionally, you can configure solver options such as parallel processing, memory allocation, and error checking to optimize the analysis performance and efficiency.
Step 7: Running the Analysis and Monitoring Convergence Once the analysis settings and solver options are set, you’re ready to run the analysis in ANSYS and monitor the convergence of the solution. Click the “Run” button in ANSYS Workbench to initiate the analysis process, and ANSYS will solve the finite element model using the specified settings and solver options. During the analysis, ANSYS displays progress indicators and convergence plots to monitor the solution progress and ensure convergence. If the solution fails to converge, you may need to adjust the analysis settings, refine the mesh, or troubleshoot the model to resolve convergence issues.
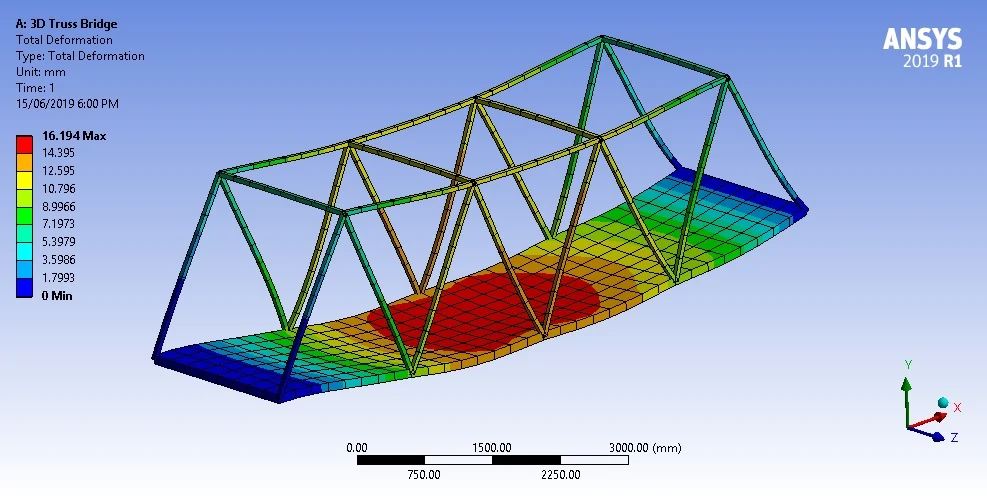
Step 8: Post-Processing and Result Interpretation After the analysis is complete, you can post-process the results in ANSYS to visualize and interpret the analysis results. ANSYS provides powerful post-processing tools for viewing and analyzing a wide range of results, including displacements, stresses, strains, temperatures, and velocities. You can create contour plots, vector plots, deformation plots, and animation sequences to visualize the behavior of the model under different loading conditions. Additionally, ANSYS allows you to generate reports, graphs, and tables summarizing the analysis results for documentation and presentation purposes.
Conclusion: Performing finite element analysis in ANSYS is a complex yet rewarding process that requires careful planning, attention to detail, and engineering expertise. By following the steps outlined in this comprehensive guide, you can leverage ANSYS’s powerful features and capabilities to simulate and analyze complex engineering problems accurately and efficiently. Whether you’re analyzing structural components, thermal systems, or fluid flow phenomena, ANSYS provides the tools you need to tackle the most challenging engineering problems and make informed design decisions. With practice and experimentation, you can become proficient in using ANSYS for finite element analysis and unlock its full potential for solving real-world engineering challenges.


