Mastering Depth and Nuance: A Comprehensive Guide to Photoshop Advanced Blending with the Blend If Sliders
Introduction:
Photoshop is a versatile powerhouse that offers an array of advanced blending techniques, providing designers and digital artists with the tools to create intricate and nuanced compositions. Among these advanced features, the Blend If sliders stand out as a powerful and often underutilized resource. This comprehensive guide aims to demystify the Blend If sliders, unraveling their capabilities and guiding you through the intricate process of mastering advanced blending in Adobe Photoshop.
Section 1: Understanding Blending Modes
Before delving into the intricacies of Blend If sliders, it’s crucial to grasp the foundational concept of blending modes in Photoshop. Blending modes determine how layers interact with each other and the base image. Modes like Multiply, Screen, Overlay, and others contribute to various effects, from darkening to lightening, creating contrasts, and enhancing overall visual appeal.
Section 2: Introducing Blend If
Blend If is an advanced blending feature in Photoshop that allows for precise control over how layers interact based on their luminosity. It enables users to define transparency levels for a layer, making it seamlessly integrate with the layers beneath. Blend If operates on the principle of luminance values, providing a nuanced approach to blending layers based on brightness and darkness.
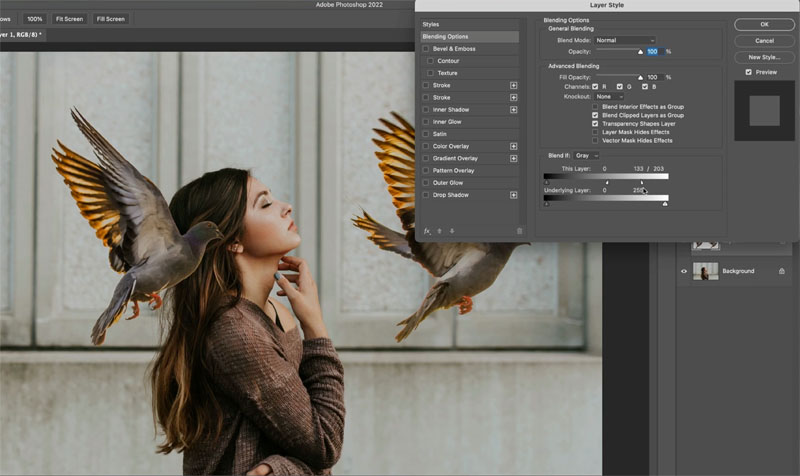
Section 3: Accessing the Blend If Sliders
To access the Blend If sliders, double-click on the layer you want to blend, opening the Layer Style dialog box. Locate the “Blend If” section, which consists of two sets of sliders: “This Layer” and “Underlying Layer.” Each set includes sliders for blending based on luminance values from black to white.
Section 4: Mastering the Basics – The Underlying Layer Sliders
The Underlying Layer sliders control how the current layer blends with the layers beneath. The black slider determines which dark areas of the underlying layer are hidden, while the white slider controls the visibility of bright areas. Holding down the Alt/Option key while dragging splits the sliders, providing a smooth transition and preventing harsh blending edges.
Section 5: Advanced Techniques – The This Layer Sliders
The This Layer sliders offer a more intricate level of control, allowing users to fine-tune blending based on the luminance values of the current layer itself. The black slider dictates transparency in the dark areas of the current layer, while the white slider influences transparency in the bright areas. Combining the This Layer and Underlying Layer sliders allows for precise and sophisticated blending.
Section 6: Blending with Gradients and Adjustment Layers
Blend If sliders can be applied to more than just image layers. They are equally effective when used with gradients and adjustment layers. By adjusting the sliders on a gradient layer, you can create seamless transitions between different elements in your composition. Applying Blend If to adjustment layers enables targeted adjustments based on luminosity, providing a non-destructive way to enhance your images.
Section 7: Real-world Applications – Photo Retouching
Blend If sliders are invaluable tools for photo retouching, offering a nuanced approach to blending and adjusting specific areas of an image. They can be used to seamlessly blend skin tones, control highlights and shadows, and enhance overall image quality without affecting the entire photo.
Section 8: Creating Atmospheric Effects – Blend If in Compositing
In the realm of compositing, Blend If sliders unlock the potential to create atmospheric effects. Whether it’s blending a subject into a background, integrating elements seamlessly, or adding depth to a composition, the Blend If sliders allow for meticulous control over luminance values, producing results that are both realistic and visually stunning.
Section 9: Layer Stack Optimization – Grouping and Masking with Blend If
To optimize your layer stack, consider grouping layers and applying Blend If to the group. This technique ensures that the blending adjustments are applied collectively to the grouped layers, streamlining your workflow. Additionally, combining Blend If with layer masks provides a dynamic way to control the visibility of specific areas within a layer, offering unparalleled flexibility.
Section 10: Pitfalls and Workarounds – Overcoming Challenges
While Blend If sliders are powerful, they come with certain limitations. Challenges may arise when dealing with complex compositions, subtle transitions, or precise adjustments. However, understanding these limitations opens the door to creative workarounds, such as using additional layers, adjustment layers, and fine-tuning opacity to achieve the desired results.
Section 11: Experimentation and Mastery – Developing Your Skills
Mastery of Blend If sliders comes through experimentation and practice. The nuances of blending based on luminance values require a keen eye and an understanding of the desired visual outcome. Regularly experiment with different layer combinations, blending modes, and slider adjustments to build confidence and proficiency in utilizing Blend If effectively.
Conclusion:
Photoshop’s Blend If sliders offer a sophisticated and nuanced approach to advanced blending, allowing artists and designers to elevate their compositions with precision and control. This comprehensive guide has navigated through the fundamentals, techniques, and real-world applications of Blend If sliders, providing you with the knowledge to unlock their full potential. As you embark on your journey to master advanced blending in Photoshop, embrace the creative possibilities that Blend If sliders offer, and let your artistic vision come to life with depth, subtlety, and sophistication.


