Unleashing Artistry: A Comprehensive Exploration of Applying Bitmap Effects as Lenses in CorelDRAW
Introduction
CorelDRAW, a powerhouse in graphic design software, continually evolves to provide users with a rich set of tools that amplify creativity. Among its myriad features, the application’s ability to apply bitmap effects as lenses stands out as a transformative way to enhance and manipulate images. This comprehensive guide delves into the intricacies of this feature, offering a step-by-step exploration, creative insights, and practical tips for artists and designers seeking to push the boundaries of visual expression within the dynamic environment of CorelDRAW.
Understanding Bitmap Effects in CorelDRAW
1. Bitmap Effects Overview:
- Bitmap effects in CorelDRAW refer to a set of tools and filters that allow users to apply various transformations to bitmap images. These effects range from basic adjustments to sophisticated artistic enhancements.
2. Diverse Range of Effects:
- CorelDRAW offers a diverse array of bitmap effects, including adjustments like brightness and contrast, artistic effects like blur and distortion, and stylized effects like halftone and sepia.
3. Non-Destructive Editing:
- One of the strengths of applying bitmap effects in CorelDRAW is the non-destructive nature of the edits. Users can experiment with different effects without permanently altering the original image, providing a flexible and iterative workflow.
Leveraging Bitmap Effects as Lenses
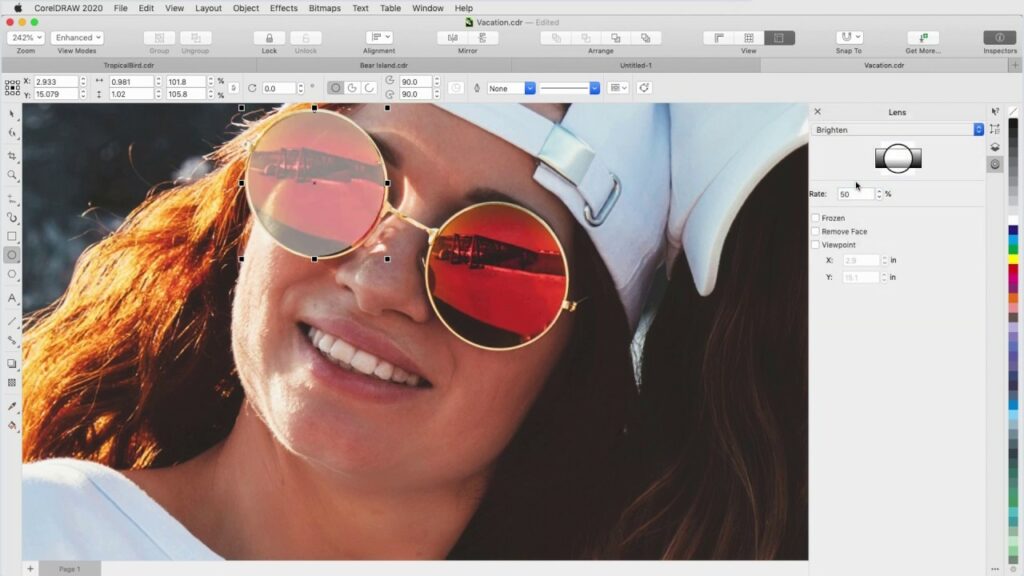
1. Lens Feature Overview:
- The Lens feature in CorelDRAW allows users to apply bitmap effects as lenses. This feature transforms the way effects interact with images, offering a dynamic and interactive approach to editing.
2. Interactive Application:
- Applying bitmap effects as lenses introduces an interactive element to the design process. Users can adjust the position, size, and intensity of the lens, observing real-time changes to the image.
3. Real-Time Preview:
- CorelDRAW’s real-time preview feature enables users to see the impact of applied lenses instantly. This facilitates a responsive and efficient editing experience, allowing for quick adjustments to achieve the desired visual effect.
Step-by-Step Guide: Applying Bitmap Effects as Lenses
Step 1: Open CorelDRAW and Load Image
- Launch CorelDRAW and open the image on which you want to apply bitmap effects as lenses.
Step 2: Access Bitmap Effects
- Navigate to the “Bitmaps” menu and select “Effects” to access the extensive array of bitmap effects available in CorelDRAW.
Step 3: Choose Bitmap Effect
- Select the desired bitmap effect from the list. Experiment with different effects to find the one that complements your artistic vision.
Step 4: Apply Effect as Lens
- With the chosen effect, click on the “Apply as Lens” button. This transforms the bitmap effect into an interactive lens that hovers over the image.
Step 5: Adjust Lens Parameters
- Use the interactive handles on the lens to adjust its size, position, and intensity. CorelDRAW’s responsive interface allows for real-time adjustments, providing immediate visual feedback.
Step 6: Fine-Tune and Experiment
- Fine-tune the effect by exploring additional parameters and experimenting with different combinations. The non-destructive nature of the lens allows for iterative adjustments until the desired outcome is achieved.
Step 7: Finalize and Save
- Once satisfied with the applied bitmap effect as a lens, finalize your edits and save the image. CorelDRAW allows users to save the edited image in various formats, preserving the original quality and the applied enhancements.
Creative Insights and Tips
1. Layering Effects:
- Combine multiple bitmap effects applied as lenses to create intricate and layered visual compositions. Experiment with stacking effects to achieve unique and captivating results.
2. Blend with Original Image:
- Adjust the transparency of the lens to blend the applied effect seamlessly with the original image. This technique adds subtlety and depth to the visual impact.
3. Dynamic Textures:
- Use bitmap effects as lenses to add dynamic textures to images. Effects like grain, halftone, or mosaic can introduce intriguing textures that transform the overall aesthetic.
4. Experiment with Color:
- Apply color adjustments as lenses to experiment with tonal variations. This technique is particularly effective for creating mood changes and emphasizing specific elements within an image.
5. Interactive Collaboration:
- Collaborate interactively with clients or team members by showcasing real-time previews of applied lenses. This collaborative approach streamlines decision-making processes and ensures that everyone is on the same creative page.
Conclusion
Applying bitmap effects as lenses in CorelDRAW transcends traditional image editing, offering a dynamic and interactive dimension to the design process. This comprehensive guide, enriched with insights into the basics, leveraging techniques, and creative tips, equips designers with the tools to push the boundaries of visual expression. CorelDRAW’s innovative approach to bitmap effects as lenses empowers artists and designers to craft visuals that resonate with depth, texture, and nuanced creativity. As you embark on your design endeavors, let the marriage of bitmap effects and lenses in CorelDRAW become a catalyst for artistic exploration and visual storytelling.


