Optimizing Power Management: A Comprehensive Guide to Configuring Power Plans in Windows 7
Efficient power management is crucial for both conserving energy and optimizing the performance of your computer. Windows 7 offers a robust set of power management tools, including power plans, which allow users to customize and control how their computer consumes energy. In this extensive guide, we will explore the intricacies of configuring power plans in Windows 7, empowering you to strike the perfect balance between performance and energy efficiency.
Understanding Power Plans:
Before delving into the configuration process, it’s essential to understand what power plans are and how they work:
- Power Plans Overview: Power plans, also known as power schemes, are sets of hardware and system settings that govern the power usage behavior of your computer. Each power plan consists of predefined settings for parameters such as display brightness, sleep mode, and processor performance.
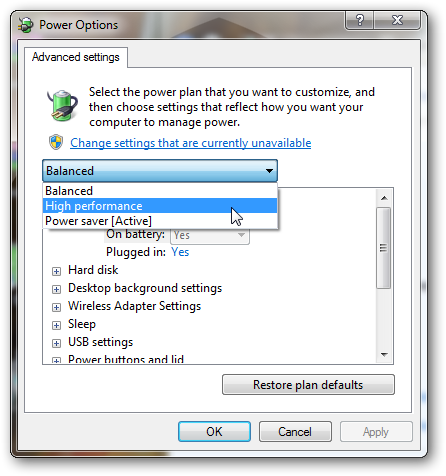
- Types of Power Plans: Windows 7 includes three default power plans: Balanced, Power Saver, and High Performance. Each power plan is designed to cater to different user needs and preferences, ranging from energy conservation to maximum performance.
- Customization Options: In addition to the default power plans, users can create custom power plans tailored to their specific requirements. Custom power plans allow for finer control over power management settings, enabling users to optimize power usage according to their unique usage patterns and preferences.
Configuring Power Plans:
Now, let’s delve into the step-by-step process of configuring power plans in Windows 7:
- Access Power Options:
- Click on the Start button in the taskbar.
- Type “Power Options” in the search box and press Enter.
- Alternatively, navigate to “Control Panel” > “System and Security” > “Power Options.”
- Select a Power Plan:
- In the Power Options window, you’ll see a list of available power plans. Click on the arrow next to each plan to expand its settings.
- Choose the power plan that best suits your needs by clicking on it. The selected power plan will be applied immediately.
- Customize Power Plan Settings:
- To customize the settings of the selected power plan, click on the “Change plan settings” link next to the plan.
- Adjust the settings according to your preferences. Common settings include:
- Turn off the display: Set the amount of time before the display turns off when the computer is idle.
- Put the computer to sleep: Specify the duration of inactivity before the computer enters sleep mode.
- Adjust screen brightness: Customize the brightness level of the display to optimize energy usage.
- Processor power management: Configure settings related to processor performance and energy efficiency.
- Create a Custom Power Plan:
- If the default power plans do not meet your specific requirements, you can create a custom power plan.
- In the Power Options window, click on the “Create a power plan” link in the left-hand pane.
- Follow the on-screen instructions to configure and customize the settings of the new power plan, including its name and power-saving preferences.
- Save Changes:
- Once you’ve configured the power plan settings to your satisfaction, click on the “Save changes” button to apply the changes.
- The customized power plan will now be listed alongside the default power plans in the Power Options window.
Advanced Power Management Features:
In addition to the basic power plan settings, Windows 7 offers advanced power management features to further optimize energy usage and performance:
- Advanced Power Options:
- In the Power Options window, click on the “Change advanced power settings” link to access advanced power settings.
- Here, you can customize additional power management settings, including processor power management, PCI Express settings, and USB selective suspend settings.
- Battery Saver Feature:
- For laptop users, Windows 7 includes a Battery Saver feature that automatically adjusts system settings to conserve battery life when the battery level is low.
- You can customize the Battery Saver settings by clicking on the battery icon in the system tray and selecting “Power Options.”
- Hibernate Mode:
- Hibernate mode is a power-saving feature that saves the current state of your computer to the hard disk and shuts down the computer.
- To enable or configure Hibernate mode, go to the Power Options window and click on “Choose what the power buttons do” in the left-hand pane.
Conclusion:
Configuring power plans in Windows 7 is essential for optimizing energy usage, extending battery life, and maximizing performance. By following the comprehensive guide outlined above, you can easily customize power plan settings to suit your specific requirements and preferences. Whether you prioritize energy conservation, performance, or a balance of both, Windows 7 provides the tools and flexibility to tailor power management to your needs. So take control of your computer’s power usage today and unlock the full potential of your Windows 7 system with optimized power plans.


