Navigating Design Precision: A Comprehensive Exploration of Previewing Traced Results in CorelDRAW
Introduction: CorelDRAW, renowned for its robust suite of design tools, empowers users with features that cater to both precision and creativity. Among these, the ability to preview traced results stands as a pivotal feature, allowing designers to fine-tune and assess the outcome before committing to the final transformation. In this extensive article, we delve into the intricacies of previewing traced results in CorelDRAW, unraveling the methods, advantages, and the pivotal role this feature plays in achieving design perfection.
Understanding the Significance of Previewing Traced Results: Previewing traced results is a fundamental step in the bitmap-to-vector transformation process within CorelDRAW. This feature enables designers to visualize the impact of their tracing settings in real-time, offering an opportunity to make immediate adjustments and refine the outcome before finalizing the conversion. By providing a glimpse into the potential vectorized version of the image, designers can ensure that the traced result aligns with their creative vision and meets the specific requirements of the design project.
Step-by-Step Guide to Previewing Traced Results in CorelDRAW:
- Import Bitmap Image:
- Initiate the tracing process by importing the desired bitmap image into your CorelDRAW workspace. Navigate to “File” > “Import” and select the image you wish to trace.
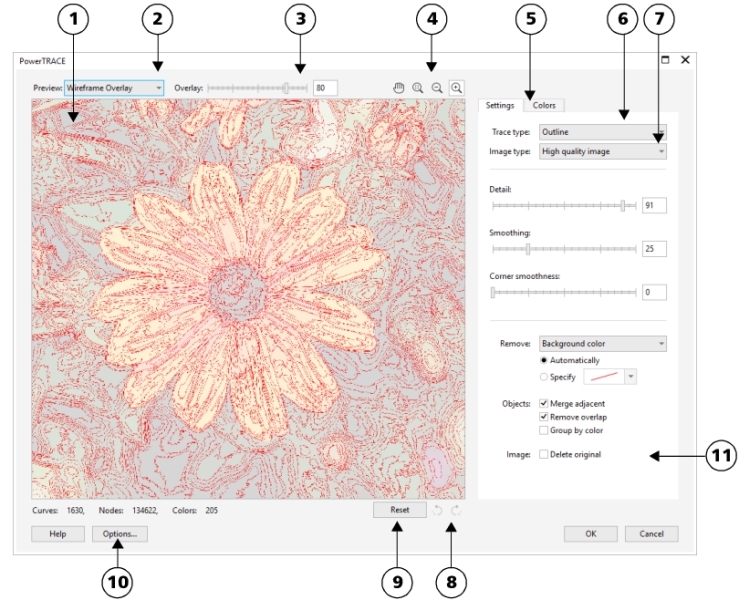
- Access PowerTRACE:
- Activate the PowerTRACE tool by navigating to the “Bitmaps” menu and selecting the “Trace Bitmap” or “PowerTRACE” option, depending on your CorelDRAW version.
- Choose Tracing Method and Adjust Settings:
- Choose the preferred tracing method based on the characteristics of the original image. Adjust relevant settings such as Detail, Smoothing, and Corner Smoothness to fine-tune the tracing parameters.
- Enable Preview Mode:
- Before committing to the trace, enable the preview mode. CorelDRAW typically provides a checkbox or toggle that activates real-time previewing, allowing designers to see the traced result alongside the original bitmap.
- Make Iterative Adjustments:
- With the preview mode active, make iterative adjustments to the tracing settings. Observe how changes impact the traced result and assess whether the level of detail, smoothness, and other parameters align with the desired outcome.
- Zoom and Pan:
- Utilize the zoom and pan tools to closely inspect specific areas of the preview. This ensures a detailed examination of the traced result, allowing designers to identify and address any anomalies or imperfections.
- Compare with Original Image:
- Use the preview mode to compare the traced result with the original bitmap. This facilitates a side-by-side evaluation, enabling designers to ensure that important details are retained and that the overall transformation aligns with their creative intent.
- Apply Final Adjustments:
- After thorough examination and adjustment, apply the final settings by confirming the trace. The previewed adjustments are incorporated into the vectorized version of the image.
Advantages of Previewing Traced Results:
- Real-Time Assessment:
- Real-time previewing provides designers with an immediate visual assessment of the traced result, enabling them to make informed decisions and refine settings on the fly.
- Iterative Fine-Tuning:
- The preview mode supports iterative fine-tuning, allowing designers to experiment with different settings and observe their impact before committing to the final trace.
- Visual Consistency:
- Previewing ensures visual consistency between the traced result and the original image, helping designers maintain essential details, contours, and overall aesthetics.
- Efficient Workflow:
- The ability to preview traced results streamlines the workflow, reducing the need for backtracking and reiteration. Designers can make informed decisions at each step, enhancing overall efficiency.
Considerations and Tips for Effective Previewing:
- Utilize Multiple Views:
- CorelDRAW often provides options for multiple views, allowing designers to simultaneously see the original bitmap, the traced result, and adjustments made in real-time.
- Check Detail Preservation:
- Pay attention to how details are preserved during the preview. Ensure that important elements of the image are accurately represented in the traced result.
- Evaluate Smoothness:
- Assess the smoothness of curves and lines in the traced result. Previewing helps identify any jagged edges or anomalies that may require adjustment.
- Consider File Size:
- Previewing allows designers to gauge the potential file size of the traced result. This consideration is crucial, especially for projects with specific size constraints.
Conclusion: In conclusion, the ability to preview traced results in CorelDRAW is a testament to the software’s commitment to providing designers with a dynamic and intuitive design experience. This comprehensive exploration has delved into the step-by-step process, advantages, and considerations associated with previewing traced results. As designers continue to navigate the complex landscape of graphic design, mastering the art of previewing becomes instrumental in achieving precision, efficiency, and creative excellence. Whether crafting detailed illustrations, refining logos, or working on diverse design projects, the journey into previewing traced results within CorelDRAW is a captivating exploration of design refinement and real-time decision-making.


