Mastering the Art of 3D Keying in DaVinci Resolve: A Comprehensive Guide
Introduction: The ability to extract subjects from their backgrounds with precision and finesse is a fundamental skill in the realm of visual storytelling. In the world of filmmaking, this process, known as keying, has evolved alongside advancements in technology, offering filmmakers powerful tools to composite subjects seamlessly into diverse environments. In this comprehensive guide, we delve into the intricacies of using the 3D keyer in DaVinci Resolve, empowering users to master the art of extraction and integration with unparalleled depth and accuracy.
Section 1: Understanding the Fundamentals of Keying Before delving into the nuances of 3D keying, it’s essential to grasp the foundational concepts of keying and its significance in the post-production workflow. This section provides an overview of keying techniques, including chroma keying, luma keying, and alpha channel keying, elucidating the principles of color contrast, luminance separation, and transparency manipulation.
- Chroma keying: Chroma keying involves isolating a subject based on color, typically against a green or blue backdrop, and removing the background to replace it with a different image or video. Understand the importance of consistent lighting, color spill suppression, and fine-tuning parameters such as hue, saturation, and spill correction to achieve clean, artifact-free keying results.
- Luma keying: Luma keying relies on differences in brightness or luminance values to isolate a subject from its background. Explore techniques for adjusting luminance thresholds, softening edges, and refining matte edges to achieve seamless integration with minimal spill or artifacts.
- Alpha channel keying: Alpha channel keying leverages pre-rendered alpha channels or masks to define transparency information for compositing purposes. Learn how to generate and refine alpha channels, apply matte controls, and composite subjects into diverse backgrounds with precision and flexibility.
Section 2: Introducing the 3D Keyer in DaVinci Resolve DaVinci Resolve’s 3D keyer represents a paradigm shift in the realm of keying technology, offering users unparalleled control and accuracy in extracting subjects from complex backgrounds. This section explores the capabilities and functionalities of the 3D keyer, highlighting its innovative approach to keying and compositing within the DaVinci Resolve environment.
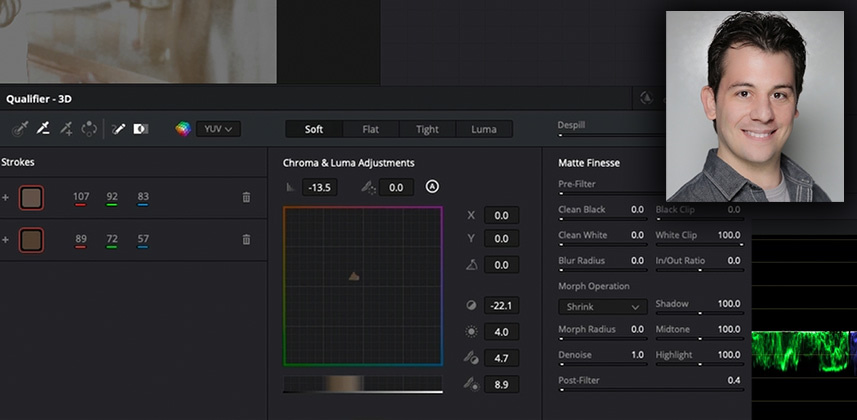
- Overview of the 3D keyer interface: Familiarize yourself with the layout and navigation of the 3D keyer interface within DaVinci Resolve’s Color page. Explore the various toolsets, parameters, and controls available for fine-tuning keying operations, including matte manipulation, spill suppression, and edge refinement.
- Advanced keying techniques: Unlock the full potential of the 3D keyer by mastering advanced keying techniques and workflows. Learn how to tackle challenging keying scenarios, such as hair and fine details, semi-transparent elements, and complex motion blur, using sophisticated tools such as despill, degrain, and pixel analysis.
Section 3: Keying Workflow in DaVinci Resolve With a solid understanding of keying fundamentals and the capabilities of the 3D keyer, it’s time to embark on the keying workflow within DaVinci Resolve. This section guides users through the step-by-step process of keying subjects, refining mattes, and integrating them into diverse backgrounds with precision and finesse.
- Pre-processing and preparation: Lay the groundwork for successful keying by optimizing your footage through pre-processing techniques such as color correction, noise reduction, and sharpening. Ensure consistent lighting, exposure, and contrast to facilitate accurate keying and minimize artifacts.
- Keying and matte refinement: Utilize the 3D keyer’s robust toolset to extract subjects from their backgrounds with precision and accuracy. Explore techniques for adjusting keying parameters, refining matte edges, and suppressing color spill to achieve clean, professional-quality results.
- Compositing and integration: Seamlessly integrate keyed subjects into diverse backgrounds using DaVinci Resolve’s powerful compositing tools and techniques. Experiment with blending modes, layer masks, and adjustment layers to fine-tune color and contrast, match lighting conditions, and enhance realism for a cohesive final composition.
Section 4: Advanced Keying Tips and Tricks Elevate your keying proficiency to the next level with advanced tips and tricks that unlock new creative possibilities and streamline your workflow. This section offers insights into overcoming common keying challenges, optimizing performance, and harnessing DaVinci Resolve’s advanced features for unparalleled keying results.
- Keying fine details and hair: Tackle challenging keying scenarios involving fine details and hair with precision and finesse. Explore techniques for preserving fine details, refining matte edges, and utilizing specialized tools such as the detail picker and matte finesse controls to achieve natural-looking results.
- Keying semi-transparent elements: Navigate the complexities of keying semi-transparent elements, such as glass, smoke, or water, with confidence and accuracy. Learn how to adjust keying parameters, manipulate alpha channels, and apply blending modes to seamlessly integrate semi-transparent subjects into your compositions.
- Keying in motion: Overcome the challenges of keying in motion by leveraging DaVinci Resolve’s motion estimation and tracking capabilities. Explore techniques for stabilizing footage, tracking subject movement, and applying dynamic keying adjustments to maintain accuracy and consistency across frames.
Section 5: Troubleshooting and Problem-Solving Even with meticulous preparation and execution, keying challenges may arise during the post-production process. This section equips users with troubleshooting strategies and problem-solving techniques to address common keying issues and achieve optimal results in DaVinci Resolve.
- Dealing with spill and color contamination: Mitigate color spill and contamination artifacts caused by reflective surfaces, uneven lighting, or proximity to colored backgrounds. Explore techniques for spill suppression, color correction, and matte refinement to eliminate unwanted color fringing and ensure clean, accurate keying results.
- Handling edge artifacts and matte discrepancies: Address edge artifacts, such as haloing, fringing, or feathering, that may occur during the keying process. Learn how to fine-tune matte parameters, adjust feathering and choke settings, and utilize edge refinement tools to achieve smooth, seamless transitions between keyed subjects and their backgrounds.
- Optimizing performance and efficiency: Streamline your keying workflow and optimize performance in DaVinci Resolve by implementing best practices and efficiency-enhancing techniques. Explore strategies for managing complex projects, optimizing system resources, and leveraging caching and proxy workflows to maximize productivity and minimize render times.
Section 6: Case Studies and Real-World Applications Gain inspiration and insight from real-world examples and case studies that demonstrate the versatility and creative potential of the 3D keyer in DaVinci Resolve. This section showcases innovative keying techniques employed in various contexts, from film and television productions to commercial advertisements and music videos.
- Film and television production: Explore how filmmakers leverage the 3D keyer in DaVinci Resolve to seamlessly integrate actors into fantastical environments, transport audiences to immersive worlds, and bring cinematic visions to life with unprecedented realism and impact.
- Commercial advertising: Discover how advertisers harness the power of the 3D keyer to create eye-catching product placements, integrate branded elements into live-action footage, and craft compelling narratives that resonate with target audiences and drive engagement and sales.
- Music videos and visual effects: Experience the creative possibilities of the 3D keyer in music videos and visual effects productions, where artists push the boundaries of imagination and technology to create surreal, otherworldly imagery that captivates and inspires viewers.
Conclusion: The 3D keyer in DaVinci Resolve represents a pinnacle of innovation and sophistication in the realm of visual effects and post-production. By mastering the art of keying, users unlock a world of creative possibilities, empowering them to seamlessly integrate subjects into diverse environments, realize cinematic visions with unparalleled realism, and captivate audiences with immersive storytelling and visual spectacle. Embrace the journey of exploration and discovery, and let DaVinci Resolve be your gateway to limitless creativity and artistic excellence in the realm of keying and compositing.


