Mastering Text Alignment: A Comprehensive Guide to Aligning Text in Word XP
Microsoft Word XP, also known as Word 2002, offers users a wide range of formatting options to customize the appearance of their documents. Among these options, text alignment plays a crucial role in creating visually appealing and well-organized documents. In this extensive guide, we’ll explore the various text alignment options available in Word XP, providing you with the knowledge and techniques to align text with precision and finesse.
Understanding Text Alignment:
Text alignment refers to the positioning of text within a document relative to its margins or other elements. Proper text alignment enhances readability, clarity, and visual appeal, making it an essential aspect of document formatting.
1. Left Alignment:
Left alignment, also known as “flush left,” aligns text along the left margin of the document. In Word XP, left alignment is the default setting for most documents. It creates a smooth and consistent left edge, making the text easy to read and follow.
How to Left Align Text:
- Select the text you want to align.
- Click on the “Align Left” button on the Formatting Toolbar.
- Alternatively, you can use the keyboard shortcut Ctrl + L to left align text.
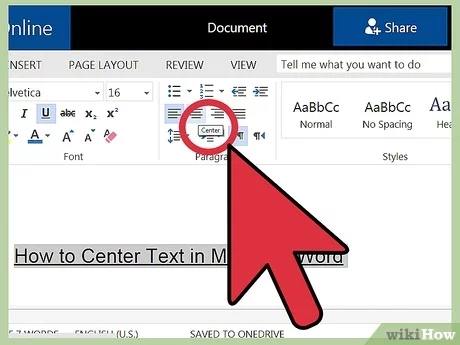
2. Center Alignment:
Center alignment positions text evenly between the left and right margins of the document. It creates a balanced and symmetrical appearance, making it ideal for titles, headings, and other prominent text elements.
How to Center Align Text:
- Select the text you want to align.
- Click on the “Center” button on the Formatting Toolbar.
- Alternatively, you can use the keyboard shortcut Ctrl + E to center align text.
3. Right Alignment:
Right alignment, also known as “flush right,” aligns text along the right margin of the document. It creates a smooth and consistent right edge, making it useful for captions, labels, and other text elements that need to be aligned with the right margin.
How to Right Align Text:
- Select the text you want to align.
- Click on the “Align Right” button on the Formatting Toolbar.
- Alternatively, you can use the keyboard shortcut Ctrl + R to right align text.
4. Justify Alignment:
Justify alignment aligns text evenly along both the left and right margins of the document. It creates a clean and uniform appearance, with each line of text extending to the full width of the text area.
How to Justify Align Text:
- Select the text you want to align.
- Click on the “Justify” button on the Formatting Toolbar.
- Alternatively, you can use the keyboard shortcut Ctrl + J to justify align text.
5. Distributed Alignment:
Distributed alignment, available in Word XP, evenly distributes the space between each character in the selected text. It creates a uniform appearance, similar to justified alignment, but with slightly looser spacing between characters.
How to Distribute Align Text:
- Select the text you want to align.
- Click on the “Distributed” button on the Formatting Toolbar.
Customizing Text Alignment:
In addition to the standard alignment options, Word XP offers users the flexibility to customize text alignment further. Users can adjust indentation, line spacing, and other formatting settings to achieve the desired appearance for their documents.
Conclusion:
Mastering text alignment is essential for creating polished and professional-looking documents in Word XP. Whether you’re formatting a report, crafting a letter, or designing a brochure, understanding how to align text effectively will enhance the readability and visual appeal of your documents. By utilizing the various alignment options and customizing formatting settings to suit your needs, you can elevate the quality of your documents and impress your audience with clear and well-organized text.


