Mastering SolidWorks: A Comprehensive Guide to Creating Holes
Introduction: SolidWorks, a leading computer-aided design (CAD) software, provides engineers and designers with powerful tools to create precise 3D models for various industries. Among its essential features is the ability to create holes, a fundamental operation necessary for designing parts that require fastening, assembly, or fluid passage. In this extensive guide, we’ll explore the intricacies of creating holes in SolidWorks, covering fundamental concepts, essential techniques, and advanced strategies to help you master this fundamental aspect of CAD design.
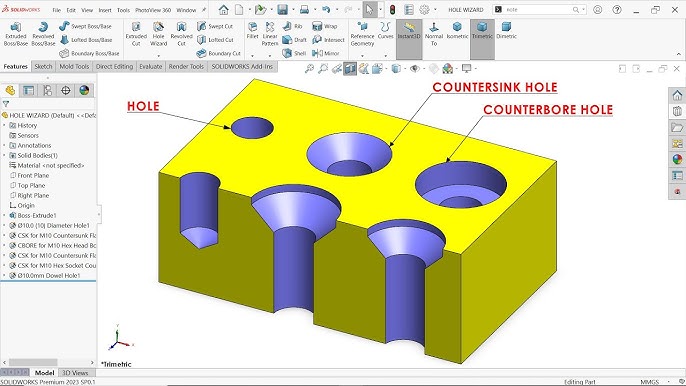
Understanding Holes in SolidWorks: Holes in SolidWorks are defined features that remove material from a part to create openings or voids. These openings can serve various purposes, including accommodating fasteners such as bolts and screws, providing access for wires or cables, or allowing fluids to pass through components. Before delving into the specifics of creating holes, it’s crucial to grasp some foundational concepts:
- Sketching:
- Sketching serves as the basis of design in SolidWorks, allowing users to create 2D profiles that define the shape and dimensions of features. Sketch entities such as lines, arcs, circles, and rectangles are used to create sketch geometry.
- Hole Wizard:
- The Hole Wizard is a specialized tool in SolidWorks that provides a streamlined workflow for creating standard holes, such as counterbores, countersinks, and tapped holes. It offers a library of predefined hole types with customizable parameters.
- Cut Extrude:
- The Cut Extrude feature in SolidWorks allows users to remove material from a part by extruding a sketch profile through the solid geometry. This method is used to create custom holes with non-standard shapes or dimensions.
Creating Holes in SolidWorks: SolidWorks offers multiple methods for creating holes, each suited to different design requirements and preferences. Let’s explore the essential tools and techniques for generating holes:
- Hole Wizard:
- The Hole Wizard is the preferred method for creating standard holes in SolidWorks. Users can access the Hole Wizard from the Insert menu and choose from a variety of predefined hole types, including counterbore, countersink, and tapped holes. The Hole Wizard guides users through the selection of hole type, size, depth, and placement, ensuring accuracy and consistency.
- Cut Extrude:
- For custom or non-standard holes, the Cut Extrude feature provides greater flexibility and control. Users begin by creating a sketch of the hole profile on a suitable plane or surface. The sketch is then extruded through the part using the Cut Extrude command, removing material and creating the desired hole.
- Hole Series:
- SolidWorks allows users to create multiple instances of the same hole type using the Hole Series feature. Users can specify parameters such as hole spacing, pattern type, and quantity to generate a series of holes quickly and efficiently.
Advanced Hole Creation Techniques: In addition to basic hole creation methods, SolidWorks offers advanced techniques to enhance hole creation workflows and achieve complex design objectives:
- Pattern Driven Hole:
- The Pattern Driven Hole feature allows users to create holes that follow a specified pattern or path. This method is useful for creating holes along curved or irregular surfaces or for replicating hole patterns from imported geometry.
- Hole Alignment:
- SolidWorks provides tools for aligning holes with existing geometry or reference features within a part. Users can specify alignment options such as concentric, coincident, or distance-based alignment to ensure accurate hole placement.
- Hole Callouts and Annotations:
- After creating holes in a SolidWorks part, users can add callouts and annotations to document the hole dimensions, type, and specifications. This information is essential for communicating design intent and manufacturing requirements to stakeholders and collaborators.
Best Practices for Hole Creation: To maximize efficiency and maintain design integrity when creating holes in SolidWorks, it’s essential to adhere to best practices:
- Design Intent:
- Consider the functional requirements and manufacturing constraints of your design when creating holes. Design with future modifications and assembly considerations in mind to ensure the longevity and versatility of your parts.
- Standardization:
- Whenever possible, use standard hole types and sizes from the Hole Wizard library to maintain consistency across your designs. Standardized holes facilitate assembly, reduce manufacturing costs, and ensure compatibility with off-the-shelf hardware.
- Dimensioning and Documentation:
- Accurately dimension and document holes in your SolidWorks models to convey design intent and facilitate manufacturing. Use hole callouts, annotations, and dimensioning tools to provide clear and comprehensive information to stakeholders and collaborators.
Conclusion: Creating holes in SolidWorks is a fundamental aspect of CAD design, enabling engineers and designers to achieve precise and functional parts for various applications. By mastering the tools and techniques for creating holes, you can enhance your design capabilities, streamline your workflow, and produce high-quality models that meet design requirements and manufacturing standards. Whether you’re a novice or an experienced SolidWorks user, understanding the principles of hole creation and applying best practices will elevate your design proficiency and enable you to realize your design visions with accuracy and efficiency.


