Mastering Shapes and Objects in Publisher 2010: A Comprehensive Guide
Introduction:
Shapes and objects are fundamental elements in the design of publications, adding visual interest, structure, and emphasis to content. Microsoft Publisher 2010 offers a robust set of tools and features for working with shapes and objects, enabling users to create dynamic layouts, incorporate illustrations, and enhance the overall visual appeal of their publications. In this extensive guide, we’ll explore every aspect of working with shapes and objects in Publisher 2010, from basic manipulation to advanced techniques and creative applications.
Section 1: Inserting and Manipulating Shapes
1.1 Inserting Shapes: Publisher 2010 provides a variety of pre-designed shapes that users can insert into their publications. To insert a shape, navigate to the “Insert” tab on the Ribbon toolbar, click on the “Shapes” button, and choose from the available shapes in the dropdown menu. Common shapes include rectangles, circles, triangles, arrows, and stars.
1.2 Resizing and Rotating Shapes: Once a shape is inserted into the publication, users can resize and rotate it to fit their design needs. Click and drag the resizing handles on the edges of the shape to adjust its size proportionally. To rotate a shape, hover over one of the rotation handles (located at the corners) until the cursor changes to a rotation icon, then click and drag to rotate the shape.
1.3 Formatting Shapes: Publisher 2010 offers extensive formatting options for customizing the appearance of shapes. Users can change the fill color, outline color, and outline weight of shapes using the formatting tools in the “Format” tab of the Ribbon toolbar. Additionally, users can apply gradients, textures, and patterns to shapes to create unique visual effects.
1.4 Grouping and Ungrouping Shapes: To streamline the design process and manage multiple shapes together, users can group them into a single object. Select the shapes you want to group, right-click, and choose “Group” from the context menu. Grouping shapes allows users to move, resize, and format them as a single unit. Conversely, users can ungroup shapes to edit them individually by selecting the grouped object and choosing “Ungroup” from the context menu.
Section 2: Adding and Editing Objects
2.1 Inserting Images: In addition to shapes, Publisher 2010 allows users to insert images, illustrations, and other objects into their publications. To insert an image, navigate to the “Insert” tab on the Ribbon toolbar, click on the “Picture” button, and select the desired image file from your computer. Images can be resized, cropped, and formatted using the image editing tools in Publisher.
2.2 Arranging Objects: Publisher 2010 offers precise control over the arrangement of objects within a publication. Users can arrange objects in layers, adjusting their position relative to one another. To change the stacking order of objects, right-click on an object and choose “Bring to Front,” “Send to Back,” or other arrangement options from the context menu.
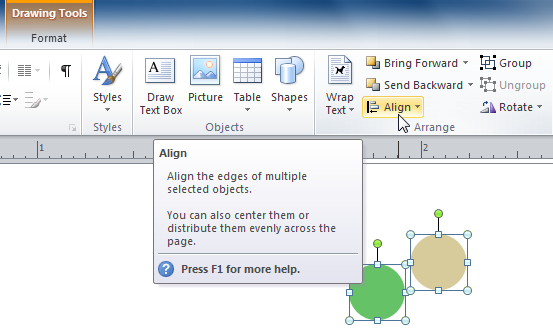
2.3 Aligning and Distributing Objects: To ensure precise alignment and spacing between objects, Publisher 2010 provides alignment and distribution tools. Users can align objects along the edges, centers, or distribution points using the alignment options in the “Format” tab of the Ribbon toolbar. Additionally, users can distribute objects evenly horizontally or vertically to achieve balanced layouts.
2.4 Customizing Object Properties: Publisher 2010 allows users to customize the properties of objects, such as fill color, outline color, transparency, and effects. Select an object, then navigate to the “Format” tab on the Ribbon toolbar to access formatting options. Users can apply shadows, reflections, and other effects to objects to enhance their visual impact.
Section 3: Advanced Techniques and Creative Applications
3.1 Creating Custom Shapes: In addition to the pre-designed shapes provided in Publisher 2010, users can create custom shapes using the drawing tools. Navigate to the “Insert” tab on the Ribbon toolbar, click on the “Shapes” button, and choose “Edit Points” to access the drawing tools. Users can draw custom shapes by clicking and dragging on the canvas, then editing the shape’s points to refine its appearance.
3.2 Using WordArt: Publisher 2010 includes WordArt tools for creating stylized text effects and typography. Users can insert WordArt objects, customize text styles, and apply artistic effects such as shadows, reflections, and 3D transformations. WordArt can be used to create eye-catching headlines, titles, and decorative text elements within publications.
3.3 Incorporating SmartArt: For visualizing concepts, processes, and relationships within publications, Publisher 2010 offers SmartArt graphics. SmartArt allows users to create diagrams, flowcharts, and organizational charts with ease. Navigate to the “Insert” tab on the Ribbon toolbar, click on the “SmartArt” button, and choose from the available SmartArt layouts to insert into your publication.
3.4 Adding Callouts and Annotations: To provide additional context or commentary within a publication, users can add callouts and annotations to shapes and objects. Callouts are text boxes with arrow pointers that can be attached to specific objects to provide explanations, labels, or captions. Annotations help clarify information and guide readers’ attention to key points within the publication.
Section 4: Best Practices and Tips
4.1 Keep it Simple: When working with shapes and objects in Publisher 2010, it’s important to avoid clutter and maintain visual clarity. Use shapes and objects sparingly, focusing on essential elements that support the overall message and design of the publication. Avoid overcrowding the layout with unnecessary decorations or distractions.
4.2 Maintain Consistency: Consistency is key to creating a cohesive and professional-looking publication. Use consistent styles, colors, and formatting for shapes and objects throughout the document to ensure visual coherence. Stick to a unified design theme and aesthetic to reinforce brand identity and improve readability.
4.3 Experiment and Explore: Don’t be afraid to experiment with different shapes, objects, and effects to discover creative possibilities. Publisher 2010 offers a wide range of tools and features for customization and personalization. Take advantage of these tools to explore new design ideas, experiment with layouts, and push the boundaries of your creativity.
4.4 Seek Inspiration: Draw inspiration from other publications, design trends, and visual resources to fuel your creativity. Explore design websites, blogs, and social media platforms for inspiration and ideas. Analyze successful publications and identify elements that resonate with your own design goals. Use inspiration as a springboard for innovation and originality in your own work.
Conclusion:
Mastering shapes and objects in Publisher 2010 opens up a world of creative possibilities for designing visually stunning and professionally polished publications. By leveraging the tools, techniques, and best practices outlined in this guide, users can create dynamic layouts, incorporate illustrations, and enhance the overall visual appeal of their publications. Whether you’re designing flyers, brochures, newsletters, or posters, Publisher 2010 provides the flexibility and versatility to bring your vision to life. With practice, experimentation, and a creative mindset, you can harness the power of shapes and objects to create publications that leave a lasting impression and drive success in your endeavors.


