Mastering Image Sharpness: A Comprehensive Guide to Sharpening Images with High Pass in Photoshop
Introduction:
The pursuit of image perfection involves a multifaceted approach, and one critical aspect is achieving optimal sharpness. Blurry or soft images can compromise the impact and clarity of your visuals. Adobe Photoshop, a cornerstone in digital image editing, offers a powerful and versatile tool known as the High Pass filter for sharpening images. In this comprehensive guide, we will explore the intricacies of sharpening images with the High Pass filter in Photoshop, unraveling the techniques, applications, and nuances that contribute to producing razor-sharp photographs.
I. Understanding Image Sharpness:
Image sharpness is a measure of the clarity and detail present in a photograph. It is influenced by factors such as focus accuracy, lens quality, camera stability, and post-processing techniques. Sharpening, as a post-processing step, aims to enhance the perceived sharpness of details within an image, making edges more defined and textures more pronounced.
A. The Role of Sharpening in Image Enhancement:
- Improving Clarity: Sharpening enhances the clarity of details, making edges and fine textures more discernible.
- Emphasizing Details: By increasing contrast along edges, sharpening draws attention to key details in a photograph.
- Compensating for Image Softening: Various factors, including image compression or resizing, can lead to a loss of sharpness. Sharpening helps compensate for such softening.
II. Introducing the High Pass Filter in Photoshop:
The High Pass filter is a sophisticated tool within Photoshop designed for sharpening images with precision. Unlike traditional sharpening methods, such as the Unsharp Mask, the High Pass filter provides a non-destructive and more controlled approach to enhancing image sharpness.
A. Accessing the High Pass Filter:
- Open your image in Photoshop.
- Duplicate the background layer to preserve the original image by right-clicking on the background layer and selecting “Duplicate Layer.”
- With the duplicated layer selected, navigate to the “Filter” menu, choose “Other,” and select “High Pass.”
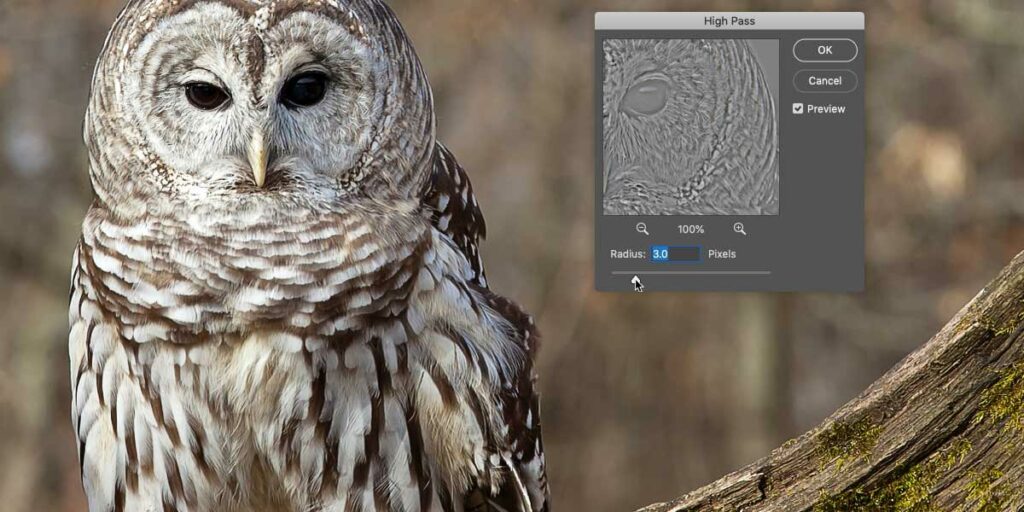
- The High Pass dialog box will appear, allowing you to adjust the radius for the desired sharpening effect.
B. Understanding the High Pass Effect:
The High Pass filter works by accentuating high-frequency details in an image, such as edges and textures, while suppressing low-frequency information. The filter highlights transitions between light and dark areas, resulting in a grayscale image where the edges stand out.
III. Step-by-Step Process for Sharpening with High Pass:
To sharpen images effectively using the High Pass filter, follow this step-by-step process:
A. Duplicate the Background Layer:
- Open your image in Photoshop.
- Duplicate the background layer to create a copy for sharpening. Right-click on the background layer and choose “Duplicate Layer.”
B. Apply the High Pass Filter:
- With the duplicated layer selected, go to the “Filter” menu, choose “Other,” and select “High Pass.”
- In the High Pass dialog box, adjust the radius slider to set the level of sharpening. A lower radius (e.g., 1-2 pixels) is suitable for fine details, while a higher radius (e.g., 5 pixels) may be used for broader edge enhancement.
- Click “OK” to apply the High Pass filter.
C. Change Blend Mode to Overlay:
- In the Layers panel, change the blend mode of the High Pass layer to “Overlay.”
- Instantly, you’ll notice a sharpening effect applied to the image.
D. Fine-Tune Opacity and Masking:
- Adjust the opacity of the High Pass layer to control the intensity of the sharpening effect. This allows for subtle or more pronounced enhancements.
- If needed, add a layer mask to the High Pass layer and use a soft brush to mask out areas where sharpening is not required. This is particularly useful for avoiding over-sharpening in smooth or gradient regions.
IV. Understanding Radius Settings in High Pass Sharpening:
The radius setting in the High Pass filter determines the size of the details that will be considered for sharpening. Understanding how to choose the appropriate radius is crucial for achieving optimal results.
A. Fine Details with Low Radius:
- A low radius (e.g., 1-2 pixels) is suitable for sharpening fine details, such as intricate textures or small objects.
- This setting enhances subtle details without introducing artifacts or harsh edges.
B. Medium Radius for General Sharpening:
- A medium radius (e.g., 3-4 pixels) is versatile for general sharpening needs.
- This setting strikes a balance, providing noticeable sharpening without overly emphasizing fine details.
C. Larger Radius for Broad Edges:
- A larger radius (e.g., 5 pixels or more) is effective for enhancing broader edges, such as those found in portraits or architectural elements.
- This setting can add a more pronounced and bold sharpening effect to emphasize key features.
V. Advanced Techniques and Considerations:
For users looking to elevate their sharpening techniques, explore advanced considerations and complementary tools within Photoshop.
A. Smart Sharpen for Additional Control:
- Use the Smart Sharpen filter in Photoshop for more advanced control over sharpening parameters.
- Adjust settings such as amount, radius, and reduce noise to tailor the sharpening effect to specific image requirements.
B. Combine High Pass with Additional Adjustments:
- Combine the High Pass filter with other adjustment layers, such as Levels or Curves, to fine-tune overall image tonality.
- This integrated approach allows for comprehensive image enhancement beyond sharpening alone.
VI. Real-World Applications: Examples and Case Studies:
To illustrate the practical application of High Pass sharpening, let’s explore real-world examples across different photographic scenarios.
A. Portrait Retouching with High Pass:
- Apply High Pass sharpening to enhance facial details, emphasizing features like eyes, lips, and hair.
- Use layer masking to selectively apply sharpening, avoiding skin areas where excessive detail may be undesirable.
B. Landscape Photography Sharpening:
- Sharpen landscape images to bring out intricate textures in elements such as rocks, foliage, or distant mountains.
- Adjust the radius based on the scale of details present in the landscape for a balanced and natural appearance.
C. Macro Photography Detail Enhancement:
- Enhance fine details in macro photography, such as the delicate textures of flower petals or insect features.
- Experiment with different radius settings to find the ideal balance between sharpness and natural appearance.
VII. Best Practices and Tips for High Pass Sharpening:
To optimize your sharpening workflow and achieve professional results, consider the following best practices and tips when using the High Pass filter in Photoshop.
A. Maintain Realism and Subtlety:
- Avoid over-sharpening, which can result in unnatural and harsh-looking images.
- Strive for a subtle and realistic sharpening effect that enhances details without creating artifacts.
B. Use High Pass as Part of a Comprehensive Workflow:
- Integrate High Pass sharpening into your overall image editing workflow.
- Combine sharpening with other adjustments and retouching techniques for a holistic approach to image enhancement.
C. Experiment with Blend Modes:
- While Overlay is a commonly used blend mode for High Pass sharpening, experiment with other blend modes to discover unique effects.
- Blend modes like Soft Light or Hard Light may produce interesting variations in sharpening results.
VIII. Conclusion:
Mastering the art of sharpening images with the High Pass filter in Photoshop is a valuable skill for photographers and digital artists seeking to elevate the quality and impact of their work. The nuanced control offered by the High Pass filter allows for precise adjustments that enhance details while maintaining a natural and realistic appearance. As you incorporate High Pass sharpening into your image editing toolkit, remember that subtlety, experimentation, and a discerning eye are key components of achieving optimal results. Transform your images into razor-sharp visual masterpieces, drawing attention to the intricate details that make each photograph a unique and compelling work of art. Explore, refine, and let your creativity thrive as you harness the power of High Pass sharpening to bring your images to new heights of clarity and impact.


