How to Replace a CMOS Battery: A Comprehensive Guide
Replacing the CMOS (Complementary Metal-Oxide-Semiconductor) battery is an essential task for maintaining the functionality and accuracy of your computer’s BIOS settings. The CMOS battery powers the BIOS firmware in your computer, allowing it to store system settings even when the computer is powered off. Over time, this battery can lose its charge and need replacement. This comprehensive guide will walk you through everything you need to know about replacing a CMOS battery.
Table of Contents
- Understanding the CMOS Battery
- What is a CMOS Battery?
- Importance of the CMOS Battery
- Signs that Your CMOS Battery Needs Replacement
- Types of CMOS Batteries
- Common Types of CMOS Batteries
- How to Identify Your CMOS Battery Type
- Pre-Replacement Preparation
- Tools and Materials Needed
- Ensuring Compatibility
- Safety Precautions
- Step-by-Step Replacement Guide
- Accessing the CMOS Battery
- Removing the Old CMOS Battery
- Installing the New CMOS Battery
- Post-Replacement Steps
- Configuring BIOS Settings
- Testing the System
- Troubleshooting Common Issues
- BIOS Not Retaining Settings
- Computer Not Booting
- Incorrect Date and Time
- Best Practices for Maintaining Your CMOS Battery
- Regular Inspections
- Periodic Replacements
- Safe Handling and Disposal
- Conclusion
1. Understanding the CMOS Battery
What is a CMOS Battery?
The CMOS battery is a small, coin-shaped battery located on the motherboard of most computers. Its primary function is to power the CMOS chip, which stores the BIOS settings, including system time and date, hardware configurations, and boot order.
Importance of the CMOS Battery
The CMOS battery ensures that your computer retains important system settings even when powered off. Without a functioning CMOS battery, your BIOS settings would reset every time you shut down your computer, leading to potential system errors and configuration issues.
Signs that Your CMOS Battery Needs Replacement
- Incorrect Date and Time: If your computer’s date and time reset frequently, it’s a strong indication that the CMOS battery is failing.
- BIOS Settings Reset: If you notice that your BIOS settings are not being retained, such as boot order changes or hardware configurations resetting, the CMOS battery may need replacement.
- Error Messages: You might encounter error messages related to CMOS settings during the boot process.
- System Clock Error: Repeated system clock errors can also signal a failing CMOS battery.
2. Types of CMOS Batteries
Common Types of CMOS Batteries
- CR2032: The most common type of CMOS battery, used in most desktop and laptop motherboards.
- CR2025: Slightly thinner than the CR2032, used in some laptops and older desktops.
- CR2016: Thinner and smaller, used in some ultra-compact devices.
How to Identify Your CMOS Battery Type
- Consult the Manual: The motherboard or laptop manual often specifies the type of CMOS battery used.
- Visual Inspection: Open the computer case and inspect the battery. The type (e.g., CR2032) is usually printed on the battery itself.
- Check Manufacturer’s Website: If the manual is unavailable, the manufacturer’s website may provide the necessary information.
3. Pre-Replacement Preparation
Tools and Materials Needed
- Replacement CMOS battery (ensure it is the correct type)
- Phillips-head screwdriver (for desktop cases)
- Anti-static wrist strap (optional but recommended)
- Small plastic pry tool (optional, for laptops)
- Flashlight (for better visibility inside the case)
Ensuring Compatibility
- Verify the type of CMOS battery required for your specific motherboard or laptop model.
- Purchase a reputable brand to ensure reliability and longevity.
Safety Precautions
- Power Off and Unplug: Ensure your computer is powered off and unplugged from the power source.
- Discharge Static Electricity: Use an anti-static wrist strap or touch a grounded metal object to prevent static discharge.
- Organize Your Workspace: Work in a clean, well-lit area to avoid losing small components.
4. Step-by-Step Replacement Guide
Accessing the CMOS Battery
For Desktop Computers:
- Power Down and Unplug: Ensure the computer is turned off and unplugged.
- Remove the Side Panel: Use a Phillips-head screwdriver to remove the screws securing the side panel of the case.
- Locate the CMOS Battery: The battery is usually located near the center of the motherboard, often near the PCIe slots or the BIOS chip.
For Laptops:
- Power Down and Unplug: Ensure the laptop is turned off and unplugged.
- Remove the Bottom Panel: Use a Phillips-head screwdriver to remove the screws securing the bottom panel. In some models, you may need to remove the battery first.
- Locate the CMOS Battery: The battery is often found near the RAM slots or under the keyboard, depending on the laptop model. Consult the manual for specific instructions.
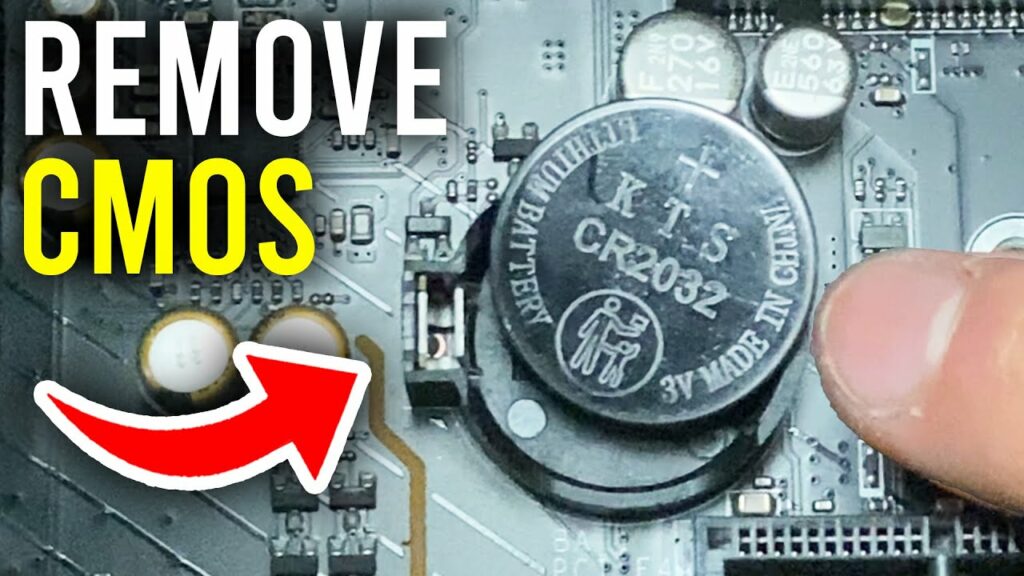
Removing the Old CMOS Battery
- Identify the Battery Holder: Most CMOS batteries are held in place by a metal or plastic clip.
- Release the Clip: Gently push the clip away from the battery. The battery should pop up slightly.
- Remove the Battery: Carefully lift the battery out of its socket. Use a small plastic pry tool if necessary to avoid damaging the motherboard.
Installing the New CMOS Battery
- Orient the Battery: Ensure the new battery is oriented correctly. The positive side (+) should face up.
- Insert the Battery: Place the battery into the socket and gently press it down until it snaps into place.
- Secure the Clip: Ensure the clip is holding the battery firmly.
5. Post-Replacement Steps
Configuring BIOS Settings
- Power On the Computer: Plug in and power on the computer.
- Enter BIOS Setup: Press the appropriate key (often Delete, F2, or Esc) during the boot process to enter the BIOS setup.
- Set Date and Time: Navigate to the Date and Time settings and adjust them as needed.
- Load Default Settings: If necessary, load the default BIOS settings and then customize any specific configurations (boot order, hardware settings, etc.).
- Save and Exit: Save the changes and exit the BIOS setup.
Testing the System
- Boot the Computer: Allow the computer to boot into the operating system.
- Verify Date and Time: Ensure the system date and time are correct.
- Check BIOS Settings: Reboot and enter the BIOS to confirm that your settings are retained.
6. Troubleshooting Common Issues
BIOS Not Retaining Settings
- Check Battery Installation: Ensure the new battery is installed correctly and securely.
- Inspect Battery: Verify that the battery is not defective. Try a different battery if necessary.
- BIOS Update: Consider updating the BIOS firmware if the problem persists.
Computer Not Booting
- Double-Check Connections: Ensure all cables and components are properly connected.
- Clear CMOS: Try clearing the CMOS settings using the jumper on the motherboard (refer to the manual for instructions).
- Reinstall Old Battery: Reinstall the old battery to see if the new battery is causing the issue.
Incorrect Date and Time
- Check BIOS Settings: Ensure the date and time are correctly set in the BIOS.
- Inspect Battery: Verify that the battery is properly installed and not defective.
7. Best Practices for Maintaining Your CMOS Battery
Regular Inspections
- Periodically check the battery’s condition, especially if you notice any timekeeping issues.
- Inspect the battery for any signs of corrosion or leakage.
Periodic Replacements
- Replace the CMOS battery every 3-5 years to ensure consistent performance.
- Keep a spare CMOS battery on hand for quick replacements.
Safe Handling and Disposal
- Avoid Short Circuits: Handle the battery carefully to avoid short-circuiting.
- Dispose of Properly: Follow local regulations for the proper disposal of batteries. Do not dispose of in regular trash.
8. Conclusion
Replacing the CMOS battery is a relatively simple but essential task that ensures your computer maintains its BIOS settings and runs smoothly. By following this comprehensive guide, you can confidently replace your CMOS battery, troubleshoot any issues, and maintain the performance and reliability of your computer. Regular maintenance and timely replacements will help prevent potential problems and extend the life of your system. Always remember to handle components with care and follow safety precautions to avoid damage and ensure a successful replacement.


