How to Configure Fan Curves in BIOS: A Comprehensive Guide
Configuring fan curves in the BIOS is an essential task for maintaining optimal system performance and ensuring that your computer components stay within safe temperature ranges. Properly configured fan curves help in achieving a balance between effective cooling and noise levels. This comprehensive guide will walk you through the entire process of configuring fan curves in the BIOS, from understanding fan curves to troubleshooting common issues.
Table of Contents
- Understanding Fan Curves
- What are Fan Curves?
- Importance of Fan Curves
- Types of Fan Curves
- Pre-Configuration Preparation
- Tools and Materials Needed
- Ensuring Compatibility
- Safety Precautions
- Accessing the BIOS
- What is BIOS?
- How to Access the BIOS
- Navigating the BIOS
- BIOS Layout
- Locating the Fan Control Section
- Configuring Fan Curves
- Automatic Fan Control
- Manual Fan Curve Configuration
- Saving and Exiting the BIOS
- Testing and Monitoring Fan Curves
- Booting into the Operating System
- Using Software Tools for Monitoring
- Adjusting Fan Curves if Necessary
- Advanced Fan Curve Settings
- Temperature Sensors and Their Role
- Fan Profiles for Different Scenarios
- Custom Fan Profiles
- Troubleshooting Common Issues
- Fans Not Responding to Changes
- Unstable Temperatures
- Excessive Noise Levels
- Best Practices for Fan Curve Configuration
- Regular Monitoring
- Periodic Adjustments
- Maintaining Optimal Airflow
- Conclusion
1. Understanding Fan Curves
What are Fan Curves?
Fan curves are graphical representations of the relationship between the temperature of a computer component (such as the CPU or GPU) and the speed of the cooling fan. These curves determine how fast the fan spins at different temperature thresholds, allowing for dynamic adjustments based on the system’s cooling needs.
Importance of Fan Curves
Properly configured fan curves are crucial for several reasons:
- Efficient Cooling: Ensures that your system components remain within safe temperature ranges, preventing overheating and potential damage.
- Noise Reduction: Balances cooling performance with noise levels, ensuring that fans only ramp up when necessary.
- System Longevity: Reduces thermal stress on components, prolonging their lifespan.
- Energy Efficiency: Optimizes fan speed to consume less power when full cooling is not required.
Types of Fan Curves
- Linear Fan Curves: Increase fan speed linearly with temperature. Simple to configure but may not provide optimal cooling at all temperature ranges.
- Custom Fan Curves: Allow for more granular control over fan speed at specific temperature points, providing a balance between cooling performance and noise.
- Preset Fan Curves: Provided by motherboard manufacturers, offering different profiles such as Silent, Standard, and Performance.
2. Pre-Configuration Preparation
Tools and Materials Needed
- Computer with BIOS that supports fan curve configuration
- Keyboard and mouse
- Software tools for monitoring temperatures (e.g., HWMonitor, SpeedFan)
- Pen and paper for noting down default settings
Ensuring Compatibility
- Check Motherboard Manual: Ensure your motherboard supports fan curve configuration in the BIOS.
- BIOS Version: Make sure you have the latest BIOS version installed. Check the manufacturer’s website for updates.
Safety Precautions
- Backup Settings: Before making any changes, note down the default fan settings in the BIOS.
- Power Off and Unplug: Ensure your computer is powered off and unplugged before accessing the BIOS.
3. Accessing the BIOS
What is BIOS?
BIOS (Basic Input/Output System) is firmware that initializes and manages hardware components during the boot process. It provides an interface for configuring hardware settings, including fan curves.
How to Access the BIOS
- Power On Your Computer: Turn on your computer and watch for the initial splash screen.
- Enter BIOS Key: Press the BIOS access key (often Delete, F2, F10, or Esc) repeatedly during the boot process. The key varies by manufacturer, so consult your motherboard manual if unsure.
- Navigate to the BIOS Interface: Once in the BIOS, you can navigate using the keyboard.
4. Navigating the BIOS
BIOS Layout
The layout of the BIOS interface can vary depending on the manufacturer. Common sections include:
- Main: Basic system information.
- Advanced: Advanced hardware settings.
- Monitor: Hardware monitoring and fan control.
- Boot: Boot order settings.
- Exit: Options to save changes and exit the BIOS.
Locating the Fan Control Section
- Enter the Advanced Section: Navigate to the “Advanced” or “Monitor” section, depending on your BIOS layout.
- Find Fan Control Settings: Look for options such as “Hardware Monitor,” “Fan Control,” or “Smart Fan Configuration.”
5. Configuring Fan Curves
Automatic Fan Control
- Enable Smart Fan Control: In the fan control section, enable the smart fan control option. This allows the BIOS to automatically adjust fan speeds based on temperature.
- Select Preset Profiles: Choose from preset profiles such as Silent, Standard, or Performance, depending on your preference for noise and cooling efficiency.
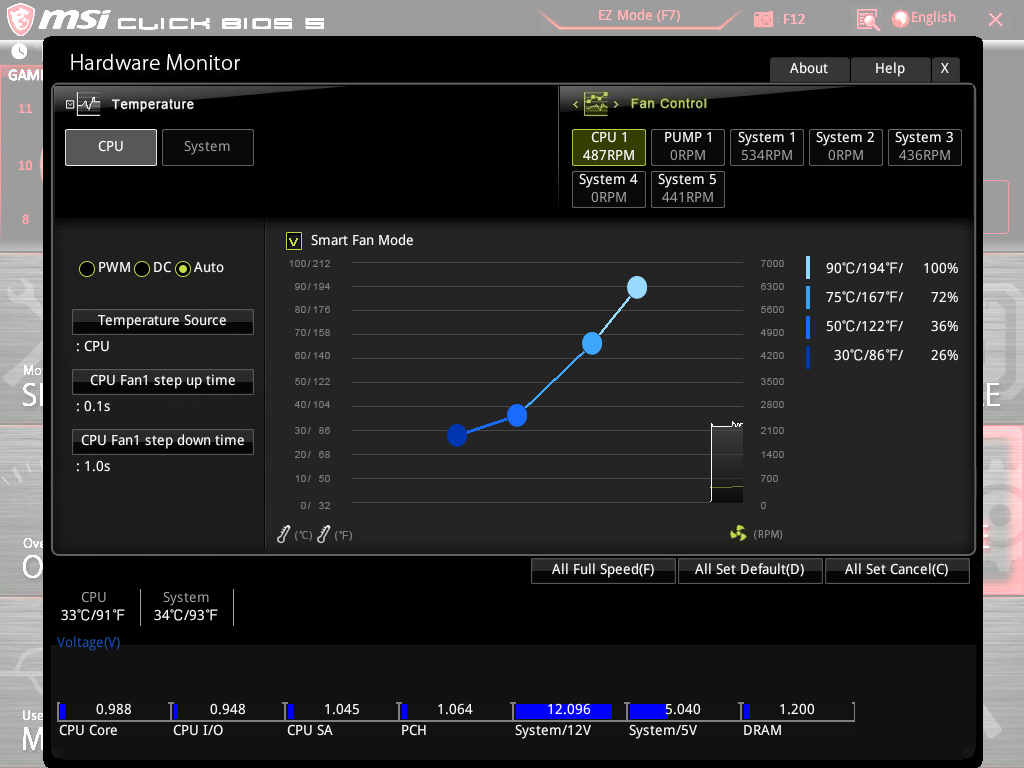
Manual Fan Curve Configuration
- Select Manual Mode: Switch the fan control to manual mode to configure custom fan curves.
- Adjust Fan Speed Points: Set specific fan speed percentages at different temperature thresholds. For example:
- 30°C: 20% fan speed
- 40°C: 40% fan speed
- 50°C: 60% fan speed
- 60°C: 80% fan speed
- 70°C: 100% fan speed
- Fine-Tune the Curve: Adjust the curve to balance between noise and cooling performance. Ensure the curve ramps up fan speed adequately at higher temperatures.
Saving and Exiting the BIOS
- Save Changes: Navigate to the “Exit” section and select “Save Changes and Exit.”
- Confirm Changes: Confirm that you want to save the changes and exit the BIOS. The system will reboot with the new fan curve settings.
6. Testing and Monitoring Fan Curves
Booting into the Operating System
- Restart Your Computer: Allow the system to boot into the operating system.
- Observe Fan Behavior: Listen for fan noise and observe if the fans ramp up as expected when the system heats up.
Using Software Tools for Monitoring
- Install Monitoring Software: Use software tools like HWMonitor, SpeedFan, or the manufacturer’s utility to monitor temperatures and fan speeds.
- Check Temperature Ranges: Ensure that the CPU, GPU, and other components stay within safe temperature ranges.
- Monitor Fan Speeds: Verify that fan speeds adjust according to the configured fan curves.
Adjusting Fan Curves if Necessary
- Re-Enter the BIOS: If adjustments are needed, re-enter the BIOS.
- Refine Fan Curves: Make necessary adjustments to the fan curves to achieve desired cooling and noise levels.
- Save and Exit: Save the changes and exit the BIOS.
7. Advanced Fan Curve Settings
Temperature Sensors and Their Role
- Understand Sensor Placement: Different temperature sensors on the motherboard and CPU provide temperature readings. Ensure you understand which sensor is used for fan control.
- Select Appropriate Sensors: In the BIOS, select the appropriate sensor for each fan. For example, CPU fans should respond to CPU temperatures.
Fan Profiles for Different Scenarios
- Create Multiple Profiles: Create different fan profiles for various scenarios, such as gaming, office work, or video editing.
- Switch Profiles Easily: Use BIOS or software utilities to switch between profiles based on current tasks.
Custom Fan Profiles
- Design Custom Profiles: Create custom fan profiles tailored to your specific needs and preferences.
- Use Software Utilities: Some motherboard manufacturers provide software utilities for creating and managing custom fan profiles within the operating system.
8. Troubleshooting Common Issues
Fans Not Responding to Changes
- Check Connections: Ensure fans are properly connected to the motherboard headers.
- Update BIOS: Ensure you have the latest BIOS version installed.
- Verify Settings: Double-check BIOS settings to ensure fan control is enabled and configured correctly.
Unstable Temperatures
- Check Thermal Paste: Ensure the CPU cooler is properly installed with adequate thermal paste.
- Improve Airflow: Ensure proper airflow within the case by managing cables and adding additional fans if necessary.
- Monitor Temperatures: Use monitoring software to keep an eye on temperature fluctuations and adjust fan curves accordingly.
Excessive Noise Levels
- Adjust Fan Curves: Fine-tune fan curves to reduce fan speed at lower temperatures.
- Check for Obstructions: Ensure fans are not obstructed by cables or other components.
- Use Quiet Fans: Consider replacing noisy fans with quieter models.
9. Best Practices for Fan Curve Configuration
Regular Monitoring
- Monitor Regularly: Regularly monitor system temperatures and fan speeds to ensure optimal performance.
- Use Alerts: Set up alerts in monitoring software to notify you of temperature spikes or fan failures.
Periodic Adjustments
- Adjust Seasonally: Adjust fan curves based on seasonal temperature changes to maintain optimal cooling.
- Update Profiles: Update fan profiles as you add or replace components in your system.
Maintaining Optimal Airflow
- Clean Regularly: Keep your case clean and free of dust to maintain optimal airflow.
- Manage Cables: Use cable management techniques to prevent obstructions and improve airflow.
- Position Fans Properly: Ensure intake and exhaust fans are positioned correctly to create an efficient airflow path.
10. Conclusion
Configuring fan curves in the BIOS is a vital aspect of maintaining a well-cooled and quiet computer system. By following this comprehensive guide, you can achieve a balanced setup that ensures efficient cooling while minimizing noise. Regular monitoring and periodic adjustments to fan curves will help maintain optimal system performance and prolong the lifespan of your components. Take your time to understand the nuances of fan curve configuration and fine-tune your settings for the best results. With a properly configured fan curve, you can enjoy a stable, quiet, and efficient computing experience.


