Harnessing the Power of Database Integration: A Comprehensive Guide to Using Databases in Adobe Dreamweaver
Introduction: Database integration is a cornerstone of modern web development, enabling dynamic, data-driven websites and applications. Adobe Dreamweaver, a leading web development tool, offers robust features and tools for seamlessly integrating databases into web projects. In this extensive guide, we’ll explore the intricacies of database integration in Adobe Dreamweaver, covering various database technologies, integration methods, and best practices to empower developers to build powerful and interactive web solutions.
Understanding Database Integration: Database integration involves connecting web applications to databases to store, retrieve, and manipulate data dynamically. Databases serve as repositories for structured data, such as user information, product catalogs, and content management systems (CMS), enabling web developers to build dynamic and interactive websites that respond to user input and deliver personalized experiences. Adobe Dreamweaver provides developers with tools and features to integrate databases seamlessly into web projects using technologies such as MySQL, Microsoft SQL Server, and SQLite.
Step 1: Planning Your Database Integration Strategy Before diving into database integration, it’s crucial to plan your integration strategy carefully. Consider the following factors when planning your database integration strategy in Adobe Dreamweaver:
- Define data requirements: Determine the types of data your web application needs to store, retrieve, and manipulate, including user profiles, product information, and content.
- Choose a database technology: Select the appropriate database technology based on factors such as scalability, performance, cost, and integration requirements. Common database technologies include MySQL, Microsoft SQL Server, PostgreSQL, and SQLite.
- Design database schema: Design the structure and relationships of your database tables, defining primary keys, foreign keys, indexes, and constraints to ensure data integrity and optimize performance.
- Plan data access methods: Decide on the methods and techniques for accessing and manipulating data in your database, such as SQL queries, stored procedures, and ORMs (Object-Relational Mapping).
Step 2: Connecting to a Database in Adobe Dreamweaver Adobe Dreamweaver offers multiple methods for connecting to databases, including direct connection via server-side scripting languages, integration with server technologies such as PHP and ASP.NET, and support for database management systems (DBMS) such as MySQL, Microsoft SQL Server, and SQLite. Here’s a step-by-step guide to connecting to a database in Adobe Dreamweaver:
- Set up a local development environment: Install and configure a local web server environment, such as XAMPP, WampServer, or MAMP, that includes support for server-side scripting languages and database servers.
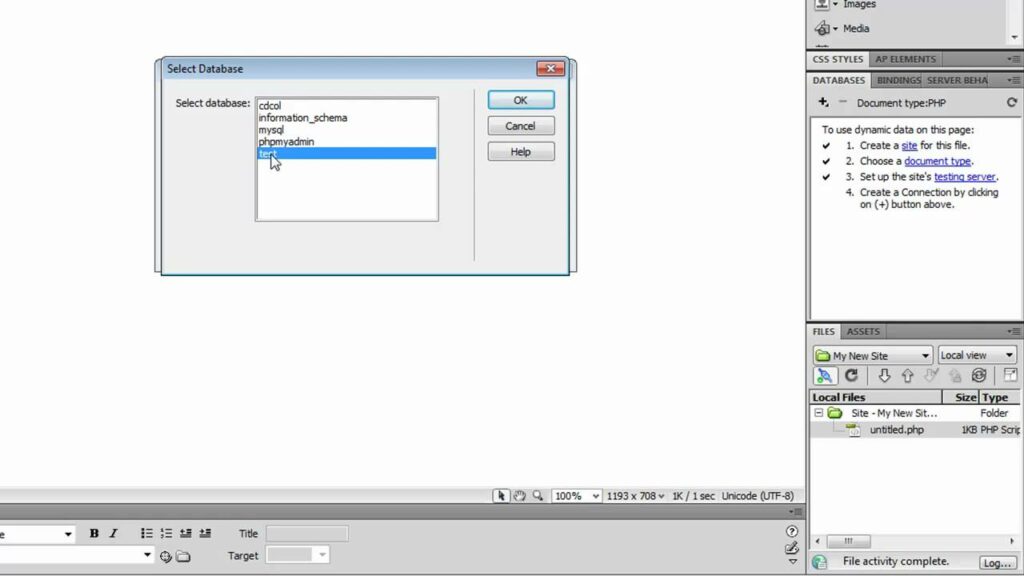
- Define a database connection: In Dreamweaver, navigate to the Database panel and click on the “+” icon to define a new database connection.
- Enter connection details: Specify the connection details, including the database type, server address, username, password, and database name, and test the connection to ensure connectivity.
- Browse database tables: Once the connection is established, browse the database tables and views within Dreamweaver’s Database panel to view the database structure and data.
Step 3: Querying and Manipulating Data Once connected to a database, Adobe Dreamweaver provides tools and features for querying and manipulating data dynamically. Here’s how to query and manipulate data in Adobe Dreamweaver:
- Create SQL queries: Use Dreamweaver’s SQL Query Builder or write custom SQL queries to retrieve data from the database, filter results, and perform calculations or aggregations.
- Bind data to web pages: Use Dreamweaver’s Bindings panel to bind query results to dynamic elements on web pages, such as tables, lists, forms, and charts, enabling dynamic data display and interaction.
- Implement CRUD operations: Implement Create, Read, Update, and Delete (CRUD) operations to allow users to interact with database records through web forms and user interfaces.
- Validate user input: Implement server-side validation of user input to prevent SQL injection attacks, data corruption, and security vulnerabilities.
Step 4: Enhancing Performance and Security Performance and security are critical considerations when integrating databases into web applications. Here are some best practices to enhance performance and security in database integration with Adobe Dreamweaver:
- Optimize database queries: Write efficient SQL queries, optimize database indexes and query execution plans, and minimize the number of database round-trips to improve query performance.
- Implement caching: Implement caching mechanisms, such as query result caching and object caching, to reduce database load and improve response times for frequently accessed data.
- Secure data access: Implement proper authentication and authorization mechanisms to restrict access to sensitive data, encrypt sensitive information at rest and in transit, and sanitize user input to prevent security vulnerabilities.
- Monitor database performance: Use database monitoring tools and performance metrics to monitor database performance, identify bottlenecks, and optimize database configuration and resource utilization.
Step 5: Testing and Deployment Before deploying your web application to a production environment, it’s essential to thoroughly test database integration and functionality. Here’s how to test and deploy your database-integrated web application in Adobe Dreamweaver:
- Test database interactions: Test database queries, data manipulation operations, and dynamic data display on web pages to ensure functionality and accuracy.
- Conduct security testing: Perform security testing, such as penetration testing and vulnerability scanning, to identify and address potential security vulnerabilities in database integration.
- Test across devices and browsers: Test your web application across different devices, screen sizes, and web browsers to ensure compatibility and responsiveness.
- Deploy to production: Once testing is complete, deploy your web application to a production environment, following best practices for server configuration, deployment, and maintenance.
- Monitor and maintain: Continuously monitor your web application for performance issues, security incidents, and user feedback, and apply updates and patches as needed to ensure ongoing security and reliability.
Conclusion: Database integration in Adobe Dreamweaver empowers developers to build dynamic, data-driven web applications that deliver personalized experiences and drive user engagement. By following the steps outlined in this guide and leveraging Dreamweaver’s tools and features, you can seamlessly integrate databases into your web projects, enabling efficient data storage, retrieval, and manipulation. Whether you’re a novice web developer or seasoned professional, mastering the art of database integration in Dreamweaver opens up endless possibilities for building powerful and interactive web solutions that meet the needs of modern users.


