Chromatic Vision: A Comprehensive Guide to Achieving the Rainbow Eye Color Effect in Photoshop
Introduction:
In the vast world of digital artistry, pushing creative boundaries often involves exploring unconventional and visually striking effects. One such captivating technique that has gained popularity is the Rainbow Eye Color Effect in Photoshop. This transformative and surreal approach allows digital artists and photographers to infuse a burst of color into the eyes, creating a mesmerizing and otherworldly aesthetic. In this exhaustive guide, we’ll embark on a detailed journey through the step-by-step process of achieving the Rainbow Eye Color Effect in Photoshop, unlocking the secrets to crafting vibrant and enchanting gazes.
I. Defining the Rainbow Eye Color Effect:
1.1 The Essence of Color Transformation:
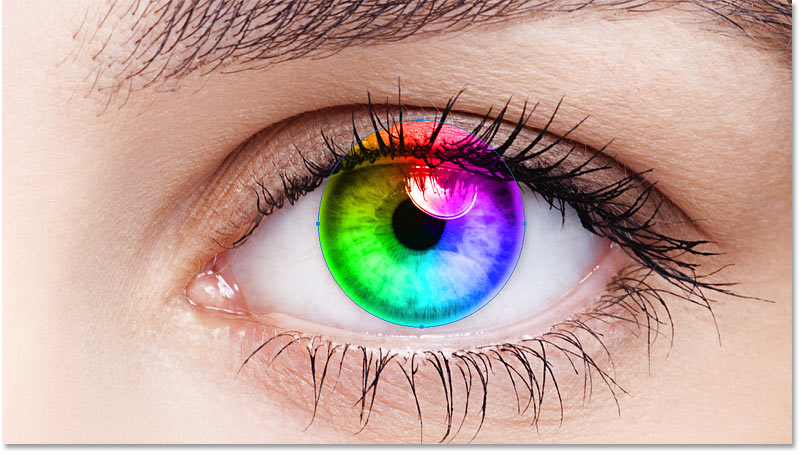
- The Rainbow Eye Color Effect involves replacing the natural eye color with a spectrum of vivid and vibrant hues, reminiscent of a rainbow.
- This technique adds a surreal and fantastical element to portraits, elevating them from ordinary to extraordinary.
1.2 Creative Applications:
- The Rainbow Eye Color Effect finds applications in various genres of digital art, fashion photography, and creative portraits.
- Artists use this technique to convey emotions, tell stories, or simply add a touch of whimsy and magic to their visual narratives.
II. Selecting the Right Image:
2.1 High-Quality Source Material:
- Begin with a high-resolution image that captures the eyes with clarity and detail.
- Ensure that the lighting is well-balanced to highlight the natural contours and features of the eyes.
2.2 Composition and Expression:
- Choose an image where the subject’s eyes are the focal point, with a captivating gaze that draws viewers in.
- Pay attention to the expression, as the Rainbow Eye Color Effect can enhance or alter the emotional impact of the image.
III. Opening and Preparing the Image in Photoshop:
3.1 Importing the Image:
- Open the selected image in Adobe Photoshop and create a duplicate layer to preserve the original.
- Renaming the duplicate layer helps maintain organizational clarity.
3.2 Adjusting Levels and Saturation:
- Fine-tune the levels and saturation of the image to enhance the overall vibrancy and contrast.
- This step ensures a dynamic base for the subsequent Rainbow Eye Color transformation.
IV. Creating a Selection of the Eyes:
4.1 Precise Selection Techniques:
- Utilize selection tools such as the Elliptical Marquee Tool or the Lasso Tool to precisely outline the eyes.
- Refine the selection using feathering to achieve a natural transition between the eyes and the surrounding area.
4.2 Layer Masking for Precision:
- Apply a layer mask to the duplicate layer, using the eye selection to reveal the duplicate layer only within the eye area.
- Layer masking allows for non-destructive editing, preserving the original image for future adjustments.
V. Applying the Rainbow Gradient:
5.1 Creating a Gradient Map:
- Access the Gradient Map adjustment layer to introduce the rainbow color spectrum.
- Choose a vibrant and harmonious gradient that spans the desired range of colors.
5.2 Blending Modes and Opacity:
- Experiment with blending modes such as Overlay or Color to integrate the rainbow gradient seamlessly with the eye color.
- Adjust the opacity to fine-tune the intensity of the Rainbow Eye Color Effect.
VI. Adding Realism and Detail:
6.1 Refining Color Tones:
- Use additional adjustment layers like Hue/Saturation and Color Balance to refine and harmonize the rainbow colors.
- Pay attention to subtleties in color variations to achieve a realistic and polished result.
6.2 Enhancing Highlights and Shadows:
- Apply Dodge and Burn tools to enhance highlights and shadows within the eyes, adding depth and dimension.
- This step contributes to a more realistic and three-dimensional appearance.
VII. Embracing Creativity with Additional Effects:
7.1 Glowing Highlights:
- Introduce a subtle glow or highlights within the eyes using the Brush Tool and a soft brush with low opacity.
- This effect can enhance the magical and ethereal quality of the Rainbow Eye Color transformation.
7.2 Exploring Texture Overlays:
- Experiment with texture overlays to add depth and complexity to the eyes.
- Textures such as glitter, sparkles, or subtle patterns can complement the Rainbow Eye Color Effect.
VIII. Final Touches and Exporting:
8.1 Fine-Tuning and Review:
- Review the entire composition, ensuring that the Rainbow Eye Color Effect complements the overall aesthetic of the image.
- Make any final adjustments or refinements to achieve a polished result.
8.2 Exporting the Final Image:
- Save the final image in the desired format, considering the intended use (web, print, etc.).
- Preserve the layers for future edits and experimentation.
IX. Conclusion:
The Rainbow Eye Color Effect in Photoshop serves as a dynamic and visually stunning way to infuse portraits with a burst of creative energy. By following the detailed steps outlined in this comprehensive guide, artists can unlock the secrets to transforming ordinary eyes into vibrant and enchanting spectacles. Embrace experimentation, let your imagination run wild, and allow the Rainbow Eye Color Effect to become a powerful tool in your digital artistry arsenal. As you explore the boundaries of color and creativity, the eyes will become windows to a world of fantasy and wonder, captivating viewers and leaving a lasting impression.


