Achieving Precision: A Comprehensive Guide to Calibrating Rulers in CorelDRAW
Introduction:
In the realm of graphic design and digital illustration, precision is paramount. Whether creating intricate artworks, detailed layouts, or precise measurements, designers rely on accurate tools and features to bring their creative visions to life. In CorelDRAW, the ruler tool serves as a fundamental instrument for measuring and aligning objects within the workspace. However, to ensure optimal accuracy, it is essential to calibrate the rulers according to specific project requirements and preferences. In this comprehensive guide, we delve into the intricacies of calibrating rulers in CorelDRAW, exploring techniques, tips, and best practices to achieve precise measurements and alignments in design projects of any scale.
Understanding the Importance of Ruler Calibration:
The rulers in CorelDRAW provide a visual reference for measuring and aligning objects within the workspace. Calibrating the rulers ensures that measurements are accurate and consistent, allowing designers to maintain precision and consistency in their designs. The importance of ruler calibration can be attributed to several key factors:
- Accuracy: Calibrating the rulers ensures that measurements are precise and reliable, enabling designers to make informed decisions and achieve desired results in their projects.
- Consistency: Consistent ruler calibration ensures uniformity across design files and projects, facilitating seamless collaboration and workflow efficiency.
- Alignment: Properly calibrated rulers help align objects and elements with precision, ensuring that design elements are accurately positioned relative to one another.
- Professionalism: Accurate measurements and alignments contribute to the overall professionalism and quality of design projects, instilling confidence in clients and stakeholders.
Now, let’s explore the various methods for calibrating rulers in CorelDRAW:
Calibrating Rulers Using Document Properties:
CorelDRAW offers a straightforward method for calibrating rulers through the Document Properties dialog, allowing users to specify measurement units and scale settings:
- Accessing Document Properties: To access Document Properties, navigate to the “File” menu, then select “Document Properties” or use the shortcut “Ctrl + J.”
- Setting Measurement Units: Within the Document Properties dialog, locate the “Units” section. Here, users can choose from a variety of measurement units, including inches, centimeters, pixels, and points. Select the desired unit of measurement based on project requirements and preferences.
- Adjusting Scale Settings: In addition to setting measurement units, users can adjust scale settings to further calibrate the rulers. The scale settings allow users to specify the ratio between the document units and real-world units. For example, if designing a floor plan, users can set the scale to represent one inch on the ruler as one foot in real life.
- Applying Changes: After making adjustments to measurement units and scale settings, click “OK” to apply the changes and calibrate the rulers accordingly. The rulers in the CorelDRAW workspace will now reflect the selected measurement units and scale settings.
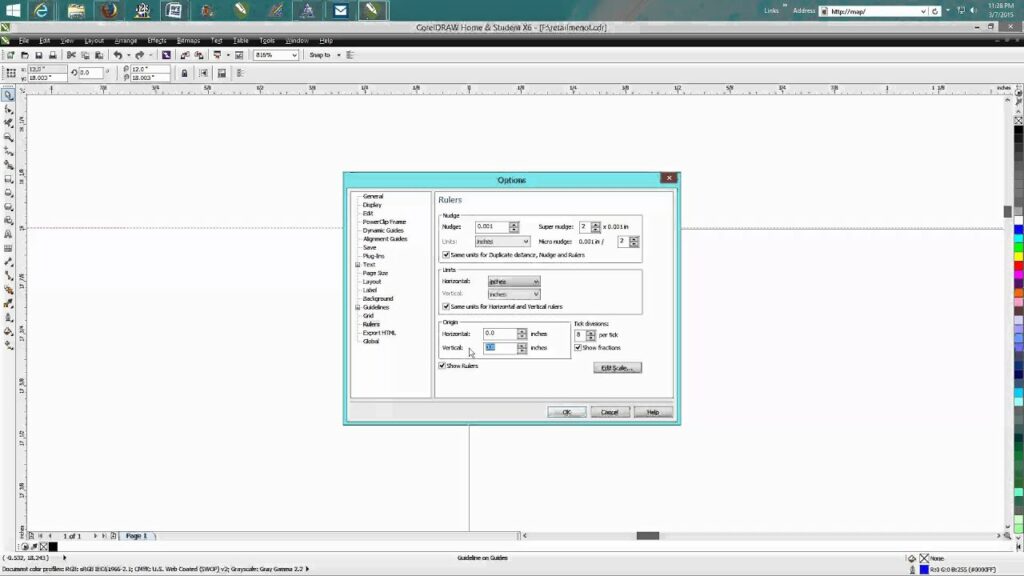
Calibrating Rulers Using Custom Guidelines:
In addition to adjusting measurement units and scale settings, CorelDRAW offers a more customizable approach to ruler calibration through custom guidelines:
- Adding Custom Guidelines: To add custom guidelines, click and drag from the horizontal or vertical ruler into the workspace. A guideline will appear, representing a reference line for alignment and measurement.
- Setting Guideline Position: Once a guideline is added to the workspace, users can adjust its position by clicking and dragging it to the desired location. Guidelines can be placed precisely using the X and Y coordinates displayed in the status bar at the bottom of the CorelDRAW window.
- Measuring Distances: With custom guidelines in place, users can measure distances between objects by aligning them with the guidelines and observing the distance displayed in the status bar. This method allows for precise measurements and alignments within the workspace.
- Removing Guidelines: To remove guidelines from the workspace, simply click and drag them back onto the rulers or press the “Delete” key after selecting them.
Advanced Techniques for Ruler Calibration:
In addition to basic calibration methods, CorelDRAW offers advanced techniques for achieving precise measurements and alignments:
- Snap to Grid and Snap to Objects: CorelDRAW provides options for snapping objects and elements to a grid or other objects, ensuring accurate positioning and alignment. Users can enable these options from the “View” menu and customize snap settings to suit their workflow preferences.
- Smart Alignment Guides: CorelDRAW’s Smart Alignment Guides offer visual cues for aligning objects with precision. As objects are moved or resized, alignment guides appear to indicate alignment with other objects or the document’s edges, facilitating precise positioning and alignment.
- Precision Tools: CorelDRAW offers a range of precision tools, such as the Object Size docker and Transformations docker, for achieving precise measurements and alignments. These tools allow users to input specific dimensions, angles, and positions with accuracy, ensuring consistent results in design projects.
Conclusion:
In conclusion, calibrating rulers in CorelDRAW is essential for achieving precision, consistency, and professionalism in design projects. By understanding the importance of ruler calibration and leveraging CorelDRAW’s comprehensive tools and features, designers can ensure accurate measurements and alignments in their projects of any scale. Whether adjusting measurement units, setting scale settings, or using custom guidelines and advanced techniques, CorelDRAW offers unparalleled flexibility and control for achieving precise design results. With practice, experimentation, and attention to detail, designers can harness the power of ruler calibration to elevate their designs and create compelling visual narratives with confidence and precision.


