Achieving Flawless Portraits: A Comprehensive Guide to Removing Skin Blemishes with the Spot Healing Brush in Adobe Photoshop
Introduction:
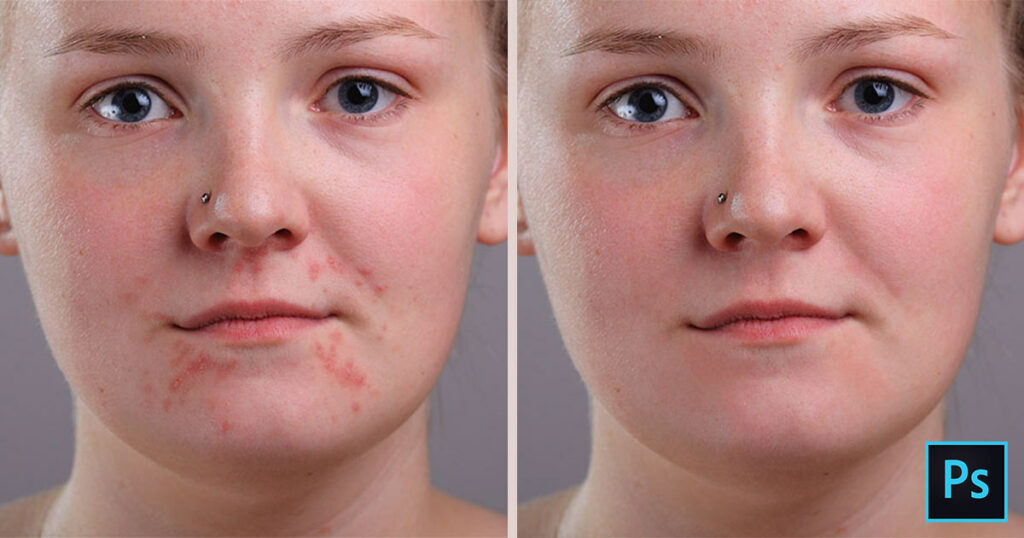
In the realm of portrait photography, the desire for flawless and radiant skin is a common goal for photographers and subjects alike. Adobe Photoshop, a powerhouse in the world of digital editing, offers a versatile set of tools for enhancing and perfecting portraits. One such tool that stands out in the quest for impeccable skin is the Spot Healing Brush. In this extensive guide, we will delve into the intricacies of using the Spot Healing Brush in Adobe Photoshop to seamlessly remove skin blemishes, empowering photographers and digital artists to elevate their portraits to a level of pristine perfection.
Understanding the Importance of Skin Retouching:
Portrait photography often involves capturing the essence and beauty of the human face. However, imperfections such as acne, blemishes, or uneven skin tones can distract from the overall appeal of the subject. Skin retouching, when done tastefully and subtly, allows photographers to enhance their images by minimizing distractions and presenting their subjects in the best possible light. The Spot Healing Brush in Adobe Photoshop is a go-to tool for achieving this level of precision and finesse in skin retouching.
Step-by-Step Guide to Removing Skin Blemishes with the Spot Healing Brush:
- Open Your Image in Adobe Photoshop: Launch Adobe Photoshop and open the portrait image you want to retouch. Ensure that the image is of sufficient resolution for detailed editing.
- Zoom In on the Problem Areas: Use the Zoom Tool (Z) to magnify the areas of the skin where blemishes or imperfections are visible. This step allows for a closer inspection and more accurate retouching.
- Select the Spot Healing Brush Tool: Locate the Spot Healing Brush Tool in the toolbar or press “J” to activate it. The Spot Healing Brush is designed to automatically blend with the surrounding pixels, making it ideal for quick and efficient retouching.
- Adjust Brush Size: Right-click anywhere on the image to access the Brush Options. Adjust the size of the Spot Healing Brush to match the size of the blemish you are retouching. A brush that is slightly larger than the blemish is generally effective.
- Set Brush Hardness: Depending on the nature of the blemish and the surrounding skin, adjust the hardness of the Spot Healing Brush. For softer blending, use a brush with lower hardness; for more defined results, opt for a higher hardness setting.
- Sample a Clean Area: Before applying the Spot Healing Brush to the blemish, Alt-click (Option-click on Mac) on a clean area of the skin nearby. This samples the texture and color from the surrounding pixels, ensuring a seamless blend.
- Paint Over the Blemish: With the Spot Healing Brush set up, gently paint over the blemish. The tool automatically blends the sampled pixels with the surrounding skin, effectively removing the imperfection.
- Repeat for Other Blemishes: Continue the process, working through each blemish one at a time. Adjust the brush size as needed for different-sized imperfections, and sample clean areas for optimal blending.
- Be Mindful of Skin Texture: While retouching, be mindful of preserving the natural texture of the skin. Avoid over-smoothing, as it can result in an unnatural and plastic appearance. Strive for a balance between perfection and authenticity.
- Address Larger Areas with Clone Stamp (Optional): For larger imperfections or areas with more complex textures, consider using the Clone Stamp Tool in addition to the Spot Healing Brush. This allows for more manual control over the retouching process.
- Check Your Progress: Periodically zoom out and review your progress to ensure that the overall skin tone and texture remain natural and consistent. Make any necessary adjustments to maintain a cohesive look.
- Adjust Opacity for Subtlety (Optional): If you find that the retouched areas appear too smooth or stand out, consider reducing the opacity of the retouched layer. This step adds subtlety to the retouching, ensuring a more realistic result.
- Consider Global Adjustments: After addressing individual blemishes, consider applying global adjustments to the overall skin tone, contrast, and brightness. This step contributes to a more polished and cohesive portrait.
- Save Your Retouched Image: Once satisfied with the retouching, save your image in the desired format. Consider saving a separate copy to preserve the original version for reference.
Conclusion:
The Spot Healing Brush in Adobe Photoshop is a powerful ally in the pursuit of flawless portraits. By following the comprehensive steps outlined in this guide, you can master the art of removing skin blemishes with precision and finesse. Embrace the potential of the Spot Healing Brush to enhance your portraits, allowing the natural beauty of your subjects to shine through without distractions. Strive for a balance between perfection and authenticity, ensuring that your retouching efforts result in portraits that captivate and resonate with viewers. With the Spot Healing Brush in your digital toolkit, you have the means to elevate your portrait photography to new heights of visual excellence.


