Unraveling the Power of Control: A Comprehensive Guide on How to Pause Windows Updates for Up to 35 Days in Windows 10
Introduction:
Windows 10, as a constantly evolving operating system, prioritizes regular updates to enhance security, fix bugs, and introduce new features. While keeping your system up to date is crucial for optimal performance, there are instances where users may prefer to pause updates temporarily. Recognizing this need, Windows 10 offers the flexibility to halt updates for a specified period. In this comprehensive guide, we will delve into the intricate process of pausing Windows updates for up to 35 days, providing users with the knowledge to exercise greater control over their system’s update schedule.
Understanding the Importance of Pausing Windows Updates:
Windows updates are essential for maintaining the security and stability of your operating system. However, there are scenarios where users may wish to delay updates temporarily. This could be due to concerns about potential compatibility issues with specific software, the desire to avoid disruptions during critical work periods, or simply the need to control the timing of updates. The ability to pause Windows updates for up to 35 days offers a valuable solution to address these concerns.
Step 1: Accessing Windows Update Settings:
To initiate the process of pausing Windows updates, begin by accessing the Windows Update settings. Press the Windows key + I to open the Settings app. From the Settings menu, select “Update & Security,” and then choose “Windows Update” from the left sidebar.
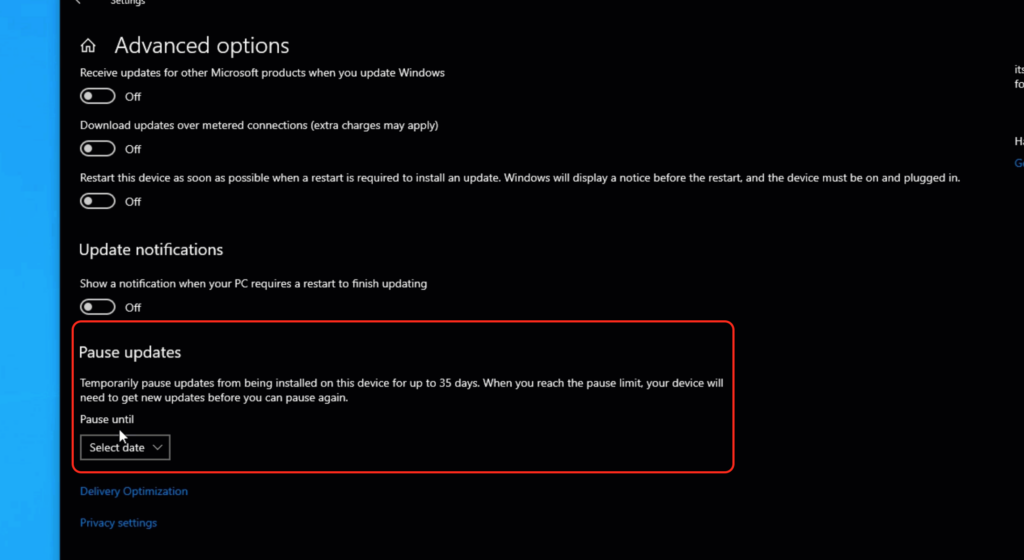
Step 2: Navigating to Advanced Options:
Within the Windows Update settings, locate and click on the “Advanced options” link. This will direct you to a new window where you can access additional settings related to Windows updates.
Step 3: Configuring Pause Updates Settings:
In the Advanced options window, you will find a section titled “Pause updates.” Here, you can toggle on the switch to pause updates. By default, Windows 10 allows you to pause updates for up to 7 days. However, to extend this duration, you need to access additional settings.
Step 4: Extending Pause Updates Duration:
To extend the pause duration beyond the default 7 days, click on the drop-down menu under “Pause until” and select the desired date up to 35 days in the future. Windows 10 allows users to pause updates for a maximum of 35 days, providing a substantial window for users to plan their update schedules according to their preferences.
Step 5: Confirming Pause Updates:
Once you’ve selected the desired duration, click the “Back” arrow to return to the Windows Update settings page. Here, you will see a confirmation of the pause duration you’ve selected. This ensures that updates will be temporarily halted for the specified period.
Step 6: Monitoring Update Status:
While updates are paused, you can continue using your Windows 10 system without the interruption of automatic updates. It’s important to monitor the update status and be proactive about resuming updates after the specified pause duration. Remember that pausing updates doesn’t exempt your system from receiving critical security updates, so it’s advisable to resume updates promptly.
Step 7: Resuming Updates:
To resume Windows updates before the specified pause duration expires, return to the Windows Update settings and click on “Resume updates.” This action will enable your system to start downloading and installing updates again.
Step 8: Adjusting Active Hours:
In addition to pausing updates, Windows 10 allows users to set “Active hours” during which the system should refrain from restarting to apply updates. This is another feature that contributes to a more user-friendly update experience. Adjust active hours in the Windows Update settings to prevent unexpected restarts during your preferred usage times.
Step 9: Quality and Feature Updates Differentiation:
It’s crucial to understand that the ability to pause updates primarily applies to feature updates. Windows 10 distinguishes between quality updates (which include security and stability fixes) and feature updates (which introduce new functionalities). While pausing feature updates is straightforward, quality updates are critical for maintaining system security. Windows 10 will still download and install quality updates during a pause on feature updates.
Conclusion:
Pausing Windows updates for up to 35 days in Windows 10 is a powerful feature that grants users greater control over their system’s update schedule. By following the comprehensive guide outlined above, users can navigate the Windows Update settings, configure pause duration, and tailor the update experience to meet their preferences. Embrace the flexibility that Windows 10 offers, ensuring that your system remains up to date while aligning with your specific requirements. Whether you’re managing a complex work schedule, avoiding potential compatibility issues, or simply seeking to exercise more control, the ability to pause updates in Windows 10 is a valuable tool in your hands, contributing to a smoother and more personalized computing experience.


