Timeless Elegance: A Comprehensive Guide to Reducing Wrinkles with the Healing Brush in Adobe Photoshop
Introduction:
Adobe Photoshop, a powerhouse in digital image editing, offers a plethora of tools to enhance and retouch photographs. One such tool that stands out for its remarkable ability to smooth and rejuvenate skin is the Healing Brush. Specifically designed to reduce wrinkles and fine lines, the Healing Brush in Photoshop empowers users to achieve a timeless elegance in portrait photography. This comprehensive guide will delve into the intricacies of using the Healing Brush to diminish wrinkles, providing photographers and retouchers with the knowledge to bring out the natural beauty of their subjects.
I. Understanding the Healing Brush Tool:
- Locating the Healing Brush:
- Open Adobe Photoshop and select the “Healing Brush Tool” from the toolbar. It shares the same spot as the Spot Healing Brush and Patch tools.
- Modes:
- The Healing Brush operates in two primary modes – “Normal” and “Replace” – each serving distinct purposes in wrinkle reduction.
II. Setting Up the Healing Brush:
- Choosing Brush Size:
- Adjust the brush size according to the area you want to work on. Use the bracket keys “[” and “]” to decrease or increase brush size, respectively.
- Softness and Hardness:
- Determine the softness or hardness of the brush by right-clicking on the image and adjusting the hardness slider. A softer brush is often preferred for skin retouching.
III. Sampling a Source Point:
- Alt-Click to Sample:
- Hold down the “Alt” key (Option key on Mac) and click on an area close to the wrinkles that has similar texture and tone. This sets the source point for the Healing Brush.
IV. Normal Mode:
- Smooth Blending:
- In “Normal” mode, the Healing Brush blends the texture and color of the sampled area with the target area seamlessly, resulting in smooth skin.
- Careful Sampling:
- Sample different areas as needed, adjusting the brush size for various wrinkle sizes and shapes.
- Build Up Gradually:
- Build up the correction gradually, applying multiple strokes to achieve a natural and even look.
V. Replace Mode:
- Sharper Correction:
- Switch to “Replace” mode for a more pronounced and potentially sharper correction. This mode is effective for deeper wrinkles or when more defined results are desired.
- Use with Caution:
- Exercise caution when using “Replace” mode to avoid overcorrection, which can lead to an unnatural appearance.
VI. Zooming In for Precision:
- Magnification Options:
- Zoom in on the image to a comfortable level using the magnification options in Photoshop.
- Detail-Oriented Correction:
- Work on wrinkles and fine lines with precision, ensuring that the correction aligns seamlessly with the surrounding skin.
VII. Utilizing Additional Healing Tools:
- Spot Healing Brush:
- The “Spot Healing Brush” is excellent for quick fixes. It automatically samples and blends nearby pixels, making it ideal for smaller blemishes.
- Patch Tool:
- The “Patch Tool” allows you to select and replace a specific area. It’s useful for larger regions with wrinkles or imperfections.
VIII. Maintaining Natural Texture:
- Avoid Over-Smoothing:
- Be mindful not to over-smooth the skin, as it can result in an unrealistic and artificial appearance.
- Preserving Skin Texture:
- Aim to maintain the natural texture of the skin while reducing wrinkles. A balance between correction and authenticity is key.
IX. Working Non-Destructively:
- Use Adjustment Layers:
- Apply wrinkle reduction on a separate layer using the Healing Brush. This allows for non-destructive editing, and adjustments can be fine-tuned later.
- Layer Opacity:
- Adjust the opacity of the wrinkle reduction layer to control the intensity of the correction.
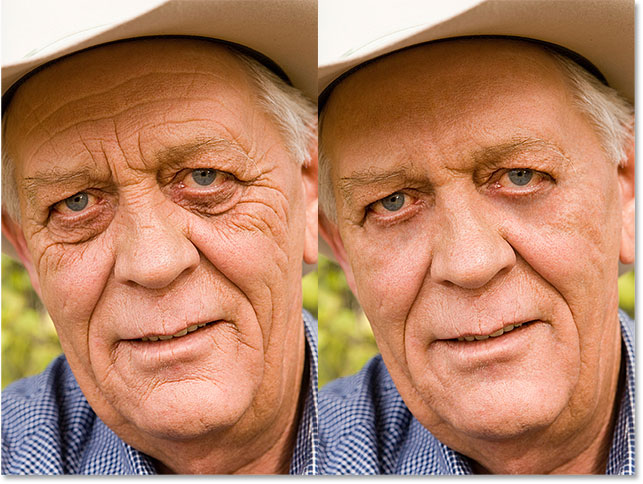
X. Before-and-After Comparison:
- Evaluate Corrections:
- Periodically toggle the visibility of the wrinkle reduction layer to compare the edited and original versions. This helps in assessing the effectiveness of the corrections.
- Refine as Needed:
- If necessary, go back and refine specific areas by revisiting the Healing Brush tool.
XI. Saving and Exporting:
- Save PSD for Future Edits:
- Save your work in the Photoshop format (.psd) to preserve layers and editing capabilities for future adjustments.
- Export for Final Use:
- When satisfied with the results, export the image in the desired format for final use.
Conclusion:
The Healing Brush in Adobe Photoshop is a powerful ally in the quest for timeless elegance in portrait photography. By understanding its nuances, setting up the tool appropriately, and employing it with precision, users can reduce wrinkles and fine lines while preserving the natural beauty of the subject. Whether working in “Normal” or “Replace” mode, maintaining a balance between correction and authenticity ensures that the final result exudes sophistication and sophistication. As you integrate these techniques into your retouching workflow, you’ll discover the transformative capabilities of the Healing Brush in achieving ageless and radiant portraits.


