The Art and Science of Achieving Dazzling Smiles: A Comprehensive Guide to Whitening and Brightening Teeth in Photoshop
Introduction:
In the realm of digital image enhancement, achieving the perfect smile often involves meticulous attention to detail. Adobe Photoshop, a powerhouse of creative tools, provides photographers and digital artists with the means to whiten and brighten teeth seamlessly, enhancing the overall aesthetics of portraits. In this comprehensive guide, we will explore the art and science of whitening and brightening teeth in Photoshop, empowering you to transform ordinary smiles into radiant expressions.
I. The Importance of a Dazzling Smile in Photography:
A captivating smile is a universal symbol of warmth and approachability, making it a focal point in portrait photography. However, various factors such as lifestyle, lighting conditions, and even genetics can contribute to dental discoloration. Photoshop’s teeth whitening and brightening techniques offer a versatile solution to address these concerns, ensuring that your subjects’ smiles shine with confidence and radiance.
II. Preparing the Image for Teeth Whitening:
Before diving into the teeth whitening process, it’s crucial to undertake some preliminary steps to ensure a seamless and natural-looking enhancement.
A. Basic Retouching:
Start by addressing basic retouching tasks such as blemish removal, skin smoothing, and overall tonal adjustments. A polished base will serve as a foundation for more targeted enhancements.
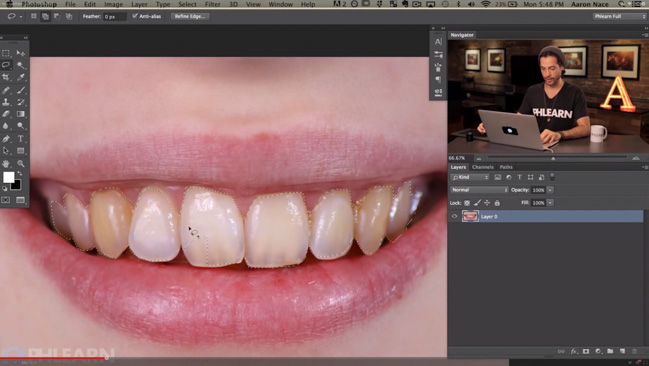
B. Zooming In and Selecting the Teeth:
Zoom in on the subject’s smile to accurately select the teeth for whitening. Use the Lasso Tool or Quick Selection Tool to create a precise selection around the teeth, ensuring that the surrounding areas are not affected.
III. Utilizing Photoshop’s Teeth Whitening Tools:
Adobe Photoshop offers various tools and techniques specifically designed for whitening and brightening teeth.
A. Adjustment Layers for Precision:
- Access the Adjustment Layers menu and choose “Hue/Saturation” or “Curves” for targeted adjustments.
- In the Hue/Saturation adjustment layer, reduce the saturation to -100 for the selected teeth, effectively desaturating any color and creating a grayscale effect.
- Alternatively, in the Curves adjustment layer, create a gentle upward curve to brighten the selected teeth. Adjust the curve until the desired level of brightness is achieved.
B. Brush Tool for Refinement:
- Select the Brush Tool and set the foreground color to white.
- With a soft brush, paint over the teeth within the selection to further enhance the whitening effect. Adjust the brush opacity to achieve a natural and gradual transition.
C. Dodge and Burn for Detailing:
- Utilize the Dodge Tool to brighten specific areas of the teeth, emphasizing highlights and adding a natural gleam. Adjust the tool’s exposure for subtle enhancements.
- Conversely, employ the Burn Tool to darken any overly bright areas, ensuring a balanced and realistic appearance.
IV. Addressing Common Challenges in Teeth Whitening:
Teeth whitening in Photoshop may encounter challenges such as maintaining realism, dealing with reflections, and addressing uneven discoloration.
A. Maintaining Realism:
Avoid excessive whitening that can lead to an unnatural appearance. Strive for a realistic result by gradually building up the whitening effect and assessing the image at various stages.
B. Dealing with Reflections:
Teeth may reflect surrounding colors, especially in images taken under diverse lighting conditions. To address this, use the Hue/Saturation adjustment layer to target and desaturate specific color ranges, eliminating unwanted reflections.
C. Addressing Uneven Discoloration:
For images where teeth exhibit uneven discoloration, a combination of targeted adjustments and careful brushing can help balance out tones. Consider using the Sponge Tool set to Desaturate to address yellowing or discoloration.
V. Going Beyond Basic Whitening: Advanced Techniques
To achieve a truly professional finish, explore advanced techniques that go beyond basic teeth whitening.
A. Color Grading for Subtle Tints:
Incorporate a subtle color grade to enhance the overall warmth of the image. Create a Color Balance adjustment layer and experiment with the midtones to introduce warm or cool tones, complementing the teeth whitening effect.
B. Custom Brush Presets for Detailing:
Develop custom brush presets for specialized detailing. This can include a soft brush for overall whitening, a smaller brush for intricate areas, and a larger brush for broader strokes. Save these presets for efficient use in future projects.
VI. Teeth Whitening in Portrait Retouching Workflows:
Integrating teeth whitening seamlessly into portrait retouching workflows ensures a cohesive and professional result.
A. Non-Destructive Editing:
Opt for non-destructive editing techniques by using adjustment layers and layer masks. This allows for easy revisions and modifications without compromising the original image.
B. Consistent Color Grading:
Maintain a consistent color grading approach across the entire image. Coordinated adjustments in other areas, such as the whites of the eyes or the overall tonality, contribute to a harmonious and polished final result.
VII. Finalizing and Exporting the Enhanced Image:
Once satisfied with the teeth whitening and overall portrait enhancements, it’s time to finalize the image for export and sharing.
A. High-Quality Export:
Ensure a high-quality export by choosing appropriate file formats and compression settings. Consider exporting images in formats like JPEG or PNG, balancing file size with image quality.
B. Comparison and Assessment:
Before finalizing, compare the enhanced image with the original to assess the effectiveness of the teeth whitening process. Pay attention to subtleties, ensuring that the result looks natural and complements the overall aesthetics of the portrait.
VIII. Conclusion:
Mastering the art of teeth whitening and brightening in Photoshop is a valuable skill for photographers and digital artists seeking to enhance the visual appeal of their portraits. The techniques explored in this comprehensive guide provide a foundation for achieving natural-looking and professionally retouched smiles. As you embark on your journey of perfecting dental enhancements, remember that subtlety, attention to detail, and a commitment to maintaining realism are key principles. By seamlessly integrating teeth whitening into your portrait retouching workflows, you can consistently deliver stunning and confident smiles that leave a lasting impression. Experiment, refine, and let your creativity shine as you elevate your photography with the transformative power of Photoshop’s teeth whitening tools.


