Safeguarding Privacy: A Comprehensive Guide to Clearing Personal Info from Cortana in Windows 10

Introduction
Cortana, Microsoft’s intelligent virtual assistant, has evolved to become an integral part of the Windows 10 experience, offering users a wide range of features to enhance productivity and convenience. While Cortana’s capabilities are undoubtedly valuable, users may, at times, wish to clear personal information from the virtual assistant to maintain privacy. In this extensive guide, we will explore the significance of clearing personal info from Cortana, discuss the privacy considerations involved, and provide a detailed, step-by-step tutorial on safeguarding your sensitive data within the Windows 10 environment.
Understanding the Need for Clearing Personal Info from Cortana
Cortana’s functionality relies on gathering and processing personal information to provide tailored assistance and recommendations. However, users may have valid reasons for wanting to clear personal information from Cortana, such as preserving privacy, limiting data exposure, or ensuring the security of sensitive details. Customizing the data stored by Cortana empowers users to strike a balance between enjoying the benefits of the virtual assistant and safeguarding their personal privacy.
The Significance of Privacy Customization in Cortana
As technology continues to play an increasingly central role in our daily lives, concerns about privacy and data security have become paramount. Cortana, by design, is intended to adapt and provide a more personalized experience based on the information it collects. However, this level of personalization may not align with everyone’s comfort level regarding data sharing. Clearing personal information from Cortana allows users to take control of their digital footprint, ensuring that sensitive details are handled in a manner consistent with their privacy preferences.
Advantages of Clearing Personal Info from Cortana
- Enhanced Privacy: Clearing personal information from Cortana directly contributes to enhanced privacy. Users can control the type and amount of data stored by the virtual assistant, reducing the risk of sensitive information falling into the wrong hands.
- Data Management: Regularly clearing personal info from Cortana is a proactive approach to managing data. It allows users to stay informed about the information stored by the virtual assistant, promoting transparency and control over their digital footprint.
- Reduced Targeted Advertising: Cortana’s personalized recommendations are based on the information it collects. Clearing personal info helps reduce the specificity of these recommendations, leading to less targeted advertising and a potentially less intrusive user experience.
- Security Measures: In the event of device loss or potential security threats, clearing personal information from Cortana becomes a crucial security measure. It minimizes the risk associated with unauthorized access to sensitive data.
Step-by-Step Guide: Clearing Personal Information from Cortana in Windows 10
Now, let’s delve into the detailed process of clearing personal information from Cortana in Windows 10:
Step 1: Open Cortana Settings
Click on the Cortana icon on your taskbar or press the Windows key and type “Cortana” to open the settings menu. Select “Settings” from the available options.
Step 2: Navigate to Privacy Settings
Within the Cortana settings, locate and click on “Privacy.” This section provides access to various privacy-related configurations.
Step 3: Clear Personal Information
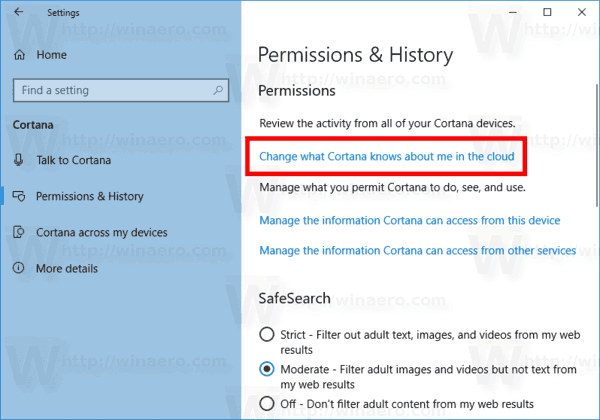
Under the “Manage what Cortana knows about me in the cloud” section, click on the “Clear” button. This action will prompt Cortana to remove stored personal information associated with your account.
Step 4: Clear Cortana Data on the Device
To clear personal information stored on your device, go to the “Speech, inking & typing” section within the Cortana settings. Click on the “Stop getting to know me” button to clear local data.
Step 5: Revoke Permissions
Review and revoke permissions granted to Cortana in various sections, including location, contacts, and browsing history. Adjust settings to align with your privacy preferences.
Step 6: Manage Cloud Content
Explore the “Cloud Content” section to manage information Cortana collects from your device and Microsoft account. Adjust settings related to search history, notebook data, and other cloud content to align with your privacy preferences.
Step 7: Remove Individual Entries
For more granular control, navigate to the “Notebook” section within Cortana settings. Here, you can remove individual entries or topics that Cortana has learned about you.
Step 8: Adjust Diagnostic Data Settings
Explore the “Diagnostics & feedback” section to control the amount of diagnostic data sent to Microsoft. Choose between basic and full diagnostic data options based on your preferences for data sharing.
Step 9: Stay Informed
Regularly revisit Cortana privacy settings to stay informed about updates and changes. Microsoft periodically updates its features, and being aware of privacy-related adjustments ensures ongoing control over your digital privacy.
Conclusion
Clearing personal information from Cortana in Windows 10 is a proactive step toward safeguarding privacy and managing digital data responsibly. By following the comprehensive step-by-step guide provided in this overview, users can navigate Cortana’s privacy settings with confidence, ensuring that their sensitive information is handled in a manner consistent with their privacy preferences. As technology continues to advance, the power to manage privacy settings empowers users to strike a balance between convenience and data protection within the Windows 10 ecosystem. Embrace the transparency and control offered by Cortana privacy settings, and enjoy a personalized and secure digital experience tailored to your comfort level.


