Resurrecting Functionality: A Comprehensive Guide to Fixing a Keyboard Button That Pops Out

Your keyboard is the gateway to your digital world, facilitating communication, productivity, and entertainment with each keystroke. However, when a keyboard button starts to pop out or becomes unresponsive, it can disrupt your workflow and cause frustration. Fortunately, fixing a keyboard button that pops out is a relatively straightforward process with the right tools and techniques. In this extensive guide, we will explore step-by-step instructions, tips, and troubleshooting methods to help you resurrect functionality and restore your keyboard to its full glory.
Understanding the Anatomy of a Keyboard Button:
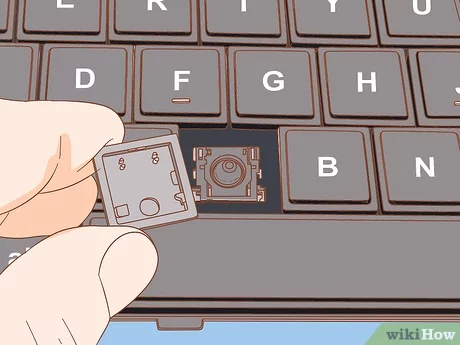
Before diving into the repair process, it’s essential to understand the basic components of a keyboard button. Each key consists of several elements, including:
- Keycap: The visible part of the key that you press with your finger.
- Plunger: The mechanism beneath the keycap that transmits the force of your press to the keyboard’s circuitry.
- Scissors or Stabilizers: The metal or plastic components that stabilize the keycap and provide a pivot point for pressing the key.
When a keyboard button pops out, it’s typically due to one of these components becoming dislodged or damaged.
1. Assessing the Damage:
Before attempting any repairs, carefully examine the affected key to determine the extent of the damage. Look for signs of physical damage, such as a broken keycap or a dislodged plunger. If the keycap is intact and the plunger appears undamaged, it may simply need to be repositioned or reattached.
2. Reattaching the Keycap:
If the keycap has come loose but is undamaged, you can usually reattach it to the plunger using the following steps:
- Locate the plunger beneath the keycap and align it with the corresponding mechanism on the keyboard.
- Press down firmly on the keycap until it snaps back into place. You should hear or feel a click when the keycap is properly seated.
- Test the key by pressing it several times to ensure that it functions smoothly and registers keystrokes accurately.
3. Repairing or Replacing the Plunger:
If the plunger is damaged or missing, you may need to repair or replace it to restore functionality to the key. Here’s how to repair or replace a damaged plunger:
- Remove the keycap by gently prying it off with a flat-blade screwdriver or a keycap puller tool. Be careful not to damage the keycap or the surrounding keys.
- Inspect the plunger for any signs of damage, such as cracks, breaks, or misalignment. If the plunger is damaged, you may be able to repair it using adhesive or epoxy glue.
- If the plunger is irreparably damaged, you will need to replace it with a new one. Replacement plungers can often be purchased from electronics repair shops or online retailers specializing in computer parts and accessories.
- Once the plunger has been repaired or replaced, reattach the keycap following the steps outlined in the previous section.
4. Testing and Troubleshooting:
After reattaching the keycap or repairing/replacing the plunger, it’s essential to test the key to ensure that it functions correctly. Press the key several times to verify that it registers keystrokes consistently and does not stick or malfunction. If the key still does not function properly, additional troubleshooting may be necessary, such as checking the keyboard’s circuitry for damage or debris.
5. Preventive Maintenance:
To prevent keyboard buttons from popping out in the future, consider implementing preventive maintenance practices, such as:
- Avoiding excessive force when pressing keys.
- Keeping the keyboard clean and free of dust, dirt, and debris.
- Using a keyboard cover or protector to shield the keys from spills and accidents.
- Periodically inspecting the keyboard for signs of wear and tear and addressing any issues promptly.
Conclusion:
In conclusion, fixing a keyboard button that pops out is a manageable task with the right tools, techniques, and a bit of patience. By following the step-by-step instructions and troubleshooting methods outlined in this guide, you can restore functionality to your keyboard and resume your digital activities without interruption. Remember to assess the damage, reattach the keycap or repair/replace the plunger as needed, and perform thorough testing to ensure that the key functions properly. With proper care and maintenance, you can keep your keyboard in top condition and enjoy reliable performance for years to come.


