Mastering the Hatch Command in AutoCAD: A Comprehensive Guide

AutoCAD, the industry-leading computer-aided design (CAD) software developed by Autodesk, offers a multitude of powerful tools and commands for creating detailed and precise drawings. Among these tools, the Hatch command stands out as a fundamental feature for adding texture, pattern, and depth to drawings. In this comprehensive guide, we delve deep into the intricacies of using the Hatch command in AutoCAD, exploring various methods, techniques, and best practices for optimal utilization.
Understanding Hatching in AutoCAD:
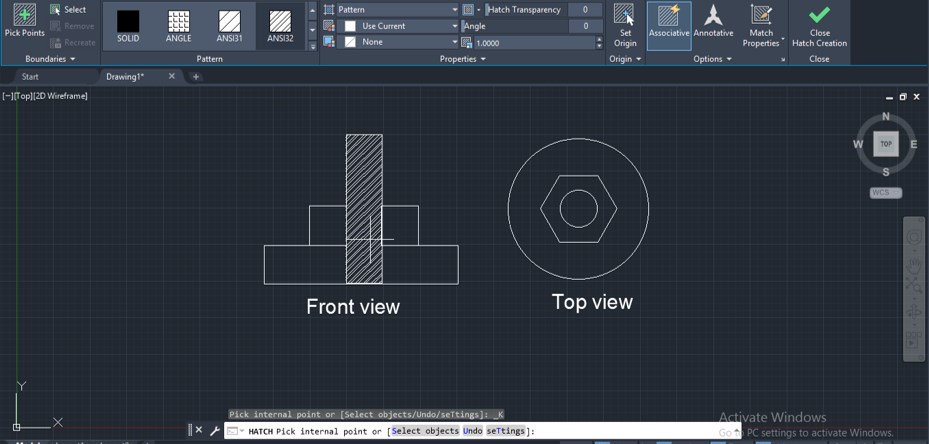
Hatching, also known as filling or shading, is a technique used to represent solid areas or regions in drawings by filling them with a pattern or texture. In AutoCAD, the Hatch command allows users to create hatched areas by defining boundary objects and selecting hatch patterns from predefined libraries or custom sources. Hatching is commonly used in architectural, engineering, and construction drawings to denote materials, surfaces, and other visual elements.
Using the Hatch Command:
AutoCAD offers multiple methods for using the Hatch command to create hatched areas in drawings:
1. Quick Access Toolbar:
The Quick Access Toolbar, located at the top of the AutoCAD interface, provides quick access to commonly used commands, including the Hatch command. To use the Hatch command from the Quick Access Toolbar, follow these steps:
- Click on the Hatch icon in the Quick Access Toolbar.
- Select the boundaries of the area you want to hatch by specifying points or selecting objects.
- Choose a hatch pattern from the Hatch Creation tab or the Hatch Editor palette.
- Press Enter to apply the hatch pattern to the selected area.
2. Ribbon Interface:
The Ribbon interface in AutoCAD organizes commands and tools into tabs and panels for easy access and navigation. To use the Hatch command from the Ribbon interface, follow these steps:
- Navigate to the Home tab on the Ribbon.
- Click on the Hatch panel to expand it.
- Click on the Hatch icon to activate the command.
- Select the boundaries of the area you want to hatch and choose a hatch pattern from the options provided.
- Press Enter to apply the hatch pattern to the selected area.
3. Command Line:
Users can also use the Command Line to execute the Hatch command by typing “HATCH” and pressing Enter. This method provides direct access to the command and allows users to input specific options and parameters as needed.
Key Hatch Command Options:
When using the Hatch command in AutoCAD, users can specify various options and parameters to customize the hatch pattern and behavior. Key options include:
- Pattern Type: Choose from a wide range of predefined hatch patterns, including solid fills, gradients, and custom patterns imported from external sources.
- Scale: Adjust the scale of the hatch pattern to control its density and appearance relative to the size of the hatched area.
- Angle: Set the angle of the hatch pattern relative to the X-axis or other reference angles, allowing for precise orientation and alignment.
- Associativity: Specify whether the hatch pattern is associative or non-associative, affecting its behavior when the boundary objects are modified or moved.
Advanced Techniques:
In addition to basic hatching methods, AutoCAD offers advanced techniques and tools for enhancing hatch patterns and efficiency:
- Boundary Detection: Use AutoCAD’s boundary detection tools to automatically identify and select boundaries for hatching, streamlining the process of defining hatched areas.
- Custom Hatch Patterns: Create custom hatch patterns using the Hatch Editor or external pattern files, allowing for unique and personalized hatch designs tailored to specific project requirements.
- Gradient Fills: Explore AutoCAD’s gradient fill options to create smooth transitions and blends between colors and shades within hatched areas, enhancing visual aesthetics and realism.
- Hatch Editing: Modify and edit existing hatch patterns using AutoCAD’s editing tools, such as grips, handles, and hatch object properties, to fine-tune appearance and alignment.
Best Practices:
To achieve optimal results when using the Hatch command in AutoCAD, it’s essential to adhere to the following best practices:
- Plan and Preview: Before applying hatch patterns, carefully plan the desired appearance and distribution of hatched areas, previewing different patterns and scales to ensure suitability and effectiveness.
- Layer Organization: Maintain a structured layering system and naming conventions for hatched areas, ensuring consistency and clarity in drawing organization and management.
- Boundary Selection: Use precise boundary selection methods, such as object snaps, selection windows, or polyline boundaries, to accurately define hatched areas and avoid gaps or overlaps.
- Scale Considerations: Consider the scale of the drawing and the intended output when selecting hatch patterns and scales, adjusting settings as needed to achieve optimal visibility and readability.
- Documentation: Document hatch settings and configurations in drawing templates or project standards documentation, ensuring consistency and repeatability across multiple drawings and projects.
Conclusion:
In conclusion, mastering the Hatch command in AutoCAD empowers designers and drafters to add texture, pattern, and depth to drawings with precision and efficiency. By understanding the various methods, options, and best practices for using the Hatch command, users can create hatched areas that enhance visualization, communication, and understanding in their drawings and designs. With AutoCAD’s versatile tools and features, designers can achieve precise and effective representation of hatched areas, bringing clarity and professionalism to their projects and contributing to the success of their endeavors.


