Mastering the FL Studio Interface: A Comprehensive Guide to Navigation and Workflow Optimization
Introduction: FL Studio, formerly known as FruityLoops, is a powerful digital audio workstation (DAW) that offers a wide range of tools and features for music production, recording, editing, and mixing. With its intuitive interface and robust functionality, FL Studio has become a favorite among musicians, producers, and DJs worldwide. In this comprehensive guide, we’ll take an in-depth look at the FL Studio interface, exploring its various components, navigation tools, and workflow optimization techniques to help you maximize your productivity and creativity.
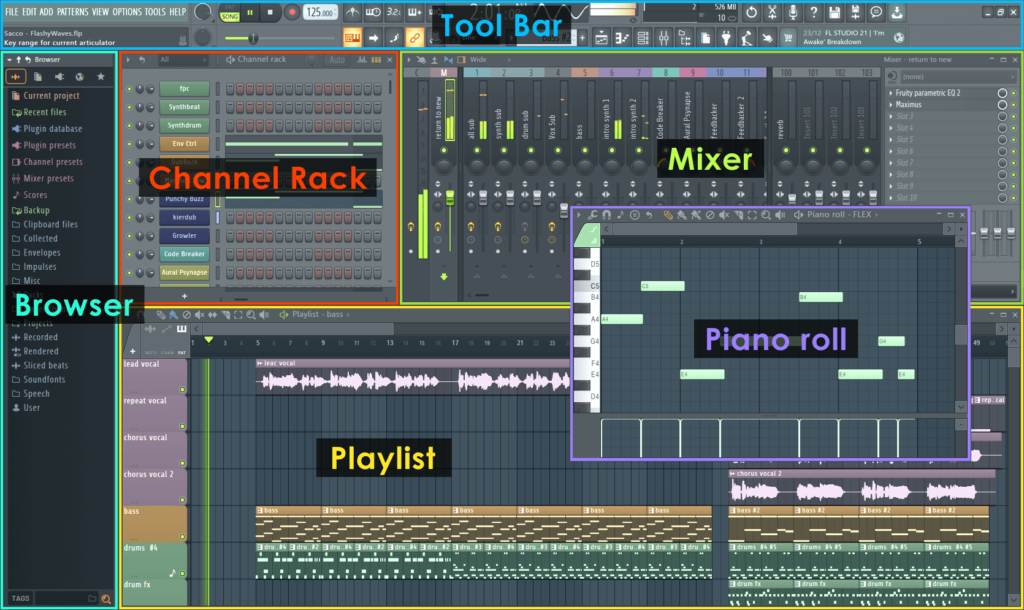
Understanding the FL Studio Interface
Before we dive into the specifics of navigating the FL Studio interface, let’s familiarize ourselves with its key components:
- Browser: The Browser is where you can access and manage your audio files, samples, presets, and plugins. It provides a convenient way to organize and browse through your library of sounds and instruments.
- Channel Rack: The Channel Rack is where you can create and arrange patterns for instruments and samples. Each pattern represents a sequence of notes or events that can be triggered by a MIDI controller or piano roll.
- Piano Roll: The Piano Roll is a graphical interface for editing MIDI notes and automation data. It allows you to precisely control the timing, pitch, and velocity of individual notes in your compositions.
- Mixer: The Mixer is where you can mix and process audio signals from various channels and tracks. It provides a comprehensive set of tools for adjusting levels, applying effects, and routing audio in your projects.
- Playlist: The Playlist is where you arrange and sequence your patterns and audio clips to create a complete song or composition. It allows you to organize and structure your project timeline and make arrangements.
- Toolbar: The Toolbar contains various tools and shortcuts for common tasks such as playback control, zooming, and editing. It provides quick access to essential functions to streamline your workflow.
Navigating the FL Studio Interface
Now that we have a basic understanding of the FL Studio interface, let’s explore how to navigate it effectively:
1. Browser Navigation:
- Use the tabs in the Browser to navigate between different categories of content, such as samples, plugins, and presets.
- Double-click on an item to preview it, and drag it into the Channel Rack or Playlist to use it in your project.
- Use the search bar to quickly find specific files or folders within the Browser.
2. Channel Rack and Piano Roll:
- Click on a channel in the Channel Rack to select it, and then use the Piano Roll to edit its MIDI notes and automation data.
- Use the tools in the Piano Roll toolbar to perform various editing tasks, such as drawing, painting, resizing, and quantizing notes.
- Use the piano keyboard at the left side of the Piano Roll to audition notes and chords, and use the mouse scroll wheel to navigate vertically.
3. Mixer Navigation:
- Use the Mixer tracks to adjust the volume, panning, and effects settings for each channel in your project.
- Click and drag the divider between Mixer tracks to resize them vertically, and use the scroll bars to navigate horizontally.
- Right-click on a Mixer track to access additional options, such as renaming, soloing, muting, and linking.
4. Playlist Navigation:
- Use the Playlist to arrange and sequence your patterns and audio clips into a cohesive composition.
- Click and drag patterns and audio clips to move them around the Playlist, and use the zoom controls to adjust the timeline view.
- Use the markers at the top of the Playlist to mark important sections of your project, such as verses, choruses, and bridges.
5. Toolbar Navigation:
- Use the playback controls in the Toolbar to start, stop, pause, and loop playback of your project.
- Use the zoom controls to adjust the zoom level of the main interface and Piano Roll.
- Use the snap settings to control the grid spacing and snap behavior when editing notes and patterns.
Workflow Optimization Techniques
In addition to basic navigation, here are some workflow optimization techniques to help you work more efficiently in FL Studio:
- Keyboard Shortcuts: Learn and memorize keyboard shortcuts for common tasks to speed up your workflow and reduce reliance on the mouse.
- Custom Templates: Create custom templates with your preferred settings, plugins, and instruments to streamline the start of new projects.
- Organization: Keep your projects organized by using color-coding, naming conventions, and folder structures to maintain clarity and focus.
- Channel Routing: Use channel routing and grouping to manage and process multiple channels and tracks simultaneously, reducing clutter and complexity in the Mixer.
- Automation Clips: Use automation clips to create dynamic changes in volume, panning, and effects parameters over time, adding movement and expression to your music.
Conclusion
In conclusion, mastering the FL Studio interface is essential for maximizing your productivity and creativity as a music producer. By familiarizing yourself with the various components of the interface and learning how to navigate them effectively, you can work more efficiently and confidently in FL Studio.
Remember to experiment with different workflow optimization techniques and find what works best for you. Whether you’re arranging patterns in the Channel Rack, editing MIDI notes in the Piano Roll, mixing tracks in the Mixer, or arranging compositions in the Playlist, FL Studio offers a wealth of tools and features to help you bring your musical ideas to life. With practice, dedication, and a passion for music production, you can unlock your full potential and create professional-quality music in FL Studio.


