Mastering Musical Precision: A Comprehensive Guide to Utilizing the Piano Roll in FL Studio
Introduction:
In the vast landscape of music production, FL Studio stands out as a powerhouse digital audio workstation (DAW), offering musicians, producers, and composers a versatile platform to bring their musical visions to life. At the heart of FL Studio’s creative toolkit lies the Piano Roll, a robust and intuitive interface for composing melodies, harmonies, and intricate musical sequences. In this extensive guide, we’ll delve deep into the world of the Piano Roll in FL Studio, exploring its features, functionalities, and advanced techniques to empower you to unleash your creativity and craft professional-quality music.
Understanding the Piano Roll:
Before we embark on our journey through the Piano Roll, let’s take a moment to understand its significance in the realm of music production:
The Piano Roll in FL Studio is a graphical interface that allows users to compose, edit, and manipulate MIDI notes with precision and ease. Modeled after a traditional piano keyboard, the Piano Roll provides a visual representation of musical notes, allowing users to input, edit, and arrange melodies, chords, and rhythms in a grid-based format. Whether you’re a seasoned pianist or a novice composer, the Piano Roll offers a versatile and intuitive platform for musical expression and creativity.
Exploring the Piano Roll Interface:
Now that we have a basic understanding of the Piano Roll, let’s explore its interface and learn how to navigate its various features and functionalities:
- Opening the Piano Roll:
- To open the Piano Roll, select a MIDI clip or instrument channel in the Channel Rack or Playlist.
- Right-click on the selected item and choose “Piano Roll” from the context menu, or simply press the shortcut key “P” on your keyboard.
- Grid and Snap Settings:
- The Piano Roll grid represents musical time in beats and measures, allowing users to quantize and align notes to the desired timing.
- Adjust the grid settings using the “Snap To Grid” dropdown menu to set the grid resolution (e.g., quarter notes, eighth notes, sixteenth notes).
- Enable or disable snapping to the grid by clicking on the magnet icon in the Piano Roll toolbar.
- Inputting Notes:
- To input notes in the Piano Roll, simply click on the desired grid position with the left mouse button.
- Use the piano keyboard on the left side of the Piano Roll to select the pitch of the note you wish to input.
- Experiment with different note durations by adjusting the length of the note using the mouse cursor.
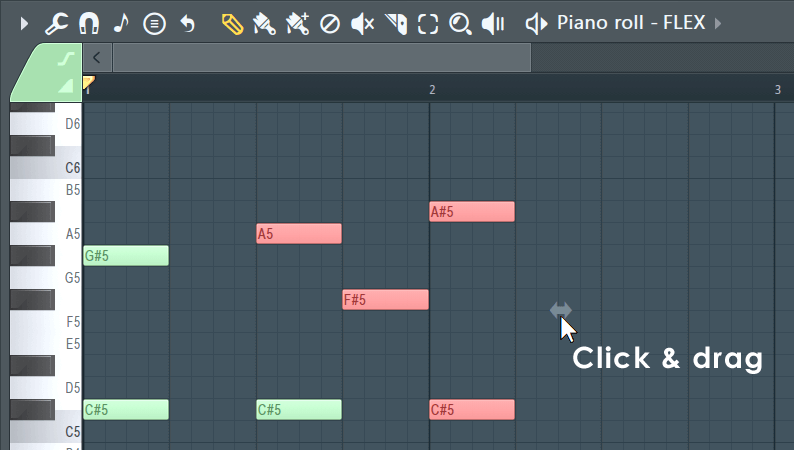
- Editing Notes:
- To edit existing notes in the Piano Roll, click and drag to move notes horizontally or vertically.
- Resize notes by clicking and dragging the edges of the note with the mouse cursor.
- Double-click on a note to open the Note Properties window, where you can adjust parameters such as velocity, panning, and fine pitch.
- Tools and Functions:
- The Piano Roll toolbar contains a variety of tools and functions for editing and manipulating notes.
- Use the “Paint” tool to quickly input notes by clicking and dragging across the grid.
- Experiment with the “Slice” tool to split notes into smaller segments or the “Mute” tool to silence individual notes.
Advanced Techniques and Tips:
Now that we’ve covered the basics of using the Piano Roll, let’s explore some advanced techniques and tips to enhance your workflow and creativity:
- Scale Highlighting:
- Enable “Scale Highlighting” in the Piano Roll settings to display the notes of a selected scale in a different color.
- This feature helps users stay within the confines of a specific scale or key signature, making it easier to compose melodies and harmonies.
- Chord Progressions:
- Experiment with building chord progressions by stacking multiple notes on top of each other within the Piano Roll.
- Use the “Chord” tool to quickly input common chord shapes and voicings, then customize them to fit your composition.
- Note Expressions:
- Take advantage of FL Studio’s Note Expressions feature to add dynamic expression and articulation to your MIDI notes.
- Use tools such as “Note Velocity,” “Note Pan,” and “Note Release” to add subtle variations and nuances to your performances.
- Automation Clips:
- Link parameters in the Piano Roll to automation clips in FL Studio’s Playlist to create dynamic changes over time.
- Experiment with automating parameters such as pitch bend, modulation, and filter cutoff to add movement and depth to your compositions.
Conclusion:
In conclusion, the Piano Roll in FL Studio is a powerful tool for composing, editing, and arranging MIDI notes with precision and creativity. Whether you’re crafting intricate melodies, building complex chord progressions, or experimenting with dynamic expressions, the Piano Roll offers a versatile platform for musical exploration and experimentation.
By familiarizing yourself with the features and functionalities of the Piano Roll and experimenting with advanced techniques and tips, you can unlock your full creative potential and take your music production skills to new heights in FL Studio. With dedication, practice, and a passion for music, the possibilities are endless in the world of the Piano Roll. Happy composing!


