How to use the color correction tool in PowerDirector
Color correction is a crucial aspect of video editing that allows you to adjust and enhance the colors of your footage, ensuring consistency and aesthetic appeal throughout your project. PowerDirector, developed by CyberLink, offers powerful color correction tools that enable you to manipulate colors, correct white balance, adjust exposure, and create visually compelling videos. This extensive guide will walk you through everything you need to know about using the color correction tools in PowerDirector, from basic adjustments to advanced techniques.
Understanding Color Correction
Color correction involves adjusting the color and tonal balance of your video footage to achieve a desired look or correct imperfections. Key aspects include:
- White Balance: Ensures accurate colors by neutralizing any color casts.
- Exposure: Adjusts brightness and contrast to enhance visibility and detail.
- Color Grading: Applies creative adjustments to achieve a specific mood or style.
Proper color correction enhances the visual quality of your videos, making them more engaging and professional.
Getting Started with Color Correction in PowerDirector
Importing Media
- Open PowerDirector: Launch PowerDirector and start a new project or open an existing one.
- Import Media: Import your video footage into the Media Room by clicking on “Import Media Files” and selecting your files.
Adding Footage to Timeline
- Drag Footage: Drag your video clips from the Media Room to the timeline.
Understanding the Color Correction Workspace
- Color Director Integration: Click on “Color Director” in the editing workspace to access advanced color correction tools.
Basic Color Correction Techniques
Adjusting White Balance
- Select Clip: Click on the video clip in the timeline to select it.
- Open Color Adjustment: Click on “Fix/Enhance” in the editing workspace.
- White Balance: Use the White Balance sliders to adjust the temperature (warmth) and tint (green/magenta).
Correcting Exposure
- Exposure Adjustment: Use the Exposure slider to adjust overall brightness.
- Contrast: Adjust the Contrast slider to enhance the difference between light and dark areas.
Enhancing Saturation and Vibrancy
- Saturation: Increase or decrease the Saturation slider to adjust the intensity of colors.
- Vibrancy: Use the Vibrancy slider to enhance the intensity of muted colors without oversaturating already vibrant colors.
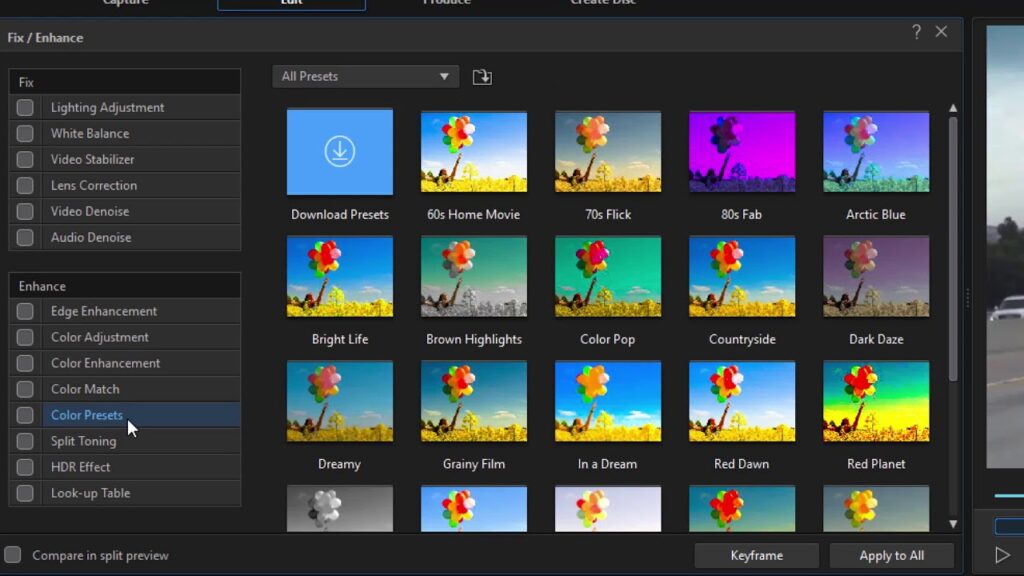
Applying Presets
- Presets: PowerDirector offers presets for quick adjustments. Click on “Presets” and choose a preset that matches your desired look (e.g., Daylight, Sunset).
Advanced Color Correction Techniques
Using Curves
- Curves Adjustment: Click on “Curves” in the Color Adjustment panel to adjust RGB curves for precise control over shadows, midtones, and highlights.
Color Grading
- Color Grading Tools: Utilize tools like color wheels or color sliders to adjust specific color tones (reds, blues, greens) for creative effects.
HSL Adjustments
- Hue, Saturation, and Luminance: Click on “HSL” to adjust individual color hues, saturation levels, and luminance values.
Masking and Tracking
- Masking: Use masking tools to apply color corrections to specific areas of your footage, such as faces or objects in motion.
- Tracking: Enable tracking to automatically follow a moving object or subject while applying color corrections.
Tips for Effective Color Correction
Use Reference Images
- Reference Image: Import a reference image with ideal color settings for comparison while adjusting your footage.
Maintain Consistency
- Consistent Settings: Apply similar color correction settings across all clips to maintain visual continuity throughout your video.
Monitor Output
- Playback: Regularly playback your video to ensure color corrections appear natural and consistent on different screens.
Save Presets
- Custom Presets: Save custom color correction settings as presets for future use on similar footage or projects.
Experiment with Effects
- Effects: Combine color correction with other video effects to achieve unique visual styles or effects.
Troubleshooting Common Issues
Color Casts
- White Balance: Adjust white balance settings to correct unwanted color casts (e.g., overly warm or cool tones).
Over or Under Exposure
- Exposure: Fine-tune exposure settings to restore details in overexposed highlights or underexposed shadows.
Inconsistent Color
- Color Matching: Use color matching tools to ensure consistent color appearance across different clips or footage sources.
Artifacts or Noise
- Noise Reduction: Apply noise reduction filters to minimize digital noise or artifacts caused by extreme color corrections.
Performance Issues
- Performance: Optimize performance by adjusting playback resolution or using proxy files for smoother editing with color correction.
Conclusion
Mastering color correction in PowerDirector enhances the visual quality of your videos, making them more appealing and professional. By understanding the basics of color adjustment, utilizing advanced techniques like curves and masking, and applying creative color grading, you can transform ordinary footage into visually stunning content. PowerDirector’s intuitive interface and comprehensive color correction tools empower you to achieve precise control over your video’s color and tone, ensuring your final production meets your creative vision. Experiment with different settings, learn from reference materials, and practice regularly to refine your color correction skills and elevate your video editing capabilities.


