How to Use Data Validation in Excel: A Comprehensive Guide
Data validation is one of Excel’s powerful features that allows users to control the type of data entered into a cell. By setting validation rules, users can ensure data accuracy and consistency, which is crucial for maintaining the integrity of spreadsheets and for performing accurate data analysis. This comprehensive guide will cover everything you need to know about using data validation in Excel, from basic concepts to advanced techniques and practical applications.
Table of Contents
- Introduction to Data Validation
- Benefits of Data Validation
- Types of Data Validation Rules
- Whole Number
- Decimal
- List
- Date
- Time
- Text Length
- Custom
- How to Apply Data Validation
- Step-by-Step Guide
- Using the Data Validation Dialog Box
- Creating Drop-Down Lists with Data Validation
- Static Drop-Down Lists
- Dynamic Drop-Down Lists
- Dependent Drop-Down Lists
- Advanced Data Validation Techniques
- Using Formulas for Custom Validation
- Applying Data Validation Across Multiple Sheets
- Data Validation with Conditional Formatting
- Managing Data Validation Rules
- Editing Existing Rules
- Removing Data Validation
- Copying and Pasting Data Validation
- Troubleshooting Common Data Validation Issues
- Identifying Invalid Data
- Handling Data Validation Errors
- Preventing Circumvention of Data Validation
- Practical Applications of Data Validation
- Ensuring Data Entry Accuracy
- Streamlining Data Entry Processes
- Enhancing Data Analysis and Reporting
- Best Practices for Using Data Validation
- Planning and Designing Data Validation Rules
- Educating Users on Data Validation
- Regularly Reviewing and Updating Validation Rules
- Conclusion
1. Introduction to Data Validation
Data validation in Excel is a feature that restricts the type of data or the values that users can enter into a cell. By setting specific criteria, you can prevent invalid data from being entered, which helps maintain the integrity and accuracy of your data. Data validation can be used for a variety of purposes, from ensuring correct data entry in a small table to enforcing strict data entry protocols in large datasets.
2. Benefits of Data Validation
- Improves Data Accuracy: Ensures that only valid data is entered, reducing errors and inaccuracies.
- Enhances Data Consistency: Standardizes data entry, ensuring uniformity across the dataset.
- Prevents Invalid Entries: Restricts input to specific types of data or values, preventing mistakes.
- Simplifies Data Entry: Provides users with clear guidelines and options, making data entry easier and faster.
- Facilitates Data Analysis: Ensures clean and reliable data, which is essential for accurate analysis and reporting.
3. Types of Data Validation Rules
Excel offers several types of data validation rules, each designed to restrict data entry to specific types of information:
Whole Number
- Definition: Allows only whole numbers within a specified range.
- Use Case: Suitable for fields requiring integer values, such as age or quantity.
Decimal
- Definition: Allows decimal numbers within a specified range.
- Use Case: Useful for fields requiring precise numerical input, such as measurements or financial data.
List
- Definition: Restricts entry to a predefined list of values.
- Use Case: Ideal for fields with a fixed set of options, such as departments or product categories.
Date
- Definition: Allows only dates within a specified range.
- Use Case: Ensures correct date formats for fields like birthdates or deadlines.
Time
- Definition: Allows only times within a specified range.
- Use Case: Suitable for fields requiring specific time entries, such as appointment times.
Text Length
- Definition: Restricts the number of characters entered in a cell.
- Use Case: Useful for fields with character limits, such as ID numbers or descriptions.
Custom
- Definition: Allows for complex validation rules using formulas.
- Use Case: Provides flexibility for advanced validation needs, such as conditional data entry rules.
4. How to Apply Data Validation
Step-by-Step Guide
- Select the Cell or Range: Highlight the cell or range of cells where you want to apply data validation.
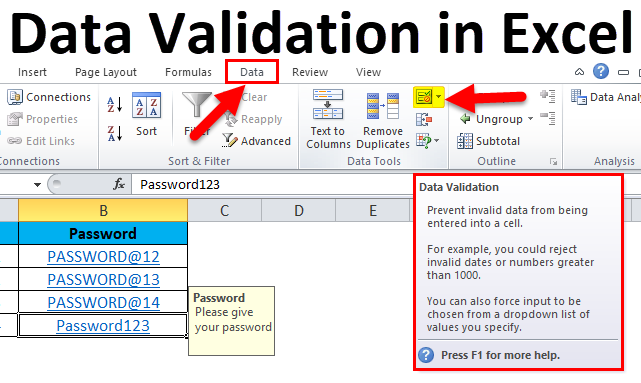
- Open Data Validation Dialog Box: Go to the “Data” tab on the Ribbon, then click “Data Validation” in the Data Tools group.
- Set Validation Criteria: In the Data Validation dialog box, select the criteria for the type of data you want to allow.
- Define Input Message: (Optional) Provide an input message to guide users on what data to enter.
- Set Error Alert: (Optional) Define an error alert to inform users when invalid data is entered.
Using the Data Validation Dialog Box
The Data Validation dialog box has three tabs:
- Settings: Define the validation criteria here.
- Input Message: Provide a message that appears when the user selects a cell.
- Error Alert: Customize the error message that appears when invalid data is entered.
5. Creating Drop-Down Lists with Data Validation
Static Drop-Down Lists
Static drop-down lists use a predefined list of values that do not change.
- Select the Cell or Range: Choose where you want the drop-down list.
- Open Data Validation Dialog Box: Go to “Data” > “Data Validation”.
- Select List: In the “Settings” tab, choose “List”.
- Enter Values: In the “Source” field, enter the values separated by commas (e.g.,
Option1, Option2, Option3).
Dynamic Drop-Down Lists
Dynamic drop-down lists update automatically when the source data changes.
- Create a Named Range: Define a named range for the list source.
- Use the Named Range: In the Data Validation dialog box, use the named range as the source (e.g.,
=ListName).
Dependent Drop-Down Lists
Dependent drop-down lists change based on the selection in another drop-down list.
- Create Named Ranges for Each Category: Define named ranges for the dependent lists.
- Use INDIRECT Function: In the Data Validation dialog box for the dependent list, use the INDIRECT function to refer to the selected category (e.g.,
=INDIRECT(A1)).
6. Advanced Data Validation Techniques
Using Formulas for Custom Validation
Custom validation rules can be created using formulas. For example, to ensure a cell value is greater than or equal to 10, you can use:
Copy code
= A1 >= 10
Applying Data Validation Across Multiple Sheets
To apply the same data validation rules across multiple sheets:
- Select Sheets: Group the sheets by selecting the first sheet, holding
Shift, and selecting the last sheet. - Apply Data Validation: Apply the data validation rule as usual.
Data Validation with Conditional Formatting
Combine data validation with conditional formatting to highlight cells that meet or do not meet the validation criteria.
- Apply Data Validation: Set your data validation rules.
- Conditional Formatting: Use conditional formatting to color-code cells based on their validity.
7. Managing Data Validation Rules
Editing Existing Rules
To edit an existing data validation rule:
- Select the Cell or Range: Highlight the cells with the validation rule you want to edit.
- Open Data Validation Dialog Box: Go to “Data” > “Data Validation”.
- Modify Criteria: Make the necessary changes to the validation criteria.
Removing Data Validation
To remove data validation from cells:
- Select the Cell or Range: Highlight the cells with data validation.
- Open Data Validation Dialog Box: Go to “Data” > “Data Validation”.
- Clear All: Click “Clear All” to remove the validation rules.
Copying and Pasting Data Validation
To copy and paste data validation rules:
- Copy the Cell or Range: Use
Ctrl+Cto copy the cells with the validation rules. - Paste Special: Select the destination cells, then use
Ctrl+Alt+V(or right-click and select “Paste Special”) and choose “Validation”.
8. Troubleshooting Common Data Validation Issues
Identifying Invalid Data
To find cells with invalid data:
- Circle Invalid Data: Go to “Data” > “Data Validation” > “Circle Invalid Data”. Excel will highlight cells that do not meet the validation criteria.
Handling Data Validation Errors
When users enter invalid data, Excel can show an error alert. Customize the error message to provide clear instructions:
- Error Alert: In the Data Validation dialog box, go to the “Error Alert” tab and customize the message.
Preventing Circumvention of Data Validation
Users can sometimes bypass data validation by copying and pasting values. To prevent this:
- Protect Worksheet: Use worksheet protection to prevent changes to cells with validation rules. Go to “Review” > “Protect Sheet”.
9. Practical Applications of Data Validation
Ensuring Data Entry Accuracy
Data validation ensures that only valid data is entered, reducing errors and improving data quality.
Streamlining Data Entry Processes
By providing drop-down lists and clear input guidelines, data validation simplifies and speeds up the data entry process.
Enhancing Data Analysis and Reporting
With accurate and consistent data, analysis and reporting become more reliable and insightful.
10. Best Practices for Using Data Validation
Planning and Designing Data Validation Rules
Carefully plan and design your data validation rules to meet the specific needs of your data entry and analysis requirements.
Educating Users on Data Validation
Ensure that users understand the importance of data validation and how to use it effectively.
Regularly Reviewing and Updating Validation Rules
Regularly review and update your data validation rules to ensure they remain relevant and effective.
11. Conclusion
Data validation is a crucial feature in Excel that enhances data accuracy, consistency, and reliability. By understanding and applying data validation rules effectively, users can significantly improve their data management practices. Whether you are creating simple lists or complex validation rules, the techniques and best practices outlined in this guide will help you make the most of Excel’s data validation capabilities. Through careful planning, implementation, and regular review, you can ensure that your data remains clean, consistent, and ready for analysis.


