How to Set Up Users and Permissions in QuickBooks: A Comprehensive Guide
Setting up users and permissions in QuickBooks is crucial for managing access to sensitive financial information and ensuring that each user has the appropriate level of access to perform their job duties. Whether you are using QuickBooks Online or QuickBooks Desktop, this comprehensive guide will walk you through the process of setting up users, assigning permissions, and best practices for maintaining security and efficiency in your accounting system.
Why Set Up Users and Permissions in QuickBooks?
Establishing user roles and permissions in QuickBooks offers several benefits:
- Security: Protect sensitive financial data by limiting access to authorized personnel only.
- Control: Maintain control over who can view, edit, or delete transactions and sensitive information.
- Compliance: Ensure compliance with internal policies and external regulations regarding data privacy and financial reporting.
- Efficiency: Streamline workflow by assigning specific roles and responsibilities to each user based on their job function.
- Audit Trail: Track user activities with an audit trail feature to monitor changes made to transactions and settings.
Setting Up Users and Permissions in QuickBooks Online
QuickBooks Online provides flexible options for managing users and their permissions to suit different organizational needs.
Step-by-Step Guide to Setting Up Users in QuickBooks Online
Step 1: Access User Management
- Log in to QuickBooks Online: Go to the QuickBooks Online login page and enter your credentials to access your account.
- Navigate to User Management: Once logged in, click on the Gear icon (⚙️) at the top right corner of the screen, then select “Manage Users” under the “Your Company” section.
Step 2: Add a New User
- Click on “Add user”: In the Manage Users window, click on the “Add user” button.
- Enter User Details: Fill in the required fields for the new user, including their name, email address, and role.
- Select User Role: Choose the appropriate user role from the available options. QuickBooks Online offers predefined roles such as “Master Administrator,” “Company Administrator,” “Standard User,” and “Reports Only.”
- Assign Permissions: Customize permissions based on the user’s role by selecting or deselecting specific access rights such as creating transactions, editing customers/vendors, or viewing reports.
- Invite User: Once permissions are set, click “Save” and then “Invite” to send an invitation to the new user via email.
Step 3: Manage User Permissions
- Edit User Permissions: To modify permissions for existing users, navigate to the Manage Users screen, click on the user’s name, and then select “Edit” next to their role.
- Adjust Permissions: Adjust permissions as needed by checking or unchecking the appropriate boxes for access rights.
- Save Changes: Click “Save” to apply the changes to the user’s permissions.
Step 4: Review and Test
- Review Settings: Double-check user roles and permissions to ensure they align with job responsibilities and security requirements.
- Test Access: Conduct a test to verify that each user can access the necessary features and data without encountering permission issues.
Setting Up Users and Permissions in QuickBooks Desktop
QuickBooks Desktop also allows you to set up multiple users with different levels of access and permissions.
Step-by-Step Guide to Setting Up Users in QuickBooks Desktop
Step 1: Access User Permissions
- Open QuickBooks Desktop: Launch QuickBooks Desktop and open your company file.
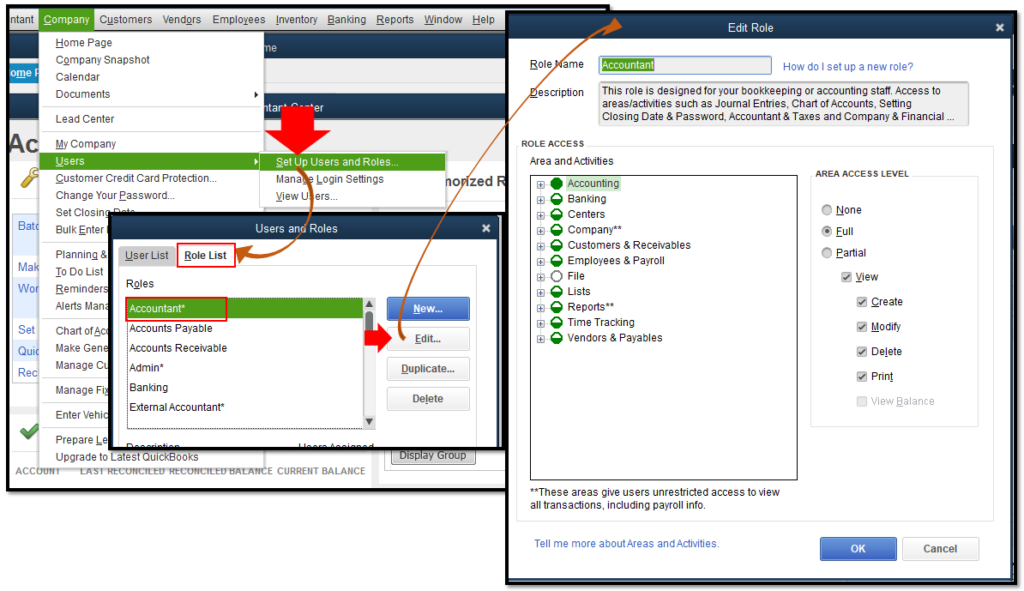
- Navigate to User Management: Go to the “Company” menu and select “Set Up Users and Roles,” then “Set Up Users.”
- Create New User: Click on “Add User” to create a new user profile.
Step 2: Enter User Information
- User Details: Enter the user’s full name, user ID (login), and password.
- Role Assignment: Assign a predefined role to the user, such as “Admin,” “Standard User,” or “Reports Only.”
- Customize Access: Customize user access by selecting or deselecting specific permissions, such as creating transactions, printing checks, or accessing sensitive financial information.
- Save User: Click “Next” to save the user profile and proceed to set additional permissions if necessary.
Step 3: Set Additional Permissions
- Modify Role Permissions: If the predefined roles do not meet your needs, click “Add User” under “Set Up Users and Roles” to create custom roles with tailored permissions.
- Customize Permissions: Define specific permissions for custom roles by selecting or deselecting checkboxes for access rights.
- Save and Close: Once permissions are set, click “Save Changes” and then “Close” to apply the settings.
Step 4: Manage User List
- Edit User Information: To edit user information or modify permissions for existing users, go to “Set Up Users and Roles” under the “Company” menu.
- Select User: Select the user from the list and click “Edit User” to make changes to their profile and permissions.
- Save Changes: After adjusting permissions, click “OK” to save changes and update user settings.
Best Practices for Managing Users and Permissions
To effectively manage users and permissions in QuickBooks, consider the following best practices:
1. Regular Review of User Roles
- Periodic Audit: Conduct periodic audits of user roles and permissions to ensure they align with current job responsibilities and organizational needs.
- Adjust as Necessary: Update user roles and permissions as job roles evolve or organizational structure changes.
2. Limit Access to Sensitive Information
- Need-to-Know Basis: Grant access to sensitive financial information only to users who require it to perform their job duties.
- Role-Based Access: Use role-based access controls to restrict access to payroll, banking, and other confidential data.
3. Implement Password Policies
- Strong Passwords: Require users to create strong passwords that include a combination of letters, numbers, and special characters.
- Regular Updates: Enforce periodic password updates to enhance security and reduce the risk of unauthorized access.
4. Train Users on Security Practices
- Security Awareness: Provide training to users on security best practices, such as recognizing phishing attempts and safeguarding login credentials.
- Data Handling: Educate users on proper data handling procedures to prevent accidental exposure or loss of sensitive information.
5. Use Audit Trail Feature
- Monitor Activities: Enable the audit trail feature in QuickBooks to track changes made by users, including transactions, edits, and deletions.
- Review Logs: Regularly review audit logs to detect unauthorized activities and maintain accountability among users.
Advanced Tips for User Management
For advanced user management in QuickBooks, consider these additional tips:
1. Multi-Location Access
- Location-Based Permissions: Utilize QuickBooks’ location tracking feature to assign permissions based on geographical locations or business units.
- Remote Access: Allow remote access to QuickBooks for users working from different locations while maintaining security controls.
2. Integration with Third-Party Apps
- Enhanced Functionality: Integrate third-party apps with QuickBooks for additional features such as advanced reporting, inventory management, or CRM capabilities.
- Compatibility: Ensure that third-party apps comply with QuickBooks’ security standards and do not compromise data integrity.
3. Role-Based Reporting
- Custom Reports: Create custom reports in QuickBooks to provide role-based insights and financial analysis tailored to specific user roles.
- Scheduled Reports: Schedule automated reports to be sent to users based on their role and reporting needs.
Troubleshooting User and Permissions Issues
Despite careful setup, you may encounter issues related to users and permissions. Here are common problems and their solutions:
Access Denied Errors
- Permissions Review: Check user permissions to ensure they have the necessary access rights for the task or report.
- Role Adjustment: Modify user roles or create custom roles with appropriate permissions if access is restricted unnecessarily.
User Lockout
- Password Reset: Reset the user’s password to unlock their account if they have been locked out due to multiple failed login attempts.
- Login Assistance: Provide assistance to the user if they are unable to access QuickBooks due to technical issues or forgotten passwords.
Unauthorized Changes
- Audit Trail Review: Investigate unauthorized changes by reviewing the audit trail log in QuickBooks to identify the user responsible for the modifications.
- Security Alert: Immediately revoke access and update permissions for users found to be making unauthorized changes.
Conclusion
Setting up users and permissions in QuickBooks is essential for maintaining data security, regulatory compliance, and operational efficiency in your organization. By following the steps outlined in this guide and implementing best practices for user management, you can effectively control access to sensitive financial information and ensure that each user has the appropriate level of access to perform their job responsibilities. Regularly review and update user roles and permissions as needed to adapt to organizational changes and evolving security requirements. With proper user management practices in place, you can leverage QuickBooks’ powerful features while safeguarding your financial data and promoting overall business success.


