How to Set Up a Guest Network: A Comprehensive Guide
Setting up a guest network is an excellent way to enhance the security of your home or office Wi-Fi. A guest network allows visitors to connect to the internet without accessing your primary network and its connected devices. This comprehensive guide will walk you through the process of setting up a guest network, covering the benefits, detailed steps for various routers, security measures, and best practices to ensure a seamless and secure experience.
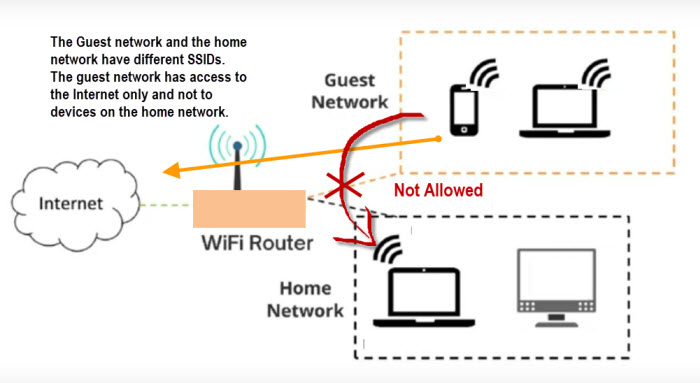
Understanding Guest Networks
What is a Guest Network?
A guest network is a separate Wi-Fi network that provides internet access to visitors without granting access to your primary network and its resources. It is isolated from your main network to enhance security and privacy.
Benefits of a Guest Network
- Enhanced Security: Prevents guests from accessing sensitive information and devices on your primary network.
- Controlled Access: Limits internet usage and access for guests.
- Bandwidth Management: Helps manage and allocate bandwidth more effectively.
- Privacy Protection: Protects personal and work-related data from potential intrusions.
Preparing for Guest Network Setup
Check Your Router’s Capabilities
Before setting up a guest network, ensure your router supports this feature. Most modern routers do, but it’s important to verify.
- Router Manual: Refer to the user manual or manufacturer’s website for information on guest network capabilities.
- Firmware Update: Ensure your router’s firmware is up to date to access the latest features and security improvements.
Gather Necessary Information
- Router’s IP Address: Commonly
192.168.1.1or192.168.0.1. - Admin Username and Password: Default credentials can usually be found in the manual or on a label on the router.
Step-by-Step Guide to Setting Up a Guest Network
General Steps for Most Routers
Step 1: Access the Router Settings
- Connect to the Router: Ensure your device is connected to the router via Wi-Fi or Ethernet.
- Open a Web Browser: Enter the router’s IP address in the address bar.
- Login: Enter the admin username and password to access the router’s settings.
Step 2: Navigate to Guest Network Settings
- Find Wireless Settings: Look for a section labeled “Wireless,” “Wi-Fi,” or “Network.”
- Locate Guest Network Option: Find the “Guest Network” or “Guest Access” section.
Step 3: Configure Guest Network
- Enable Guest Network: Toggle the option to enable the guest network.
- Set Network Name (SSID): Enter a unique name for the guest network.
- Choose Security Settings: Select WPA2 or WPA3 encryption for security.
- Set Password: Create a strong password for the guest network.
- Configure Additional Settings: Adjust settings such as access time limits, bandwidth limits, and network isolation.
Step 4: Save and Apply Settings
- Save Changes: Click “Save” or “Apply” to activate the guest network.
- Reboot Router (if necessary): Some routers may require a reboot to apply changes.
Detailed Steps for Specific Routers
Setting Up a Guest Network on a Linksys Router
- Access Router Settings: Connect to the router and enter
192.168.1.1in a web browser. - Login: Enter the admin username and password.
- Navigate to Guest Access: Go to “Wireless” > “Guest Access.”
- Enable Guest Access: Toggle “Guest Access” to “On.”
- Set Network Name: Enter a unique SSID for the guest network.
- Set Security Settings: Choose WPA2/WPA3 encryption and set a password.
- Save Settings: Click “Save” or “Apply.”
Setting Up a Guest Network on a Netgear Router
- Access Router Settings: Connect to the router and enter
192.168.0.1orrouterlogin.netin a web browser. - Login: Enter the admin username and password.
- Navigate to Guest Network: Go to “Advanced” > “Setup” > “Guest Network.”
- Enable Guest Network: Check the box to enable the guest network.
- Set Network Name: Enter a unique SSID for the guest network.
- Set Security Settings: Choose WPA2/WPA3 encryption and set a password.
- Save Settings: Click “Apply.”
Setting Up a Guest Network on an ASUS Router
- Access Router Settings: Connect to the router and enter
192.168.1.1in a web browser. - Login: Enter the admin username and password.
- Navigate to Guest Network: Go to “General” > “Guest Network.”
- Enable Guest Network: Toggle “Enable” to turn on the guest network.
- Set Network Name: Enter a unique SSID for the guest network.
- Set Security Settings: Choose WPA2/WPA3 encryption and set a password.
- Configure Additional Settings: Adjust settings such as time limits and access restrictions.
- Save Settings: Click “Apply.”
Configuring Guest Network on Mesh Wi-Fi Systems
Google Nest Wi-Fi
- Open Google Home App: Open the Google Home app on your smartphone.
- Select Wi-Fi Settings: Tap “Wi-Fi” > “Guest Network.”
- Enable Guest Network: Toggle “Guest Network” to “On.”
- Set Network Name: Enter a unique SSID for the guest network.
- Set Password: Create a strong password.
- Share Guest Network: Optionally, add devices that guests can access (e.g., Chromecast).
- Save Settings: Tap “Save.”
Eero
- Open Eero App: Open the Eero app on your smartphone.
- Navigate to Settings: Tap “Settings” > “Guest Network.”
- Enable Guest Network: Toggle “Guest Network” to “On.”
- Set Network Name: Enter a unique SSID for the guest network.
- Set Password: Create a strong password.
- Save Settings: Tap “Save.”
Securing Your Guest Network
Best Practices for Guest Network Security
- Use Strong Encryption: Always use WPA2 or WPA3 encryption.
- Set a Strong Password: Create a complex, unique password.
- Enable Network Isolation: Ensure guests cannot access your primary network.
- Monitor Guest Network Usage: Regularly check connected devices and network activity.
- Limit Access Time: Set time limits for guest network access.
Advanced Security Measures
Enable Network Isolation
Network isolation prevents devices on the guest network from communicating with devices on the primary network.
- Access Router Settings: Follow the steps to access your router settings.
- Enable Network Isolation: Locate the network isolation option in the guest network settings and enable it.
- Save Settings: Click “Save” or “Apply.”
Bandwidth Management
Limit the bandwidth available to the guest network to ensure optimal performance for your primary network.
- Access Router Settings: Follow the steps to access your router settings.
- Navigate to QoS Settings: Go to “Quality of Service” or “Bandwidth Control.”
- Set Bandwidth Limits: Allocate a specific amount of bandwidth to the guest network.
- Save Settings: Click “Save” or “Apply.”
Regular Firmware Updates
Keep your router’s firmware up to date to ensure the latest security patches and features.
- Check for Updates: Access your router settings and look for firmware updates.
- Download and Install: Follow the instructions to download and install the latest firmware.
Troubleshooting Common Issues
Guest Network Not Visible
- Check Settings: Ensure the guest network is enabled in the router settings.
- Reboot Router: Restart the router to apply changes.
- Firmware Update: Update the router firmware to the latest version.
Guest Network Not Connecting
- Check Password: Ensure guests are using the correct password.
- Check Security Settings: Verify the encryption type (WPA2/WPA3) is correctly set.
- Reboot Devices: Restart the router and guest devices.
Slow Internet on Guest Network
- Bandwidth Management: Ensure bandwidth limits are appropriately set.
- Network Traffic: Check for heavy network usage and manage connected devices.
- Router Placement: Ensure the router is placed centrally for optimal signal coverage.
Best Practices for Managing Guest Network
Regular Monitoring
- Check Connected Devices: Regularly check for and remove unauthorized devices.
- Monitor Network Activity: Use router tools or third-party software to monitor network usage.
Periodic Password Changes
Change the guest network password periodically to maintain security.
- Access Router Settings: Follow the steps to access your router settings.
- Change Password: Update the guest network password.
- Notify Guests: Inform regular guests of the new password.
Educate Guests
Inform guests about the purpose of the guest network and encourage responsible usage.
- Network Rules: Explain any rules or restrictions for using the guest network.
- Security Practices: Encourage guests to avoid visiting malicious websites and downloading suspicious files.
Conclusion
Setting up a guest network is a simple yet effective way to enhance the security and performance of your home or office Wi-Fi. By following the detailed steps and best practices outlined in this comprehensive guide, you can create a secure and reliable guest network for visitors. Regular monitoring, periodic password changes, and educating guests about responsible usage will help maintain the security and efficiency of your network. With a well-configured guest network, you can enjoy peace of mind knowing your primary network and its resources are protected.


