How to Install Python on Windows/Mac/Linux
Introduction
Python is a versatile and widely-used programming language that is known for its simplicity and readability. It is an excellent choice for both beginners and experienced developers. This comprehensive guide will walk you through the process of installing Python on Windows, Mac, and Linux operating systems. By the end of this guide, you’ll have Python up and running on your computer, ready for you to start coding.
Table of Contents
- Introduction
- Prerequisites
- Installing Python on Windows
- Downloading Python
- Running the Installer
- Verifying the Installation
- Setting Up Environment Variables
- Installing Python on Mac
- Using the Official Installer
- Using Homebrew
- Verifying the Installation
- Installing Python on Linux
- Using the Package Manager
- Building from Source
- Verifying the Installation
- Setting Up a Virtual Environment
- What is a Virtual Environment?
- Creating a Virtual Environment
- Activating and Deactivating a Virtual Environment
- Common Post-Installation Tasks
- Installing Pip
- Updating Pip
- Installing Packages
- Conclusion
Prerequisites
Before you begin, make sure you have administrative access to your computer. You’ll also need a stable internet connection to download the necessary files.
Installing Python on Windows
Downloading Python
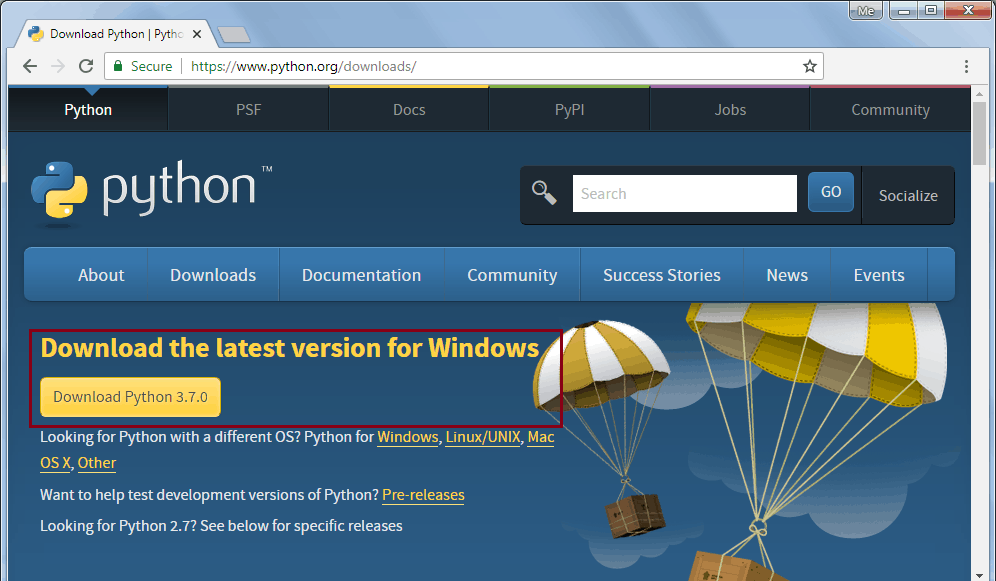
- Open a Web Browser: Open your preferred web browser and navigate to the official Python website: python.org.
- Navigate to the Downloads Section: Click on the “Downloads” link in the top navigation bar.
- Choose the Latest Version: You will see a button that suggests the latest version of Python for Windows. Click on this button to start the download.
Running the Installer
- Locate the Downloaded Installer: Once the download is complete, locate the installer file (it will typically be in your “Downloads” folder) and double-click it to run.
- Run the Installer: The Python installer will open. Check the box that says “Add Python to PATH” at the bottom of the window. This step is crucial as it allows you to run Python from the command line.
- Choose Installation Type: You can either choose the “Install Now” option, which installs Python with the default settings, or click on “Customize installation” for more options. For most users, the default settings are sufficient.
- Complete the Installation: Click on “Install Now” and the installer will begin the installation process. This may take a few minutes. Once the installation is complete, you will see a screen confirming the successful installation. Click on “Close” to exit the installer.
Verifying the Installation
- Open Command Prompt: Press
Win + Rto open the Run dialog, typecmd, and press Enter to open the Command Prompt. - Check Python Version: Type
python --versionand press Enter. You should see the installed version of Python displayed.
Setting Up Environment Variables
If you didn’t add Python to the PATH during the installation, you can do it manually:
- Open System Properties: Right-click on “This PC” or “Computer” on the desktop or in File Explorer, and select “Properties”.
- Advanced System Settings: Click on “Advanced system settings” on the left sidebar.
- Environment Variables: In the System Properties window, click on the “Environment Variables” button.
- Edit Path Variable: In the Environment Variables window, find the “Path” variable in the “System variables” section, select it, and click “Edit”.
- Add Python Path: Click “New” and add the path to your Python installation (e.g.,
C:\Python39\). Also, add the path to the Scripts directory (e.g.,C:\Python39\Scripts\). - Save and Close: Click “OK” to close all dialog boxes.
Installing Python on Mac
Using the Official Installer
- Open a Web Browser: Open your preferred web browser and navigate to the official Python website: python.org.
- Navigate to the Downloads Section: Click on the “Downloads” link in the top navigation bar.
- Choose the Latest Version: You will see a button that suggests the latest version of Python for macOS. Click on this button to start the download.
- Run the Installer: Once the download is complete, locate the installer file (usually in your “Downloads” folder) and double-click it to run.
- Follow Installation Instructions: The installer will guide you through the installation process. Follow the prompts and agree to the terms and conditions.
- Complete the Installation: Once the installation is complete, you will see a confirmation screen. Click on “Close” to exit the installer.
Using Homebrew
Homebrew is a popular package manager for macOS that makes it easy to install software like Python.
- Install Homebrew: If you don’t already have Homebrew installed, open the Terminal and paste the following command:shCopy code
/bin/bash -c "$(curl -fsSL https://raw.githubusercontent.com/Homebrew/install/HEAD/install.sh)" - Install Python: Once Homebrew is installed, run the following command in the Terminal to install Python:shCopy code
brew install python - Verify Installation: After the installation is complete, verify the installation by running:shCopy code
python3 --version
Installing Python on Linux
Using the Package Manager
Most Linux distributions come with Python pre-installed. However, you may want to install a newer version. The commands for installing Python will vary depending on your distribution.
Ubuntu/Debian
- Update Package List: Open the Terminal and run:shCopy code
sudo apt update - Install Python: Install Python by running:shCopy code
sudo apt install python3 - Verify Installation: Check the installed version by running:shCopy code
python3 --version
Fedora
- Update Package List: Open the Terminal and run:shCopy code
sudo dnf check-update - Install Python: Install Python by running:shCopy code
sudo dnf install python3 - Verify Installation: Check the installed version by running:shCopy code
python3 --version
Arch Linux
- Update Package List: Open the Terminal and run:shCopy code
sudo pacman -Syu - Install Python: Install Python by running:shCopy code
sudo pacman -S python - Verify Installation: Check the installed version by running:shCopy code
python --version
Building from Source
If you need a specific version of Python or want to build it from source, follow these steps:
- Install Dependencies: Install the necessary build dependencies. For Ubuntu, run:shCopy code
sudo apt update sudo apt install -y build-essential libssl-dev libffi-dev python3-dev - Download Python Source Code: Download the latest source code from the official Python website:shCopy code
wget https://www.python.org/ftp/python/3.x.x/Python-3.x.x.tgzReplace3.x.xwith the desired version number. - Extract the Archive: Extract the downloaded archive:shCopy code
tar -xf Python-3.x.x.tgz - Compile and Install: Change into the extracted directory and compile Python:shCopy code
cd Python-3.x.x ./configure --enable-optimizations make -j 4 sudo make altinstallReplace3.x.xwith the version number. The-j 4flag speeds up the build process by using 4 CPU cores.
Setting Up a Virtual Environment
What is a Virtual Environment?
A virtual environment is an isolated Python environment that allows you to manage dependencies for your projects without affecting the global Python installation.
Creating a Virtual Environment
- Install virtualenv: If it’s not already installed, you can install it using pip:shCopy code
pip install virtualenv - Create a Virtual Environment: Navigate to your project directory and run:shCopy code
python3 -m venv myenvReplacemyenvwith the name of your virtual environment.
Activating and Deactivating a Virtual Environment
- Activate the Virtual Environment:
- On Windows:shCopy code
myenv\Scripts\activate - On Mac/Linux:shCopy code
source myenv/bin/activate
- On Windows:shCopy code
- Deactivate the Virtual Environment: To deactivate the virtual environment, simply run:shCopy code
deactivate
Common Post-Installation Tasks
Installing Pip
Pip is the package installer for Python, used to install and manage software packages.
- Verify Pip Installation: Pip is usually installed with Python. Check if it’s installed by running:shCopy code
pip --version - Install Pip (if not installed): If pip is not installed, you can download and install it by running:shCopy code
curl https://bootstrap.pypa.io/get-pip.py -o get-pip.py python get-pip.py
Updating Pip
- Update Pip: It’s a good idea to keep pip up to date. Update pip by running:shCopy code
pip install --upgrade pip
Installing Packages
- Install a Package: To install a package using pip, run:shCopy code
pip install package_nameReplacepackage_namewith the name of the package you want to install.
Conclusion
Installing Python on Windows, Mac, and Linux is a straightforward process that involves downloading the appropriate installer or using a package manager. By following the steps outlined in this guide, you will have Python installed and configured on your system. Additionally, setting up virtual environments and managing packages with pip will help you maintain a clean and organized development environment. Whether you are a beginner or an experienced developer, having Python installed and properly configured is the first step towards building powerful and efficient applications.


