How to install a CPU cooler
Introduction to Installing a CPU Cooler
A CPU cooler is essential for maintaining optimal thermal performance and prolonging the lifespan of your processor. Installing a CPU cooler involves attaching the cooler to your CPU and securing it properly to ensure efficient heat dissipation. Here’s a detailed step-by-step guide on how to install an air CPU cooler:
Preparation
Before you begin installing the CPU cooler, gather the necessary tools and components:
- Tools Needed:
- Screwdriver (usually Phillips-head, sometimes flathead or hex depending on cooler design)
- Thermal paste (typically included with the cooler or purchased separately)
- Rubbing alcohol and lint-free cloth (for cleaning CPU and applying thermal paste)
- Components Needed:
- CPU cooler (air cooler with heatsink and fan)
- Backplate or mounting brackets (if required by the cooler)
- Mounting screws or clips (included with the cooler)
- CPU (already installed in the motherboard)
- Safety Precautions:
- Power off your computer and unplug it from the power source to prevent electrical shock.
- Ground yourself by touching a metal part of the case to discharge static electricity, which can damage sensitive components.
Step-by-Step Guide to Install a CPU Cooler
Step 1: Prepare the Motherboard
- Remove Existing Cooler (if applicable):
- If replacing an existing CPU cooler, disconnect the fan cable and unscrew the cooler from the motherboard. Clean off any residual thermal paste from the CPU using rubbing alcohol and a lint-free cloth.
- Install Backplate or Mounting Brackets (if required):
- Some CPU coolers come with a backplate or mounting brackets that need to be installed on the underside of the motherboard. Follow the manufacturer’s instructions to secure these components in place.
Step 2: Apply Thermal Paste
- Apply Thermal Paste:
- Apply a small amount of thermal paste (about the size of a pea or rice grain) onto the center of the CPU. Avoid spreading the paste; the pressure from mounting the cooler will evenly distribute it.
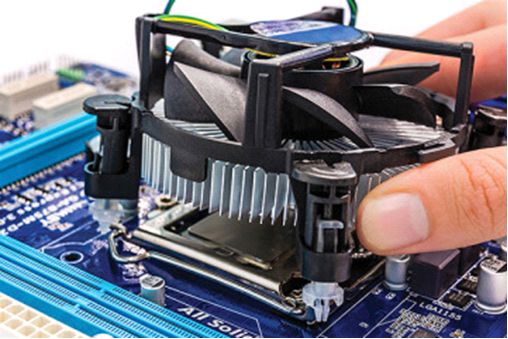
Step 3: Install the CPU Cooler
- Attach Cooler to CPU:
- Align the CPU cooler’s mounting brackets or screws with the corresponding holes around the CPU socket on the motherboard.
- Gently lower the cooler onto the CPU, ensuring that the base makes contact with the thermal paste.
- Secure Cooler in Place:
- Use the provided screws or clips to secure the cooler to the motherboard. Tighten them evenly in a diagonal pattern to ensure even pressure and proper contact between the cooler and CPU.
- Connect Fan Cable:
- Attach the CPU cooler’s fan cable to the CPU fan header on the motherboard. This header is usually labeled and provides power to the fan.
Step 4: Cable Management
- Route Fan Cable:
- Route the CPU cooler’s fan cable neatly along the motherboard and secure it using cable ties or Velcro straps. Ensure the cable does not obstruct other components or interfere with airflow.
Step 5: Test and Monitor
- Power On Your Computer:
- Once the CPU cooler is installed, plug your computer back into the power source and power it on.
- Enter BIOS/UEFI settings or use monitoring software to check CPU temperatures and fan speeds. Ensure temperatures are within safe operating limits.
Step 6: Maintenance and Troubleshooting
- Regular Maintenance:
- Periodically check CPU temperatures and fan operation using monitoring software. Clean dust buildup on the CPU cooler’s heatsink and fan blades using compressed air.
- Troubleshooting:
- If you encounter high CPU temperatures or noisy fan operation, check for loose cooler mounts, insufficient thermal paste application, or fan speed settings in BIOS/UEFI.
Conclusion
Installing a CPU cooler is a crucial step in building or upgrading a computer system to ensure efficient heat dissipation and optimal performance of your processor. By following this step-by-step guide and taking necessary precautions, you can successfully install an air CPU cooler for your desktop PC.
Always refer to specific instructions provided by your CPU cooler manufacturer and motherboard manual for detailed guidance and compatibility information tailored to your hardware.


