How to Add Particle Effects in PowerDirector
Particle effects are a powerful tool in video editing that can enhance the visual appeal of your projects. CyberLink PowerDirector, a comprehensive video editing software, offers a wide array of particle effects that can be customized to fit various themes and styles. This guide will provide an in-depth look at how to add particle effects in PowerDirector, from the basics to advanced techniques.
1. Introduction to Particle Effects
Particle effects simulate natural or magical phenomena such as snow, rain, fire, smoke, sparkles, and more. They can add dynamic elements to your videos, making them more engaging and visually appealing.
a. What Are Particle Effects?
- Definition: Particle effects consist of many small, moving objects that collectively create an animated effect.
- Purpose: Used to simulate realistic or fantastical elements that enhance the storytelling or aesthetic appeal of a video.
b. Benefits of Using Particle Effects
- Visual Appeal: Adds dynamic and eye-catching elements to videos.
- Engagement: Keeps viewers engaged with visually stimulating effects.
- Storytelling: Enhances the narrative by adding relevant visual elements.
2. Getting Started with Particle Effects in PowerDirector
Before diving into adding particle effects, you need to set up your project and familiarize yourself with the interface.
a. Setting Up Your Project
- Open PowerDirector: Launch PowerDirector on your computer.
- Import Media: Click on the “Import Media” button to add your video clips and other assets.
- Add to Timeline: Drag your media from the Media Library to the timeline.
b. Accessing the Particle Room
- Particle Room: Click on the “Particle Room” icon located on the left-hand panel. This icon looks like a spark or explosion.
- Explore Presets: Browse through the various preset particle effects available. PowerDirector offers a range of effects such as snow, rain, fireworks, and more.
3. Adding Particle Effects to Your Video
Now that your project is set up and you have accessed the Particle Room, you can start adding particle effects to your video.
a. Selecting a Particle Effect
- Choose Effect: Select a particle effect from the list of presets.
- Preview: Preview the effect by hovering over it or by clicking the play button in the preview window.
b. Applying the Effect
- Drag and Drop: Drag the selected particle effect onto the timeline, placing it on a new track above your video clip.
- Adjust Duration: Adjust the duration of the particle effect by dragging the edges of the effect clip to match the desired length.
4. Customizing Particle Effects
PowerDirector allows you to customize particle effects to better fit your project’s needs. This section will cover the various customization options available.
a. Opening the Particle Designer
- Select Effect: Click on the particle effect clip in the timeline to select it.
- Particle Designer: Click on the “Designer” button that appears above the timeline, then select “Particle Designer.”
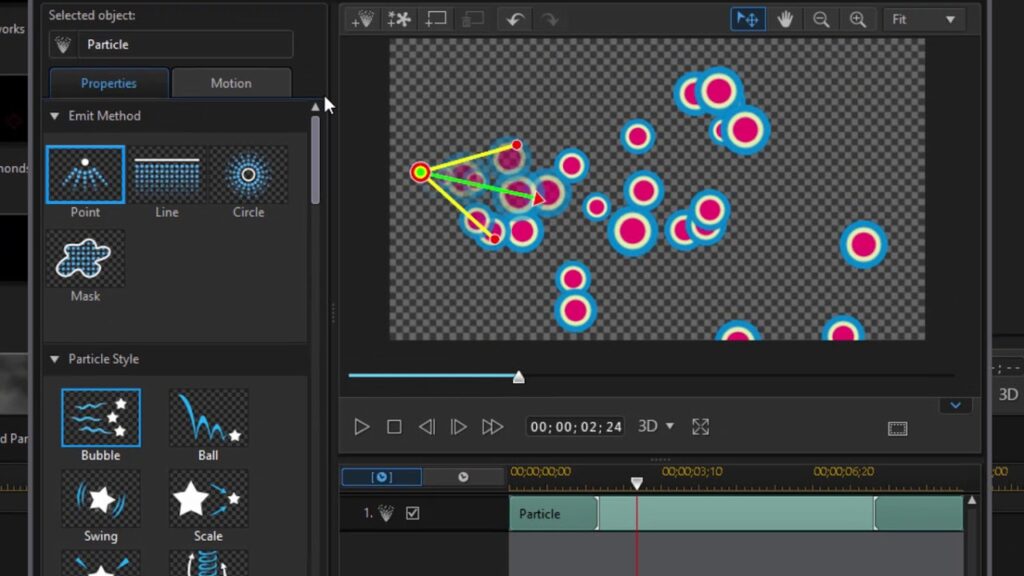
b. Adjusting Particle Properties
- Emitters: Adjust the properties of the emitters, which are the sources of the particles. You can change the number, size, and position of emitters.
- Particle Settings: Modify particle settings such as size, speed, and lifespan to achieve the desired effect.
- Color and Opacity: Change the color and opacity of the particles to match the theme of your video.
c. Adding Motion to Particle Effects
- Motion Path: Add a motion path to the particle effect by clicking on the “Motion” tab in the Particle Designer. This allows you to animate the movement of the particles.
- Keyframes: Use keyframes to create smooth transitions and movements for the particle effect. Set keyframes at different points on the timeline and adjust the particle properties at each keyframe.
5. Advanced Techniques with Particle Effects
For advanced users, there are several techniques to create more complex and visually stunning particle effects.
a. Layering Multiple Particle Effects
Layering multiple particle effects can create a rich and dynamic visual experience.
- Add Multiple Effects: Drag and drop multiple particle effects onto separate tracks in the timeline.
- Adjust Timing: Stagger the start and end times of the effects to create a seamless transition between them.
- Customize Each Layer: Customize each particle effect individually using the Particle Designer to achieve the desired look.
b. Combining Particle Effects with Other Visual Elements
Combining particle effects with other visual elements can enhance the overall impact of your video.
- Text and Titles: Add text or titles to your video and apply particle effects to them for a dynamic introduction or emphasis.
- Transitions: Use particle effects in combination with transitions to create visually appealing scene changes.
- Backgrounds: Apply particle effects to backgrounds to add depth and movement to your video scenes.
c. Using Keyframes for Animation
Keyframes can be used to animate particle effects over time, creating a more dynamic and engaging visual.
- Open Keyframe Settings: Select the particle effect clip in the timeline and click on the “Keyframe” button above the timeline.
- Add Keyframes: Add keyframes at different points in the timeline to animate properties such as position, size, and opacity.
- Adjust Values: Adjust the values of the properties at each keyframe to create smooth animations and transitions.
6. Practical Applications of Particle Effects
Particle effects can be used in various types of video projects to enhance storytelling and visual appeal.
a. Action Videos
Enhance action sequences with particle effects to create a more immersive experience.
- Explosions and Fireworks: Use explosion and fireworks particle effects to add excitement to action scenes.
- Debris and Dust: Apply debris and dust particle effects to create a sense of realism in high-impact scenes.
b. Nature and Environmental Videos
Simulate natural phenomena to enhance the visual appeal of nature and environmental videos.
- Snow and Rain: Use snow and rain particle effects to create realistic weather conditions.
- Leaves and Petals: Apply falling leaves or petals particle effects to add a touch of elegance and beauty to nature scenes.
c. Fantasy and Sci-Fi Videos
Create fantastical and otherworldly visuals with particle effects.
- Magic and Sparkles: Use magic and sparkles particle effects to add a mystical element to fantasy videos.
- Energy and Sci-Fi Effects: Apply energy and sci-fi particle effects to create futuristic visuals in sci-fi videos.
7. Tips and Best Practices
To create professional and polished particle effects, consider these tips and best practices:
a. Subtlety
- Avoid Overuse: Use particle effects sparingly to avoid overwhelming the viewer.
- Enhance, Don’t Distract: Ensure that particle effects enhance the video rather than distract from the main content.
b. Consistency
- Maintain Style: Keep the style of particle effects consistent throughout the video to ensure a cohesive look.
- Match Theme: Choose particle effects that complement the theme and tone of your video.
c. Quality
- High-Resolution Footage: Use high-resolution footage for better quality particle effects.
- Preview Before Export: Always preview the video before exporting to ensure the effects are applied correctly and look good.
8. Troubleshooting Common Issues
When working with particle effects, you might encounter some common issues. Here’s how to troubleshoot them:
a. Performance Issues
- System Requirements: Ensure your computer meets the system requirements for PowerDirector and particle effects.
- Close Background Programs: Close unnecessary background programs to free up system resources.
- Proxy Files: Use proxy files for smoother editing with high-resolution footage.
b. Effect Not Showing Properly
- Check Placement: Ensure the particle effect is placed correctly on the timeline and above the relevant video clip.
- Update Software: Make sure you are using the latest version of PowerDirector.
- Restart Software: Try restarting PowerDirector to resolve any temporary issues.
c. Sync Issues
- Align with Audio: Ensure the particle effect is aligned with the audio or other elements in the timeline.
- Keyframe Adjustment: Adjust keyframes to ensure smooth transitions and synchronization.
9. Exporting Your Video
After creating and enhancing your particle effects, it’s time to export your video.
a. Previewing
- Final Preview: Play back the entire project to ensure the particle effects are smooth and correctly applied.
- Make Adjustments: Make any final adjustments to the effects, text, or transitions.
b. Exporting
- Produce: Click on the “Produce” button to open the export settings.
- Select Format: Choose the desired video format and quality settings.
- Export: Click “Start” to export the video with the applied particle effects.
Conclusion
Adding particle effects in CyberLink PowerDirector can significantly enhance the visual appeal of your videos, providing you with powerful tools to simulate natural or magical phenomena. By following this comprehensive guide, you can add, customize, and animate particle effects to achieve professional-quality results. Whether you are creating action-packed scenes, beautiful nature visuals, or fantastical elements, particle effects offer endless creative possibilities. Experiment with different effects, combine layers, and use keyframes to unlock the full potential of particle effects in your video projects. Happy editing!


