How to add music to a video in PowerDirector
Adding music to a video is an essential part of the video editing process. Music enhances the mood, sets the tone, and can significantly elevate the overall impact of your video project. PowerDirector, developed by CyberLink, offers a comprehensive suite of tools that make adding and managing music in your videos both straightforward and powerful. This extensive guide will delve into how to add music to a video in PowerDirector, covering the import process, editing and synchronization techniques, customization options, and tips for creating a seamless audio-visual experience.
Introduction
PowerDirector is a robust and user-friendly video editing software that provides a wide array of tools for creating professional-quality videos. One of its key features is the ability to add and customize music tracks in your video projects. Adding music can dramatically enhance the viewer’s experience by providing emotional context, creating a sense of rhythm, and filling in auditory gaps. This article will cover everything you need to know about adding music to a video in PowerDirector.
Understanding Music in Video Editing
Music plays a crucial role in video editing for several reasons:
- Emotional Impact: Music can evoke specific emotions and enhance the storytelling of your video.
- Rhythmic Flow: Music provides a rhythmic flow that can help guide the pacing of your video.
- Atmosphere and Tone: Different types of music can set the atmosphere and tone of your video, making it feel more professional and polished.
- Engagement: A well-chosen soundtrack can increase viewer engagement and retention.
Importing Music into PowerDirector
Method 1: Importing Music from Your Computer
The first step in adding music to your video is to import your chosen music files into PowerDirector.
- Open PowerDirector: Launch PowerDirector and open the project to which you want to add music.
- Open Media Room: Click on the “Media Room” (icon of a film strip) in the Media Content tab.
- Import Media Files:
- Click the “Import Media Files” button.
- Browse your computer for the music file you want to use.
- Select the file and click “Open” to import it into the Media Room.
- Drag Music to Timeline:
- Drag and drop the imported music file from the Media Room onto the audio track in the timeline.
- Position the music track at the desired starting point in your video.
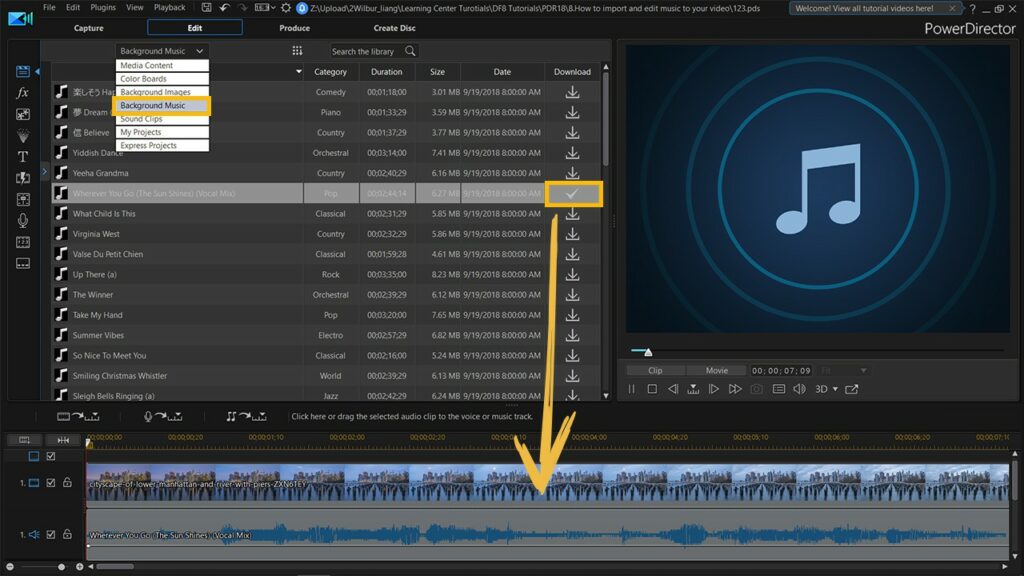
Method 2: Using PowerDirector’s Built-in Music Library
PowerDirector also offers a built-in music library with a variety of royalty-free tracks that you can use in your projects.
- Open PowerDirector: Launch PowerDirector and open your project.
- Open Media Room: Click on the “Media Room” in the Media Content tab.
- Select Background Music:
- Click on the “Background Music” tab to browse the built-in music library.
- Preview the available tracks by clicking on the play button next to each track.
- Add Music to Timeline:
- Drag and drop the selected track from the library onto the audio track in the timeline.
- Position the music track at the desired starting point in your video.
Editing and Synchronizing Music
Once you have imported your music track, the next step is to edit and synchronize it with your video clips. PowerDirector offers a variety of tools to help you achieve this.
Trimming and Splitting Music Tracks
To ensure your music fits perfectly with your video, you may need to trim or split the track.
- Select Music Track: Click on the music track in the timeline to select it.
- Trim Music:
- Hover your cursor over the beginning or end of the music track until you see the trim icon.
- Click and drag to adjust the length of the track.
- Split Music:
- Position the playhead at the point where you want to split the music track.
- Right-click on the track and select “Split” from the context menu.
Synchronizing Music with Video Clips
To create a seamless audio-visual experience, it’s important to synchronize the music with your video clips.
- Align Music with Key Moments: Position the music track so that key moments in the video align with changes in the music. This can enhance the emotional impact of your video.
- Use Markers:
- Add markers to the timeline to highlight important moments in the video.
- Use these markers to help align the music with the video.
- Adjust Timing:
- Adjust the timing of the music track by dragging it along the timeline.
- Ensure the music starts and stops at the appropriate points in your video.
Fading In and Out
Adding fade-in and fade-out effects to your music can create a smoother transition and prevent abrupt starts or stops.
- Select Music Track: Click on the music track in the timeline to select it.
- Open Audio Tools:
- Click on the “Audio Tools” button above the timeline.
- Add Fade-In and Fade-Out:
- Use the fade-in and fade-out sliders to adjust the duration of the fade effects.
- Preview the track to ensure the fades are smooth and natural.
Adjusting Volume Levels
Balancing the volume of your music track with other audio elements is crucial for creating a professional-sounding video.
- Select Music Track: Click on the music track in the timeline to select it.
- Open Audio Mixing Room:
- Click on the “Audio Mixing Room” (icon of a speaker) in the Media Content tab.
- Adjust Volume:
- Use the volume slider to adjust the overall volume of the music track.
- Ensure the music is loud enough to be heard but not so loud that it overwhelms dialogue or other important audio elements.
Adding Audio Effects
PowerDirector allows you to add audio effects to your music track to enhance its quality and fit the style of your video.
- Select Music Track: Click on the music track in the timeline to select it.
- Open Audio Editor:
- Right-click on the music track and select “Edit Audio” from the context menu.
- Add Effects:
- Use the available tools to add effects such as reverb, echo, and equalization.
- Adjust the settings to achieve the desired sound.
Customizing Music Tracks
Looping Music
If your video is longer than your music track, you can loop the music to extend its duration.
- Select Music Track: Click on the music track in the timeline to select it.
- Copy and Paste:
- Right-click on the music track and select “Copy” from the context menu.
- Position the playhead at the end of the music track, right-click, and select “Paste.”
- Blend the Loops:
- Ensure the transition between the loops is seamless by adjusting the position and adding a crossfade if necessary.
Using Multiple Music Tracks
You can use multiple music tracks to create a more dynamic and varied soundtrack for your video.
- Import Additional Music: Import additional music files into the Media Room and drag them onto the timeline.
- Arrange Tracks:
- Position the additional music tracks at different points in the timeline.
- Adjust the timing and volume of each track to ensure a smooth transition between them.
- Add Crossfades:
- Use crossfades to blend the transitions between different music tracks.
Synchronizing Music with Visual Effects
To create a more immersive experience, synchronize your music with visual effects in your video.
- Add Markers: Add markers to the timeline to highlight key moments in the video.
- Align Music with Effects:
- Position the music track so that changes in the music align with visual effects.
- Adjust the timing of the music and effects to create a cohesive audio-visual experience.
Tips for Effective Use of Music
Choose the Right Music
Select music that complements the tone and mood of your video. The right music can enhance the emotional impact and make your video more engaging.
Balance Volume Levels
Ensure the music volume is balanced with other audio elements such as dialogue and sound effects. The music should enhance, not overpower, the other audio elements.
Use Music to Guide the Viewer
Use music to guide the viewer’s emotions and reactions. The right music can help convey the intended message and enhance the storytelling of your video.
Preview Regularly
Regularly preview your video to see how the music fits with the visual elements. Make adjustments as needed to ensure a seamless and cohesive experience.
Be Mindful of Copyright
Ensure that you have the right to use the music in your video. Use royalty-free music or obtain proper licenses to avoid copyright issues.
Troubleshooting Common Issues
Music Not Playing
If the music track is not playing, check the following:
- Ensure the music track is properly imported and placed on the audio track in the timeline.
- Verify that the audio track is not muted.
- Check the volume levels to ensure the music is audible.
Performance Issues
If your project becomes sluggish after adding music, try these solutions:
- Render Preview: Use the “Render Preview” option to create a smoother playback experience.
- Enable Proxy Files: Use proxy files to reduce the load on your system and improve performance.
- Update Software: Ensure you are using the latest version of PowerDirector, as updates can fix performance issues.
Music Overlaps Unwanted Areas
If the music overlaps unwanted areas of your clips:
- Trim Music: Trim the music track to remove the unwanted areas.
- Adjust Position: Manually adjust the position of the music track in the timeline.
Advanced Music Techniques
Using Audio Ducking
Audio ducking automatically lowers the volume of the music when there is dialogue or important audio. This can help ensure that dialogue is clearly heard over the music.
- Select Music Track: Click on the music track in the timeline to select it.
- Enable Audio Ducking:
- Click on the “Audio Ducking” button in the Audio Mixing Room.
- Adjust the settings to control the amount and duration of the ducking effect.
Creating Custom Music Presets
If you frequently use certain music styles or settings, create custom presets to save time. Save your music settings as a preset and apply them with a single click in future projects.
Using Music to Build Tension
Gradually increasing the volume or intensity of the music can build tension and anticipation in your video.
- Select Music Track: Click on the music track in the timeline to select it.
- Adjust Volume Gradually: Use keyframes to gradually increase the volume or intensity of the music over time.
Combining Music with Sound Effects
Enhance your video by combining music with sound effects. Use sound effects to highlight specific actions or moments in your video.
- Import Sound Effects: Import sound effects into the Media Room and drag them onto the timeline.
- Position and Adjust:
- Position the sound effects at the appropriate points in the timeline.
- Adjust the volume and timing to ensure they blend seamlessly with the music.
Utilizing Audio Effects
PowerDirector offers a variety of audio effects that can enhance your music track. Experiment with different effects to create unique sounds and enhance the quality of your music.
- Select Music Track: Click on the music track in the timeline to select it.
- Open Audio Editor:
- Right-click on the music track and select “Edit Audio” from the context menu.
- Add Effects:
- Use the available tools to add effects such as reverb, echo, and equalization.
- Adjust the settings to achieve the desired sound.
Conclusion
Adding music to a video in PowerDirector is a crucial skill for creating engaging and professional-quality video projects. By mastering the techniques of importing, editing, and synchronizing music, and utilizing the various customization options and advanced techniques available in PowerDirector, you can create a seamless and impactful audio-visual experience. PowerDirector’s robust features and intuitive interface make it an excellent choice for editors of all skill levels, and with the comprehensive guidance provided in this article, you’ll be well-equipped to enhance your video projects with music.


