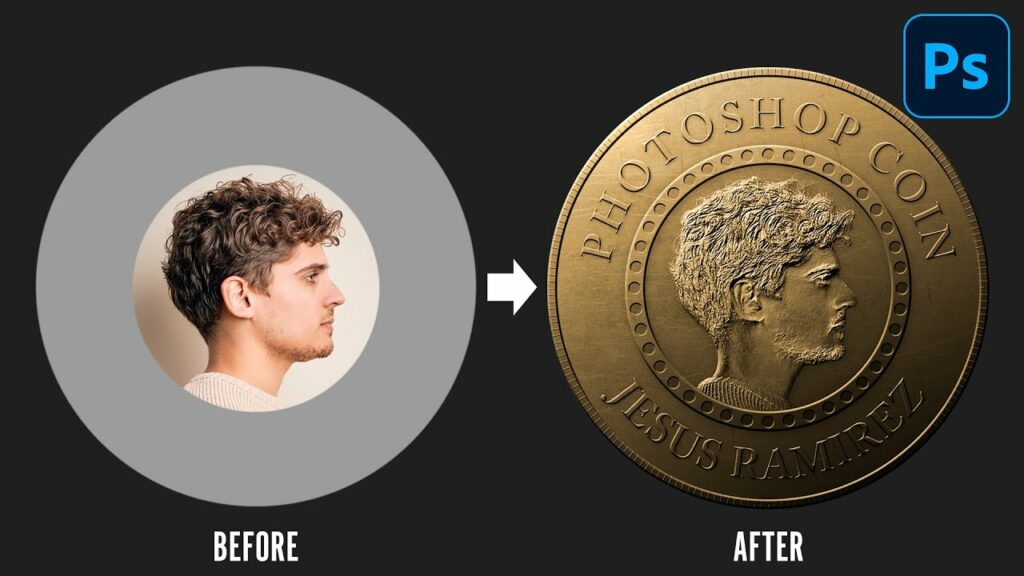
Crafting Authentic Wealth: A Comprehensive Guide to Creating a Realistic Coin in Photoshop
Introduction
In the expansive world of digital design, the ability to create realistic objects is a skill that can bring authenticity and depth to visual compositions. One intriguing project that combines both artistic creativity and technical precision is the creation of a realistic coin in Adobe Photoshop. In this extensive guide, we will embark on a step-by-step journey through the intricate process of crafting a lifelike coin, exploring the essential techniques, tools, and details that will breathe authenticity into your digital masterpiece.
Understanding the Anatomy of a Coin
- Research and Reference:
- Begin by studying real coins to understand their key features, such as shape, texture, and the elements they typically feature, such as portraits, symbols, or inscriptions.
- Collect reference images to guide your design process and ensure accuracy.
- Coin Composition:
- Familiarize yourself with the typical components of a coin, including the obverse (front) and reverse (back) sides, the outer rim, and any featured elements like text or images.
Setting Up Your Photoshop Workspace
- Creating a New Document:
- Open Photoshop and create a new document with dimensions suitable for your coin design.
- Consider using a square canvas for simplicity.
- Defining the Coin Shape:
- Use the Ellipse Tool to draw a circle representing the outer shape of your coin.
- Adjust the size and proportions to match the desired dimensions.
Designing the Coin Face
- Background and Base Color:
- Choose a metallic color for the coin base, such as gold, silver, or copper.
- Apply the chosen color as the background, setting the foundation for your coin’s metallic appearance.
- Adding Gradients and Highlights:
- Use the Gradient Tool to add subtle gradients to your coin surface.
- Introduce highlights and shadows to create a three-dimensional effect, mimicking the way light interacts with a physical coin.
- Texturing for Realism:
- Apply a texture overlay to simulate the surface imperfections found on real coins.
- Experiment with various textures, such as brushed metal or subtle patterns, to enhance authenticity.
- Incorporating Engravings and Inscriptions:
- Add any necessary text, engravings, or inscriptions typically found on coins.
- Use the Text Tool to create crisp and legible typography.
Creating a Realistic Coin Edge
- Rim and Edge Detailing:
- Draw the outer rim of the coin using the Line Tool or by creating a circular selection.
- Apply a metallic gradient to the rim to distinguish it from the coin face.
- Edge Lettering or Patterns:
- Add lettering or patterns along the edge of the coin for additional realism.
- Ensure that the details align seamlessly with the overall design.
Enhancing the Coin’s Three-Dimensional Appearance
- Drop Shadows and Inner Shadows:
- Use the Layer Styles options to apply subtle drop shadows and inner shadows to the coin layers.
- Adjust the opacity and distance to create a convincing three-dimensional effect.
- Overlaying Shadows:
- Duplicate the coin layer and apply a Gaussian Blur to create a shadow.
- Position the shadow layer beneath the coin layer, adjusting opacity and angle for a natural shadow effect.
Finishing Touches and Fine-Tuning
- Color Adjustments:
- Use adjustment layers to fine-tune the overall color and contrast of your coin.
- Experiment with levels, curves, and hue/saturation adjustments to achieve the desired aesthetic.
- Adding Wear and Tear:
- Introduce subtle scratches, scuffs, or wear marks to mimic the natural aging of a physical coin.
- Apply these details sparingly to maintain a polished appearance.
- Reflections and Highlights:
- Enhance the coin’s shine by adding reflections and highlights.
- Experiment with the Brush Tool or the Dodge and Burn tools to accentuate metallic reflections.
Exporting and Showcasing Your Realistic Coin
- Saving for Different Purposes:
- Save your coin design in a high-resolution format for printing or detailed presentations.
- Create a web-friendly version for online sharing, ensuring a smaller file size.
- Incorporating into Designs:
- Integrate your realistic coin into various design projects, such as posters, digital art, or websites.
- Experiment with incorporating the coin into different contexts to showcase its versatility.
Conclusion
Crafting a realistic coin in Photoshop is a captivating journey that combines technical precision with artistic ingenuity. By understanding the anatomy of coins, setting up your workspace thoughtfully, and paying attention to details such as texturing, engravings, and three-dimensional effects, you can create a digital masterpiece that mirrors the authenticity of physical currency. Whether you’re a seasoned graphic designer or an enthusiast exploring the realms of digital artistry, this comprehensive guide equips you with the skills and techniques to embark on a rewarding creative endeavor. Unleash your creativity, mint your own digital currency, and let your realistic coin design become a shining testament to the magic of Photoshop.


