Building Inclusivity: A Comprehensive Guide on How to Add a User (Child or Adult) in Windows 10
Introduction:
As the digital landscape evolves, Windows 10 continues to prioritize user inclusivity by offering a comprehensive system for managing multiple user accounts. Whether you’re setting up an account for a child, a family member, or a colleague, Windows 10 provides a user-friendly interface to add new users and tailor their experience. In this exhaustive guide, we will explore the intricacies of adding users in Windows 10, discussing the steps to create accounts for both children and adults while ensuring a secure and personalized computing environment.
1. Understanding User Types in Windows 10: A Customized Approach
Before delving into the steps of adding a user in Windows 10, it’s crucial to understand the different user types available. Windows 10 provides three primary user types: Local Users, Microsoft Accounts, and Child Accounts. Local Users are accounts tied to a specific device, while Microsoft Accounts offer a synchronized experience across multiple devices. Child Accounts, on the other hand, are designed with additional parental controls and monitoring features for a more secure experience for younger users.
2. Adding a Local User in Windows 10: A Device-Centric Approach
To add a local user account in Windows 10, follow these steps:
- Press Win + I to open the Settings menu.
- Navigate to “Accounts” and then “Family & other users.”
- Under “Other users,” click on “Add someone else to this PC.”
- Choose “I don’t have this person’s sign-in information” and proceed with the account creation steps.
- Enter the username, password, and password hint for the new account.
This method is ideal for users who want to create an account specifically tied to a single device, providing local access without syncing preferences or data across multiple devices.
3. Adding a Microsoft Account in Windows 10: Synchronized Convenience
For users seeking a more synchronized experience across multiple devices, adding a Microsoft Account is the preferred approach:
- Open the Settings menu (Win + I) and go to “Accounts” > “Family & other users.”
- Click on “Add a family member” or “Add someone else to this PC.”
- Choose “Sign in with a Microsoft account” and follow the prompts to create the account.
- Enter the Microsoft email address and password for the new user.
Adding a Microsoft Account allows for seamless synchronization of settings, preferences, and app installations across all devices linked to that account.
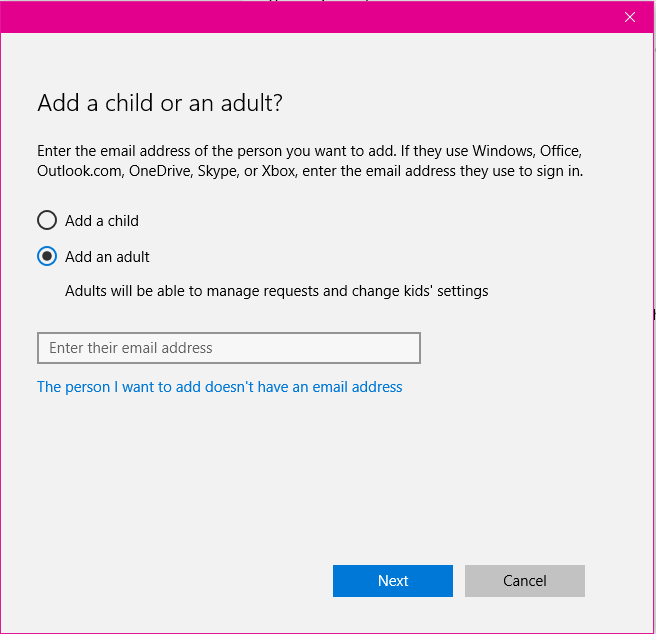
4. Adding a Child Account in Windows 10: Parental Controls and Monitoring
Creating a child account in Windows 10 involves additional steps to enable parental controls and monitoring features:
- Open the Settings menu (Win + I) and navigate to “Accounts” > “Family & other users.”
- Click on “Add a family member” and select “Add a child.”
- Enter the child’s Microsoft email address or create a new one.
- Follow the prompts to complete the setup, including configuring parental control settings.
Child accounts provide parents with the ability to manage and monitor their child’s online activity, set screen time limits, and receive activity reports.
5. Managing User Accounts: Configuring Permissions and Settings
Once a user account is added, it’s essential to manage and configure account settings according to individual preferences. Navigate to “Settings” > “Accounts” > “Family & other users” to access user accounts. Here, you can modify account types, change passwords, or remove accounts as needed. For child accounts, additional parental control settings can be adjusted to enhance the security and monitoring aspects.
6. Advanced User Management: Local Users and Groups
For advanced users and system administrators, Windows 10 provides access to the Local Users and Groups management tool. To open it:
- Press Win + R, type “lusrmgr.msc,” and press Enter.
- In the Local Users and Groups window, navigate to “Users.”
- Right-click to create a new user and follow the prompts to configure the account.
This advanced method is suitable for users who require granular control over account configurations and permissions.
7. Switching Between User Accounts: Seamless Transition
Windows 10 allows users to switch between different accounts without logging out, facilitating a seamless transition between user profiles. To switch accounts:
- Click on the Start menu and select the account name or picture.
- Choose the desired user account from the list to switch instantly.
This feature is beneficial for households or shared devices with multiple users, enabling quick access to individual profiles.
Conclusion: Fostering Inclusive Computing Environments
In conclusion, adding users in Windows 10 is a straightforward and customizable process that caters to the diverse needs of users. Whether you’re creating local accounts for individual devices, synchronizing experiences across multiple devices with Microsoft Accounts, or implementing additional parental controls for child accounts, Windows 10 offers a comprehensive suite of tools for user management. By incorporating these steps into your routine, you can foster an inclusive computing environment that meets the unique preferences and requirements of each user, ensuring a secure and personalized experience in the dynamic world of Windows 10.


